Published 2020-03-01.
Last modified 2024-12-10.
Time to read: 11 minutes.
av_studio collection.
I have written eighteen articles about Pro Tools. They are somewhat ordered, but largely are meant to be read in any order.
- Pro Tools Overview
- Pro Tools Installation and Preferences
- HUI & MCU
- Pro Tools Keyboards and Hot Keys
- Avid Control, EuControl and EuCon
- Pro Tools Modes and States
- Pro Tools Sessions
- Pro Tools Beats, Bars and Click Tracks
- Pro Tools Operations
- Pro Tools Workspaces and Catalogs
- Pro Tools Sessions
- Pro Tools Editing
- Pro Tools Effects
- Pro Tools Automation
- Pro Tools MIDI
- Pro Tools GrooveCell & Xpand!2
- EZdrummer 3 & Pro Tools
- Pro Tools Issues
See the Pro Tools Reference Guide, pages 7 for general information about MIDI and Pro Tools, and see pages 178-184 for information about configuring MIDI for Pro Tools. MacOS information is provided first. MIDI Studio Setup (Windows) starts on page 181.
MIDI Track vs Instrument Track
Pro Tools is an old program that has evolved over the years yet maintained a high degree of compatibility with older versions. Before Pro Tools had instrument tracks, MIDI tracks were used to record MIDI data and AUX tracks were used to monitor the sound. An instrument track is like a combo track that combines a MIDI and an AUX track. Use instrument tracks with software instruments like Xpand!2, and Kontakt, and use MIDI+AUX tracks for external sound devices like synthesizers.
Instrument tracks are the primary way to route MIDI to an instrument plugin and then route the plugin’s sound to outputs, sends and buses, or other inserts. Instrument tracks can also be used to send MIDI to and monitor audio from external MIDI devices
Instrument plugins are different from processing plugins in that they generate audio rather than process the audio signal from a track’s audio input or from hard disk. Instrument plugins are typically played by MIDI.
Paths are any routing option in Pro Tools, including internal or external inputs, outputs, buses, and inserts. Pro Tools lets you name these paths, and these path names appear in the Audio Input and Output Path selectors and other menus. For more information, see "I/O Setup" on page 57.
MIDI Drums Plugins
All drum plugins work with MIDI data. EZdrummer 3 is my favorite drum plugin. I also discuss GrooveCell and Xpand!2 because they were part of my Pro Tools learning process.
MIDI Setup
- Create or open an existing Pro Tools session.
- Open the Pro Tools Preferences window by selecting the Pro Tools / Preferences menu item.
-
Select the MIDI tab.
It has four areas for configuring various aspects of Pro Tools MIDI operation:
- Basics:
This area lets you configure the following:
- Automatically creating a click track on all new sessions.
- Using MIDI to tap the tempo.
- Selecting the default MIDI through instrument.
- Setting the pencil tool resolution for drawing.
- Defining MIDI merge mode.
- Note Display: This area lets you select the middle C pitch for MIDI purposes. The options offered are: using the standard C3 as middle C; using C4 as middle C; and using MIDI note #60 as middle C.
- Delay Compensation for External Devices: This panel lets you enable the delay compensation for external devices on parameters such as MIDI timecode, MIDI notes and controllers, and MIDI Beat Clock.
- MIDI/Score Editor Display: This area lets you assign the number of additional empty bars in the score editor. This setting has no effect when using some MIDI plugins, for example, GrooveCell and EZdrummer 3.
- Press OK to apply the settings.
- Basics:
This area lets you configure the following:
The following video is very helpful.
The .middev file promised in the video description is no longer available, however.
MIDDEV and MIDNAM Files
Pro Tools can import patch names for external MIDI devices.
These MIDI patch name files have a midname file extension.
For Microsoft Windows, midname files are stored in
%COMMONPROGRAMFILES%/.
For Mac, midname files are stored in
root/
For more information, see MIDI Patch Names on page 956.
Mac OS X Patch Names & MIDI Device Definitions
has a section entitled Creating Custom MIDI Patch Name Files discusses how to create midnam files.
I discuss the .middev and .midnam files for the Roland Juno-DS synthesizer
here.
MIDI Input Display
The MIDI Editor in Pro Tools also has a MIDI Input Display and that display will show you single notes, multiple notes, and chords.
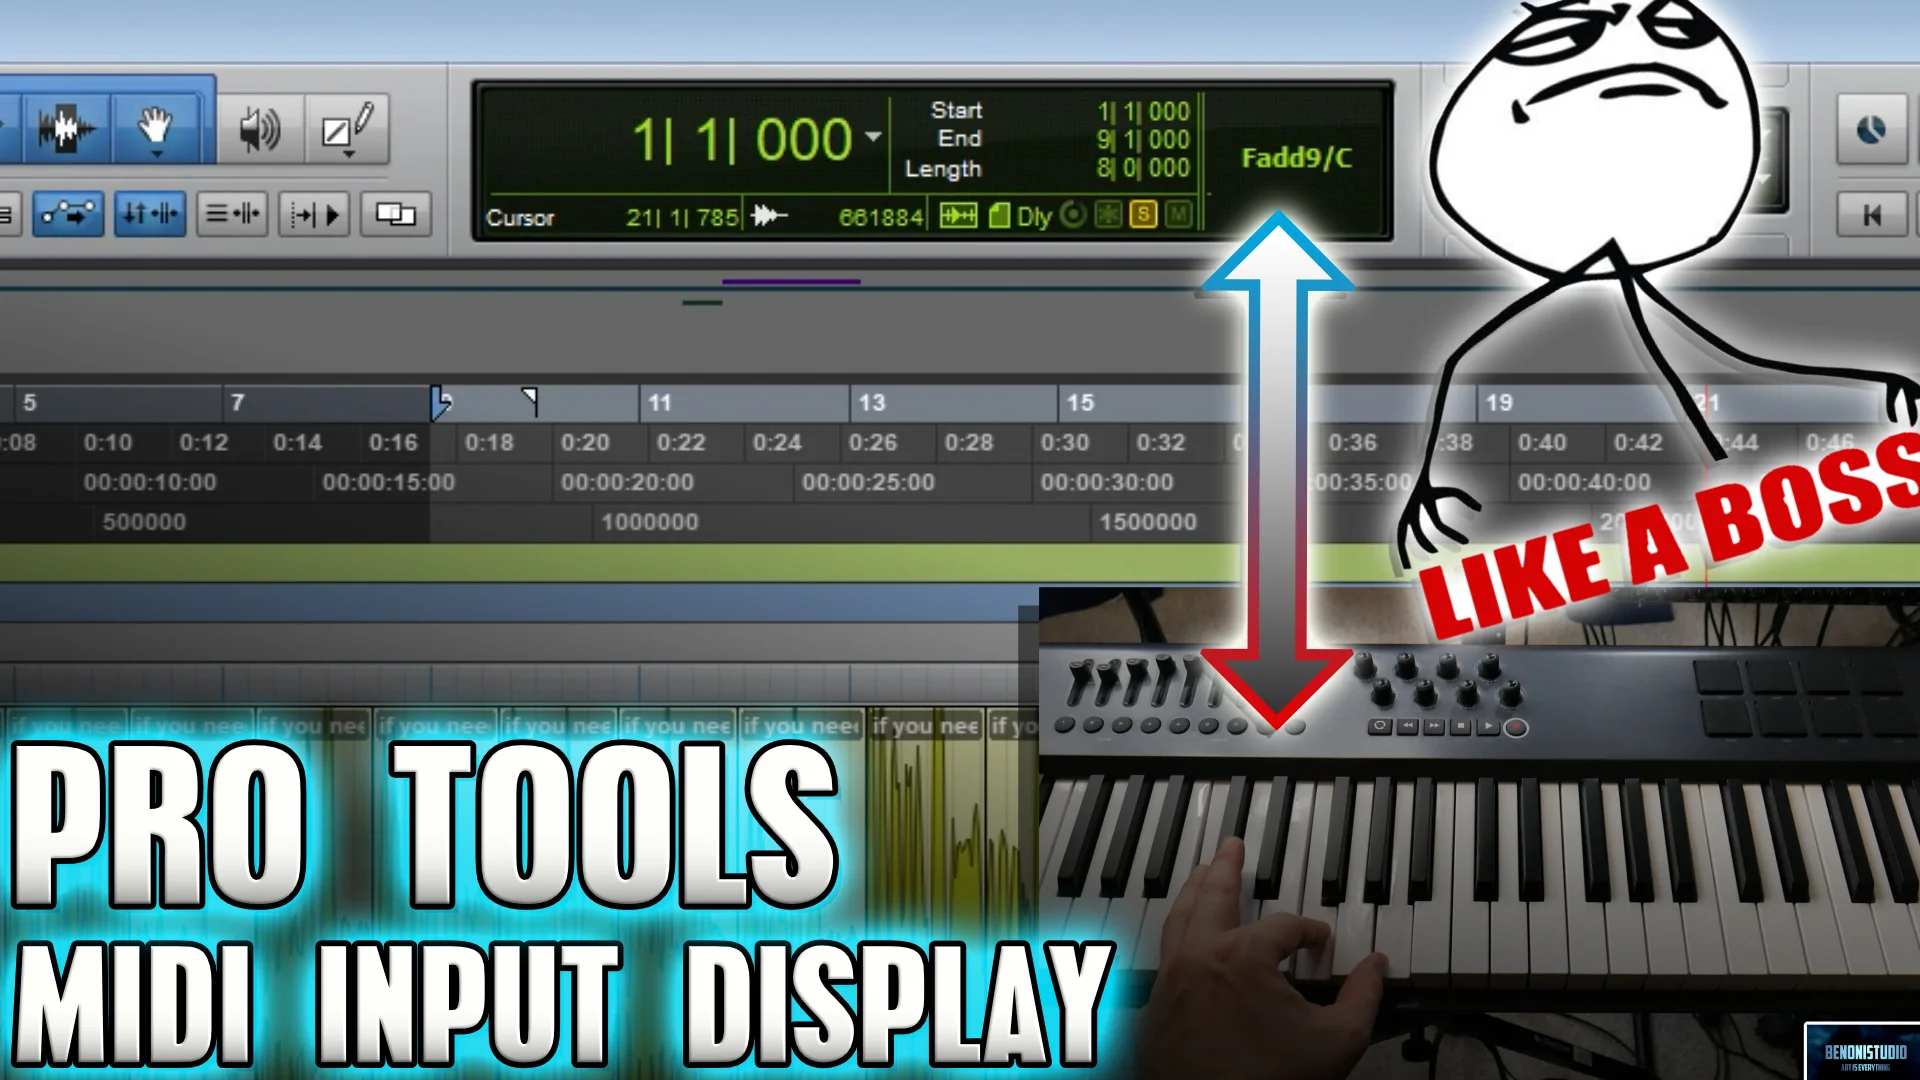 – From See What Notes and Chords You are Playing in Pro Tools - MIDI Input Display
I do not currently see the MIDI Input Display in the MIDI Editor. It used to be visible; now it is not. Unsure why.
Define An External MIDI Device
MIDI tracks can accept inputs from virtual and physical MIDI channels, or they can accept inputs from predefined Pro Tools MIDI devices. Please see Roland TD-07 And DAWs for an example of how I did that for a Roland V-Drum kit.
If you are using EZdrummer 3 as a Pro Tools plugin without a physical drum kit, it is not necessary to define an external MIDI device.
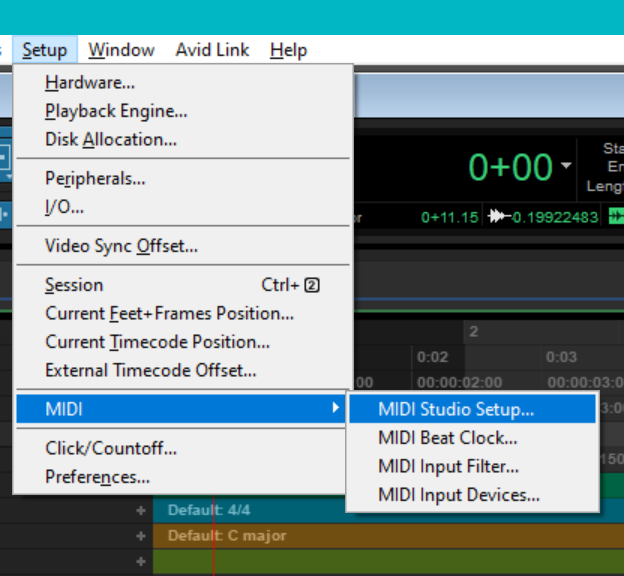
You should define external MIDI devices in Pro Tools for your physical MIDI devices. These MIDI devices are global, that is, they available from all Pro Tools sessions. To achieve that, use the menu Setup / MIDI / MIDI Studio Setup, shown to the right.
Below, you can see that I defined a MIDI instrument called Roland Handsonic HPD-15.
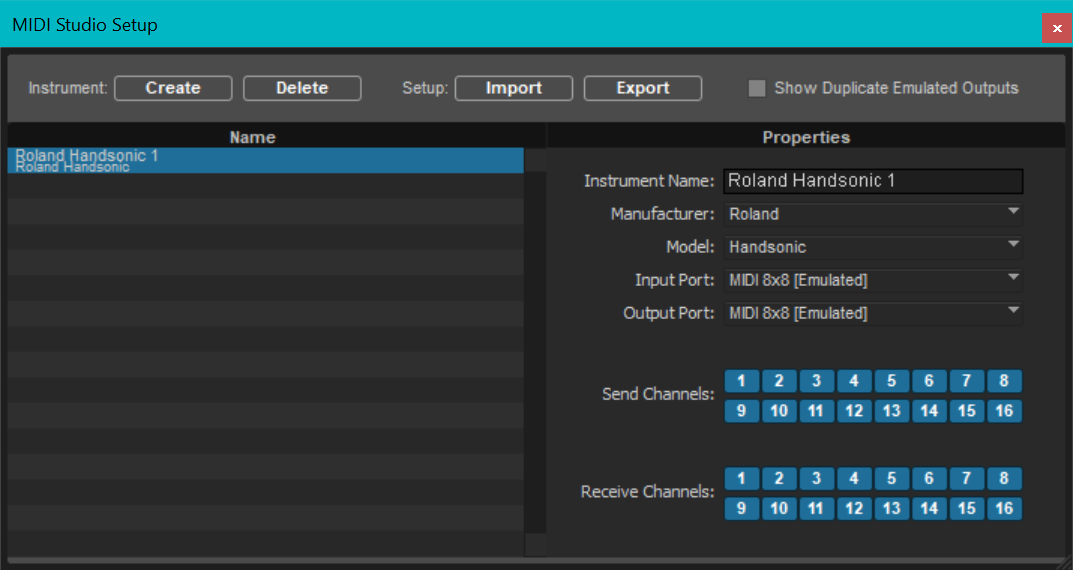
When defining MIDI channel inputs, the new MIDI instrument will appear as a choice.
I saved the definition into E:\media\proTools\ProTools MIDI Studio Setup.dms.
MIDI Latency
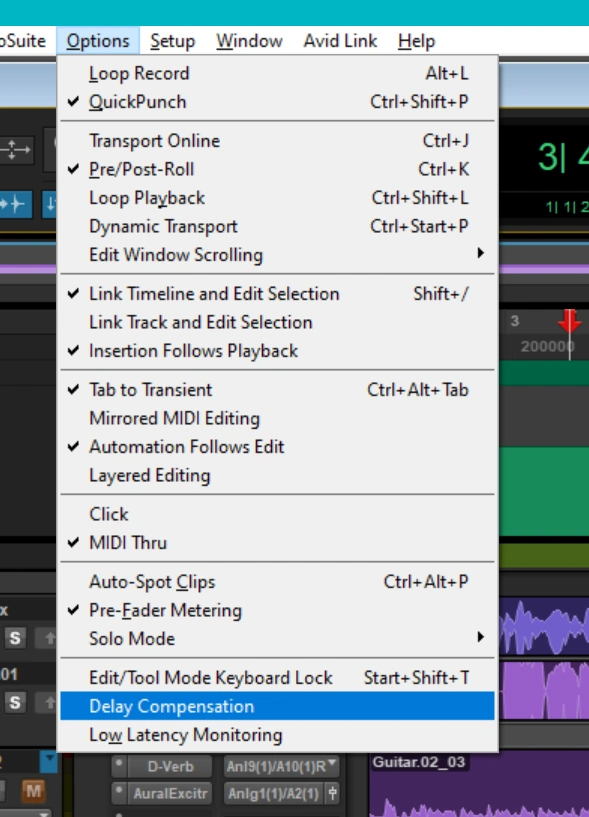
For some reason, Pro Tools introduced about 200 ms of latency only for MIDI inputs from external MIDI devices.
Disabling Options / Delay Compensation was required to eliminate latency for external MIDI devices.
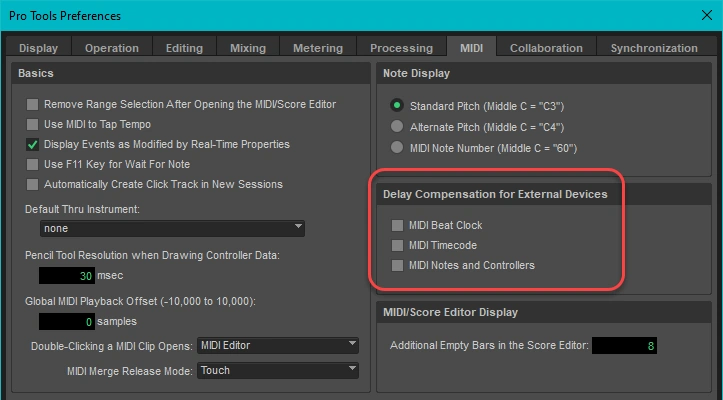
To make extra sure, I also disabled all 3 Delay Compensation for External Devices settings under Setup / Preferences / MIDI.
Recording MIDI
You should already have set up a click track and set the tempo (beats per minute) and meter (4/4, 3/4, etc.)
- Record arm the MIDI track(s) (not the instrument track)
- Press Enter to rewind the playhead.
- Press CTRL-Space to start recording
- Play the MIDI devices.
- Press Space to stop recording.
The MIDI data will remain in the MIDI track. When that track is played, the data is sent to its assigned instrument track, which makes sound. Control the volume of the sound, and apply effects by adjusting the instrument track.
Editing MIDI
-
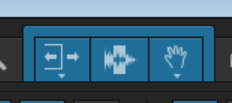
Ensure that the smart selector is set
-
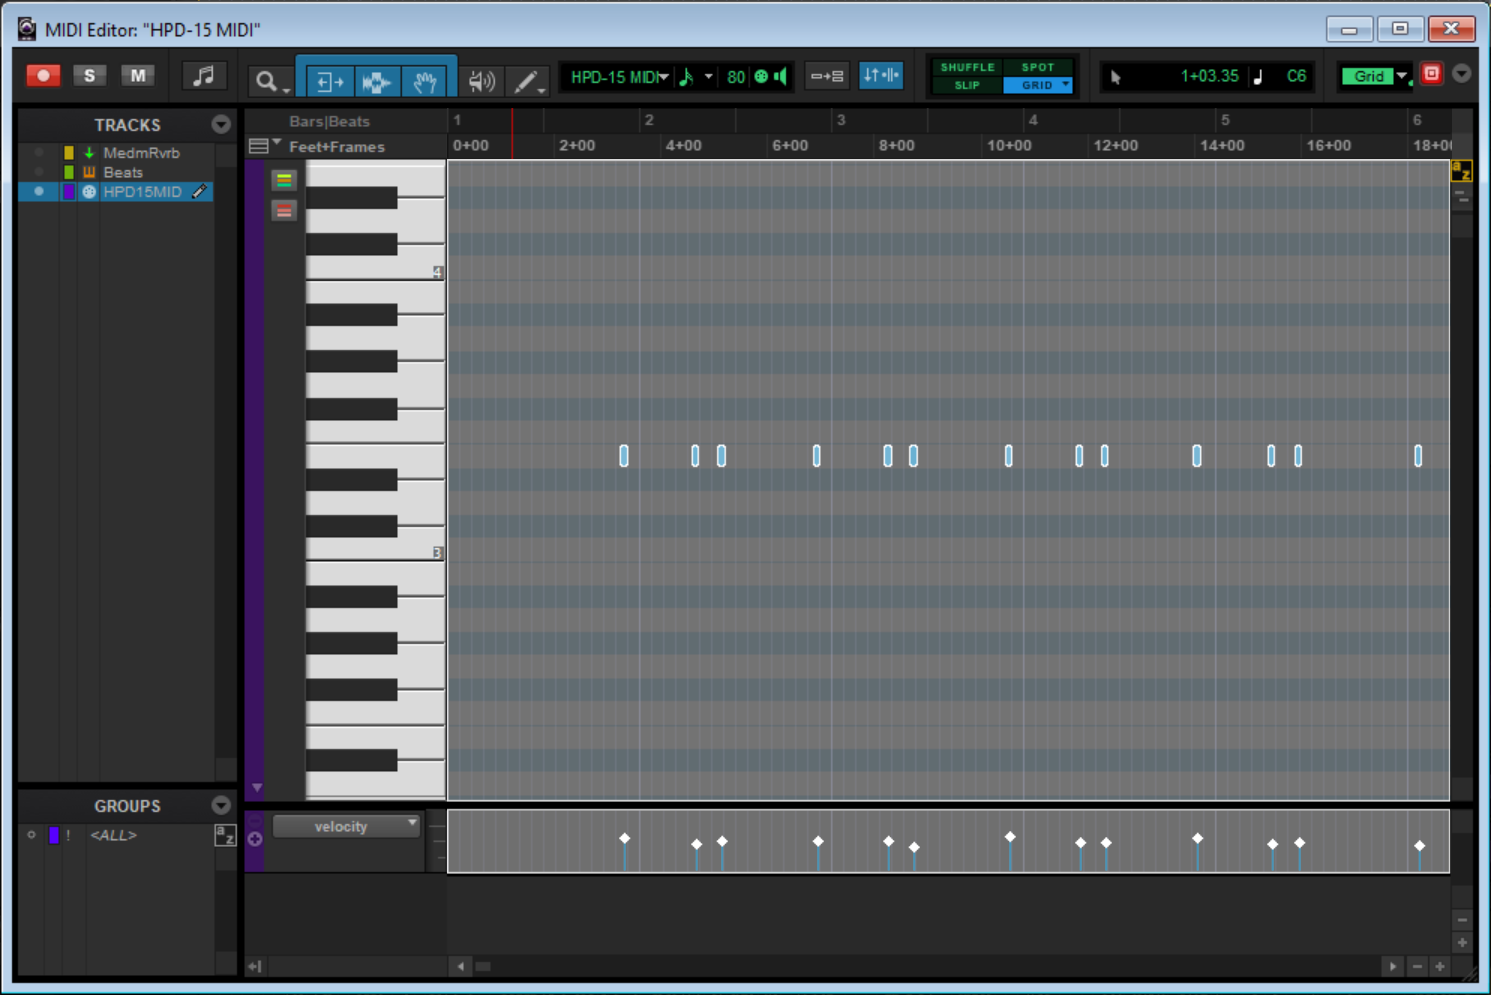
Double-click on the lower half of the MIDI track recording (the instrument track will not show any data).
The MIDI editor will appear, and all the MIDI data will be selected.
You can move all of it left and right to adjust when the notes sound, or up and down to reassign notes to the data.
Each note might correspond to a different sound.
Create an Empty MIDI Clip
For creating empty MIDI Clips, select an empty area with the Selector tool in Clips or Blocks view and then press
ALT+SHIFT+numeric keypad 3 (Consolidate).
The new MIDI clip will be named after the track, followed by a dash, then a two-digit number.
For example, if a track is called Inst 1,
the first empty clip you create will be called Inst 1-01.
The new MIDI file is stored as part of the Pro Tools session, so it does not exist as a separate file.
Quickly Creating MIDI Files
I felt it would be useful to have a quick way to create MIDI files. This would allow me to quickly define several MIDI clips on an instrument track; I know of no other way to do this. Later I discovered that every DAW I tried (Pro Tools, Guitar Pro and Ableton Live) would not import an empty MIDI file. The solution was to add notes to the MIDI file.
I decided to write a small Ruby program to generate small MIDI files that could be imported.
mide_create
creates small MIDI files that can be imported into Pro Tools, Ableton Live, Guitar Pro, etc..
Importing MIDI Files
Importing a MIDI file into Pro Tools is a quick way to start building a MIDI track. A MIDI file is imported as a MIDI clip on a MIDI or Instrument track; the MIDI clip contains all the data in the MIDI file.
If you create a MIDI or Instrument track without specifying a pre-existing MIDI file to import, the entire track will consist of a single MIDI clip.
Pro Tools stores MIDI data in the Pro Tools session, which is saved with a .ptx file name extension.
Once a MIDI clip has been defined in a Pro Tools MIDI or Instrument track,
loading and saving the Pro Tools session does not cause MIDI files to be read or written.
You can import more than one MIDI clip into an Instrument or MIDI track. If you do so, Pro Tools will be able to edit the clips separately. For example, if you add a new MIDI note to a MIDI clip, the extra data is stored in the currently active MIDI clip.
If you make changes to the MIDI clips, the changes are not written back to the original MIDI files when the Pro Tools session is saved.
See the Importing MIDI Files / Pro Tools Reference Guide pp 572-575 for more options.
Exporting MIDI
Pro Tools cannot export a single MIDI clip; instead you have two choices:
-
Export an entire Instrument or MIDI track.
Right-click on the track name and select Export MIDI. -
Export all Instrument and MIDI tracks with data in the Pro Tools session.
Empty MIDI tracks are not exported. Select File / Export / MIDI...
Both of the above options will result in a single MIDI file being created, and the following dialog box is displayed:
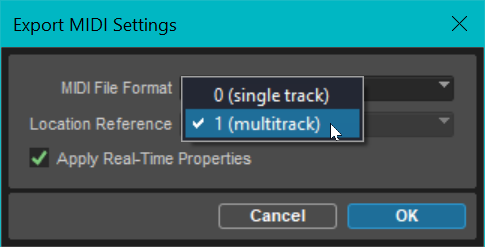
As you can see, you have the option of exporting to a single file:
- MIDI format 0 (combine all MIDI data on all Pro Tools tracks into one multichannel MIDI track).
- MIDI format 1 (export each Pro Tools track on a separate MIDI channel).
Now navigate to the directory where you want to store the MIDI file(s) and click Save.
See the Exporting MIDI Files / Pro Tools Reference Guide pp 575-577 for more information.
Merge Clips / Notes from Two MIDI tracks
The following assumes that all MIDI clips have the same sync point, which usually means they need to all start at the same time. If they start at different times, you must redefine their sync point before attempting the following.
- Select a source MIDI / Instrument track
- CTRL-C
- Select a destination MIDI / Instrument clip on another track
- ALT-M (Paste Special Merge) copies the MIDI notes from the source notes/clips/track to the destination clip.
Pro Tools Virtual MIDI Keyboard
Shift-K brings up a virtual MIDI keyboard mapped to computer keyboard letters:
w e t y u
a s d f g h j k
z x c v
Keys z and x transpose the keyboard by one octave.
Keys c and v affect the velocity.
Audio to MIDI
The Celemony Melodyne Essential plugin (included with Pro Tools subscriptions) can obtain MIDI notes from audio tracks. Melodyne provides five algorithms. Depending on the material being played, and how it is being played, you will find that some audio passages are processed differently than others. You can then choose the algorithm you require for each passage. Selecting several algorithms allows you to assemble a composite track.
See Pro Tools Reference Guide, Chapter 47, Melodyne Editing and Audio to MIDI, p 1220.
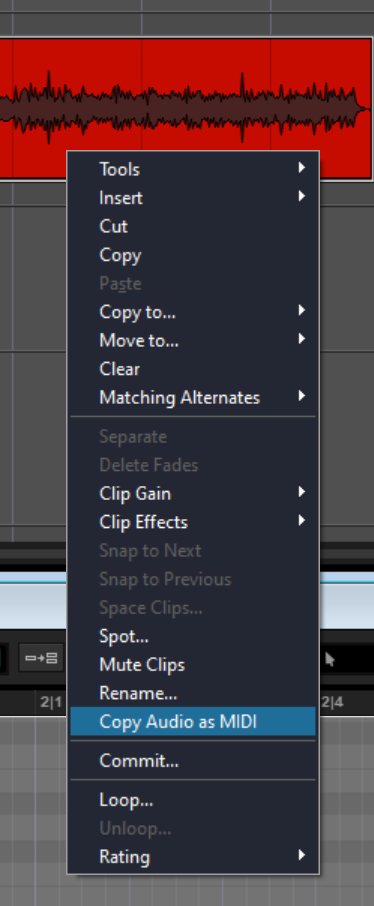
Right-click the audio track and select Copy Audio as MIDI. The first time you do this you will be prompted to authorize Melodyne.
Authorizing Celemony Melodyne
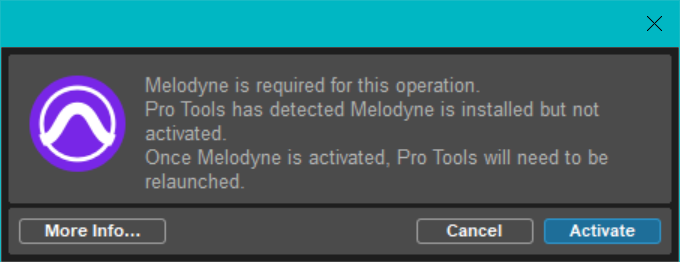
Clicking the More info... button displays a web page entitled Melodyne plugin licensing in your default web browser. Clicking on the Activate button displays the following in your default web browser:
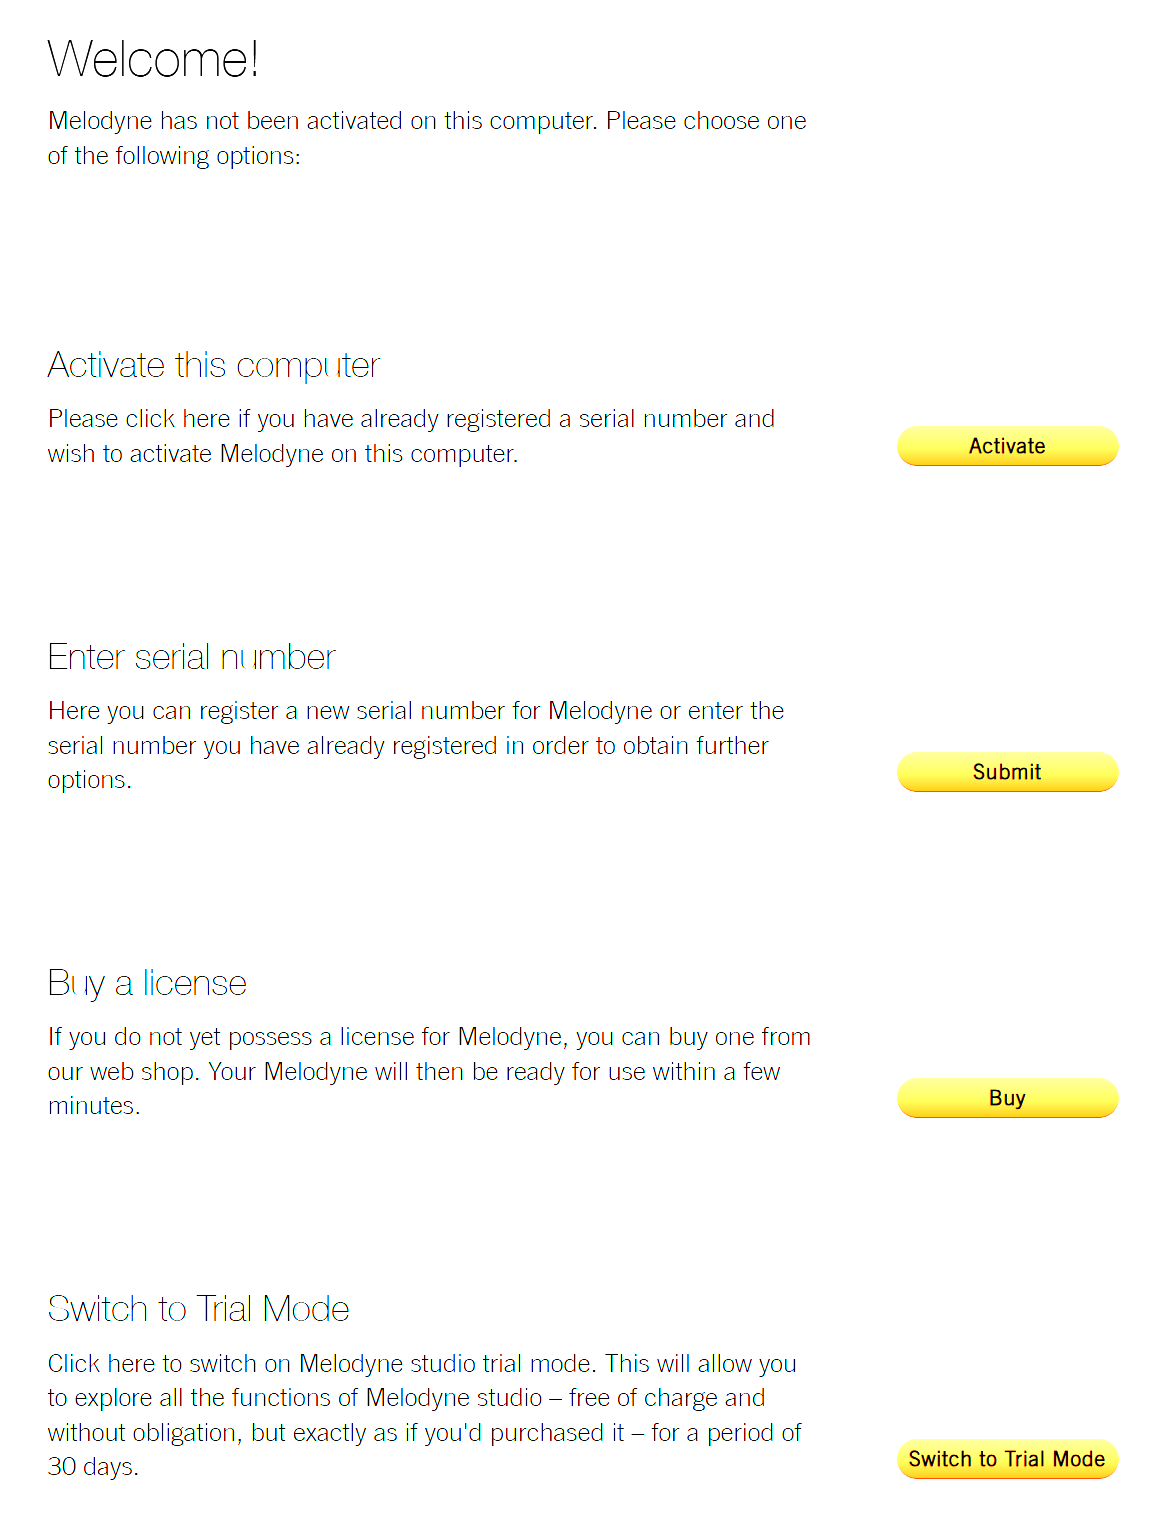
I clicked on Activate this computer.
I was then asked to log in. Unfortunately, the web page did not indicate what I was logging in to.
The URL for the web page started with https://services.celemony.com/.
I had logged into this webserver two years earlier, and activated this same computer then.
I do not know why this computer needed to be re-authorized, or to cancel the previous activation.
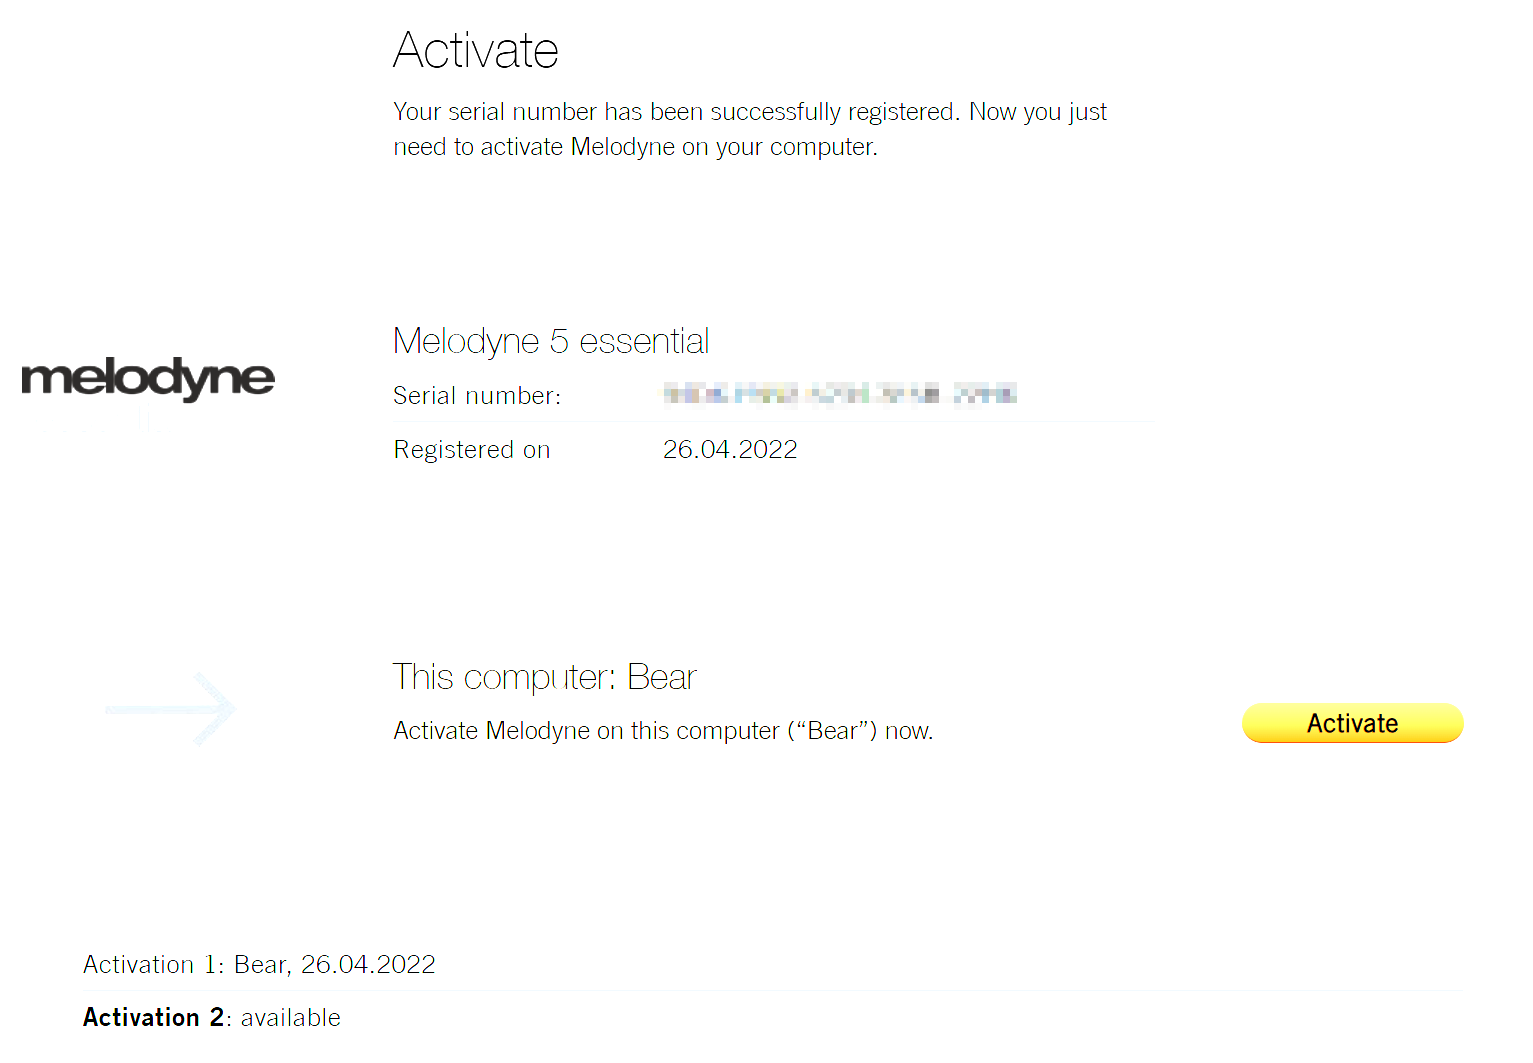
After activation, the Melodyne 5 FAQ webpage was displayed. After digging around, I found the following:
www.celemony.com/login
or by choosing License from Melodyne’s Help menu.
I logged in again, clicked on License Options, and deactivated the oldest activation. The help information for To deactivate a computer showed just how much Celemony (does not) care about its users:
Continuing On
If you had to authorize Melodyne, the previous action you had initiated in Pro Tools is forgotten. You must right-click on the clip again, and select Copy Audio as MIDI. This creates a new MIDI clip, but does not create a MIDI or an Instrument track for the clip. Instead, you should now create an Instrument track, assign a MIDI insert, and drag the new MIDI clip from the clips panel into the new track.
Now you can try various conversion audio-to-MIDI algorithms provided by Celemony Melodyne. Save each conversation as a playlist, where each clip is suitably named.
Right-click the audio track, select Copy Audio as MIDI, and then try various conversion algorithms. Save them as a playlist, where each clip is suitably named.
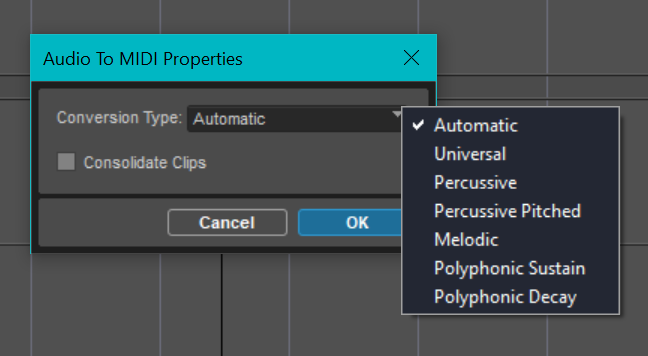

I paraphrased the Celemony documentation about their algorithms and settings:
To obtain the most suitable and detailed editing possibilities for the following sound sources, the following algorithms are generally used:
- Melodic: Singing, speech, saxophone, flute, monophonic bass, etc. (monophonic sources only)
- Percussive: Drum and percussion sounds or loops, and other percussive sounds with no significant pitched components.
- Percussive Pitched: 808-kicks and toms, tabla and similar percussive sounds with a pitched component.
- Two Polyphonic algorithms: Both algorithms yield scores where simultaneous individual notes are required. They are well suited to pianos, strings, organs, guitars and other instruments capable of sounding more than one note at a time. The differences between the Polyphonic Decay and the Polyphonic Sustain algorithms are their sound and the playing techniques employed (pizzicato, legato, etc.).
- Polyphonic Sustain is suitable for a wide range of polyphonic audio material in which the start of each note does not differ significantly from the rest, as is the case with string instruments played legato and organ music.
- Polyphonic Decay is a variation of that algorithm designed for instruments or playing techniques where the start of each note is markedly different from what follows; examples are string instruments played pizzicato, the entire guitar family, and pianos.
- Universal: (probably not useful when Melodyne is invoked from Pro Tools):
- Rhythm guitars (funky guitars or distorted riffs and similar sounds), where you only wish to time-stretch or transpose them and no access to individual notes is required.
- Loops featuring multiple instruments or complete mixes that you wish to time-stretch, quantize or transpose.
The Sound-on-Sound review of Melodyne 4 says, “The Polyphonic Decay [algorithm] is similar to the original polyphonic algorithm, whereas Polyphonic Sustain is designed to work with sounds such as legato strings that do not contain clear note attacks… The Universal algorithm allows the user to perform very high-quality time-stretching and time correction.”
I found that Polyphonic Decay worked reasonably well for picking and strumming a guitar. Significant cleanup was required, and several MIDI editors were tried. Pro Tools offers the best options. Polyphonic Sustain was almost the same, maybe not quite as good.
I have written eighteen articles about Pro Tools. They are somewhat ordered, but largely are meant to be read in any order.
- Pro Tools Overview
- Pro Tools Installation and Preferences
- HUI & MCU
- Pro Tools Keyboards and Hot Keys
- Avid Control, EuControl and EuCon
- Pro Tools Modes and States
- Pro Tools Sessions
- Pro Tools Beats, Bars and Click Tracks
- Pro Tools Operations
- Pro Tools Workspaces and Catalogs
- Pro Tools Sessions
- Pro Tools Editing
- Pro Tools Effects
- Pro Tools Automation
- Pro Tools MIDI
- Pro Tools GrooveCell & Xpand!2
- EZdrummer 3 & Pro Tools
- Pro Tools Issues


