Published 2024-11-13.
Last modified 2025-04-14.
Time to read: 7 minutes.
av_studio collection.
This article continues from Roland VQD-106 V-Drum Kit and addresses how to work with a DAW, including Pro Tools, Ableton Live and EZdrummer 3, on Windows 10.
WSL (Windows Subsystem for Linux) is briefly mentioned because I use that to build the content for this website, run the DAWs, etc. I do not expect most readers to know or care about WSL.
I am not using a Mac these days, although I have an old Mac mini sitting forlorn and cold in a corner. This article says nothing about working with Macs.
😁 😁Ableton Live 12 and EZdrummer 3 worked with the Roland TD-07 immediately.
😖 😖I still have not got Pro Tools to work correctly with the TD-07.
Roland V-Drum Sound Module
The TD-07 is one of Roland’s most basic drum modules. I was unable to find a Roland product page for this drum module, just entire drum kits that feature it. The TD-07 is not expandable and Roland offers nothing for it on Roland Cloud.
The only compatible sound module that is a step up in capability is the TD-17. r/edrums has a discussion on the differences between the TD-07 and the TD-17.
However, if you are using V-Drums just as a MIDI controller with a DAW to run EZdrummer 3, Ableton Live, Pro Tools, etc. then the sound module is less important.
Windows MIDI & Audio
The TD-07 support site provides the Windows 10 drivers for MIDI and audio.
The only Roland documentation that mentions that the Roland audio driver is an
ASIO driver
is the README, installed in the computer when the driver is installed.
If you installed the Roland TD-07 drivers into a Windows computer, the README is here; see the Input/output device settings for your application.
The web page says:
USBDrv of the TD-07 to VENDOR.
Your computer automatically downloads the Windows 10/11 driver from the Internet when a product requiring the driver is connected to the computer. Downloading and installing the driver yourself is not necessary.
Under normal conditions, the driver installation is completed in several minutes.
Here is how to set the USBDrv of the TD-07 to VENDOR:
| Press | Comment |
|---|---|

| Wait until Drum Kit is displayed. |
| ⚙ Setup | The display should show Setup Pad ⯈, and [Enter] should be flashing. |
| ⯈⯈ | The display should show Setup System, and [Enter] should be flashing. |
| ⎆ Enter | The display should show LCDContrast 8⯈. |
| ⯈⯈⯈ | The display should show ⯇USBDrv Generic⯈. |
| ⎆ Enter | |
| Rotate wheel clockwise | The display should show USBDrv Vendor. |
| ↺ Exit↺ Exit | The display should show Drum Kit again. |

| The display should show Saving before shutting down. |
The next time the Roland drum sound module turns on, it will be ready to connect to a computer.
Fixing the Driver Problem
I had no problem setting USBDrv to VENDOR.
However, the Windows driver installation described above did not work for me.
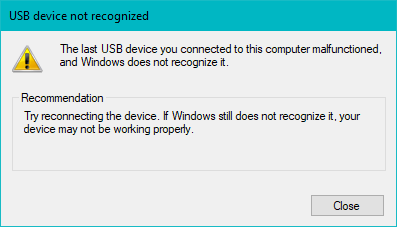
The Windows error message was unhelpful and somewhat misleading:
The last USB device you connected to this computer malfunctioned,
and Windows does not recognize it.
Recommendation:
Try reconnecting the device.
If Windows still does not recognize it,
your device may not be working properly.
I had previously encountered a similar problem with the driver for the Roland Juno-DS61 synthesizer. The solution to each problem was different; if you encounter this problem, check out both articles for the two solutions.
This time I had used a regular USB extension cable with a short USB B-A cable because my DAW is some distance from the Roland drum set. When I tried installing the Roland TD-07 driver on a laptop without using the USB extension cable, it worked.
To aid in the installation process on the DAW,
I started Windows Device Manager by briefly pressing the Windows key,
typing device, then Enter.
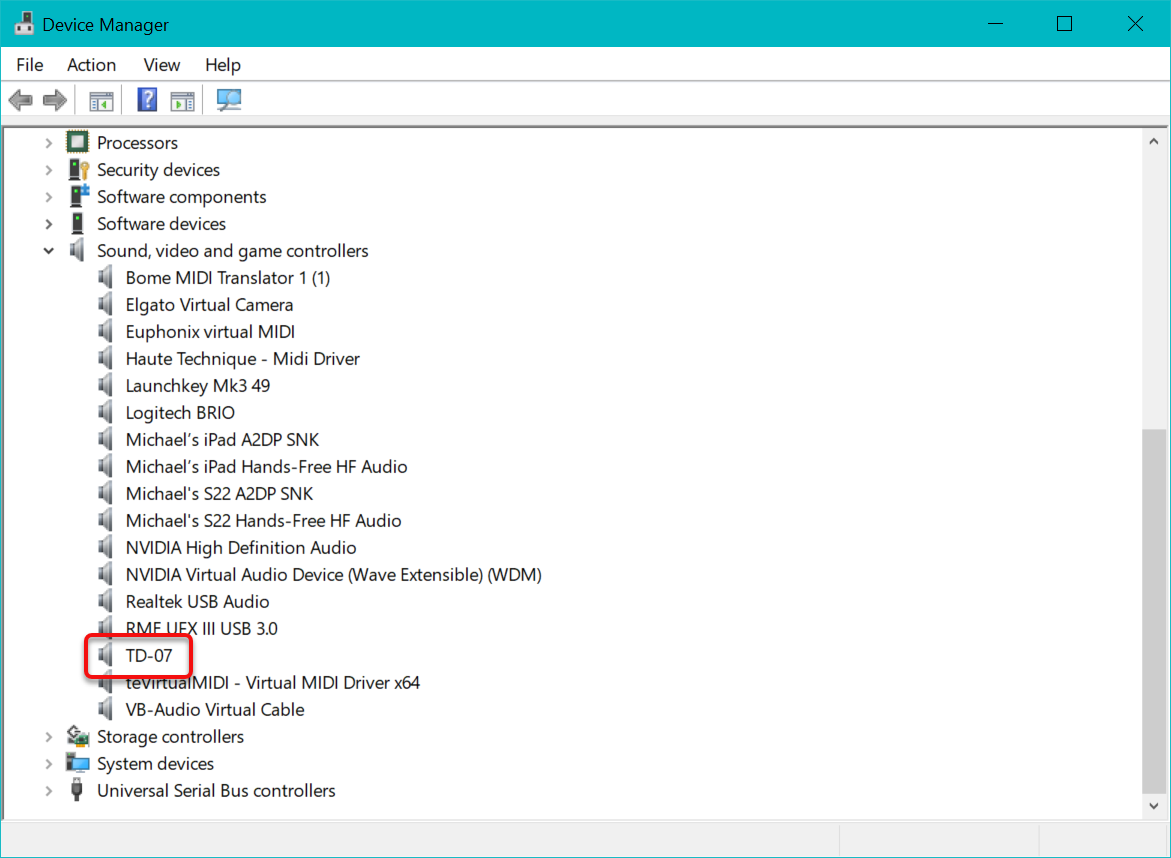
I opened up the Other devices and the Sound, video and game controllers folders.
I then used an active USB extension cable instead of the regular USB extension cable, and the driver began to install automatically.
The installation process takes a few minutes. First, the driver appeared in the Other devices folder:
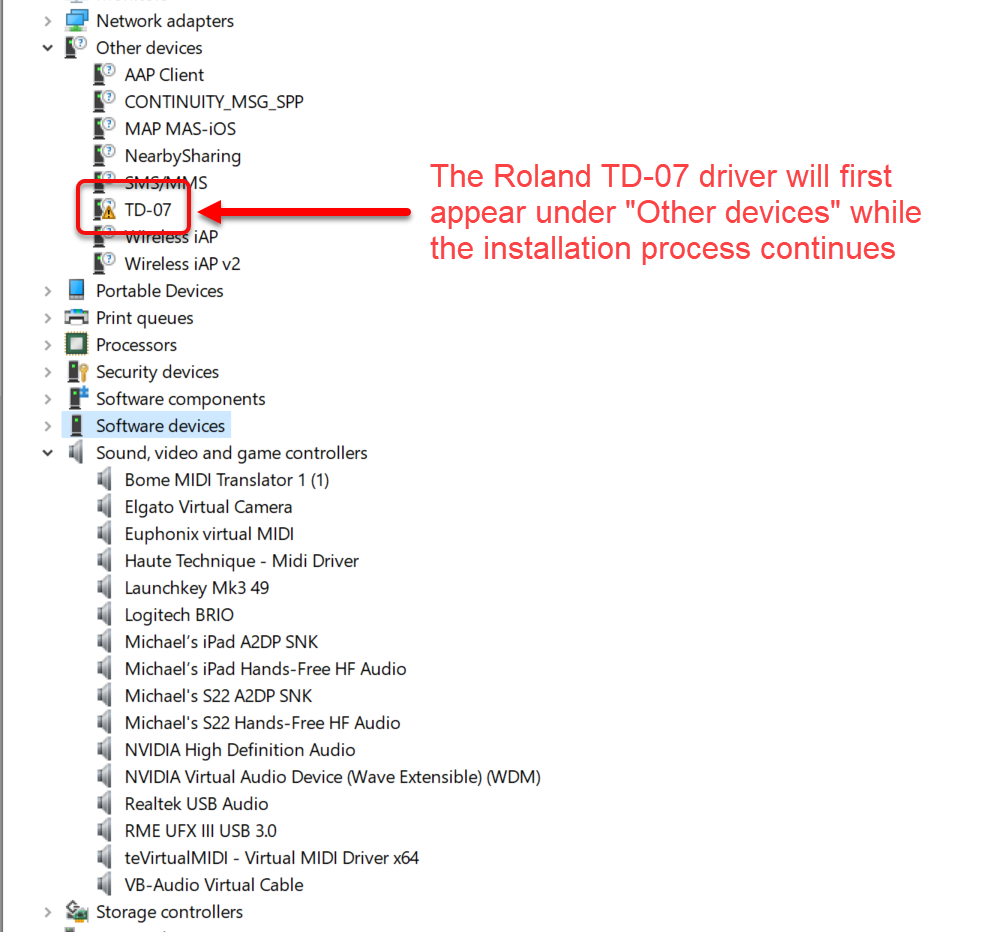
A minute or so later, the Roland TD-07 driver moved from the Other devices folder to the Sound, video and game controllers folder. Success!
Driver Testing
My DAW is on the other side of the studio from the drum kit. I constantly need the drum sound module to emit some sort of audio signal that I can use for debugging. Everything I found was too short-lived.
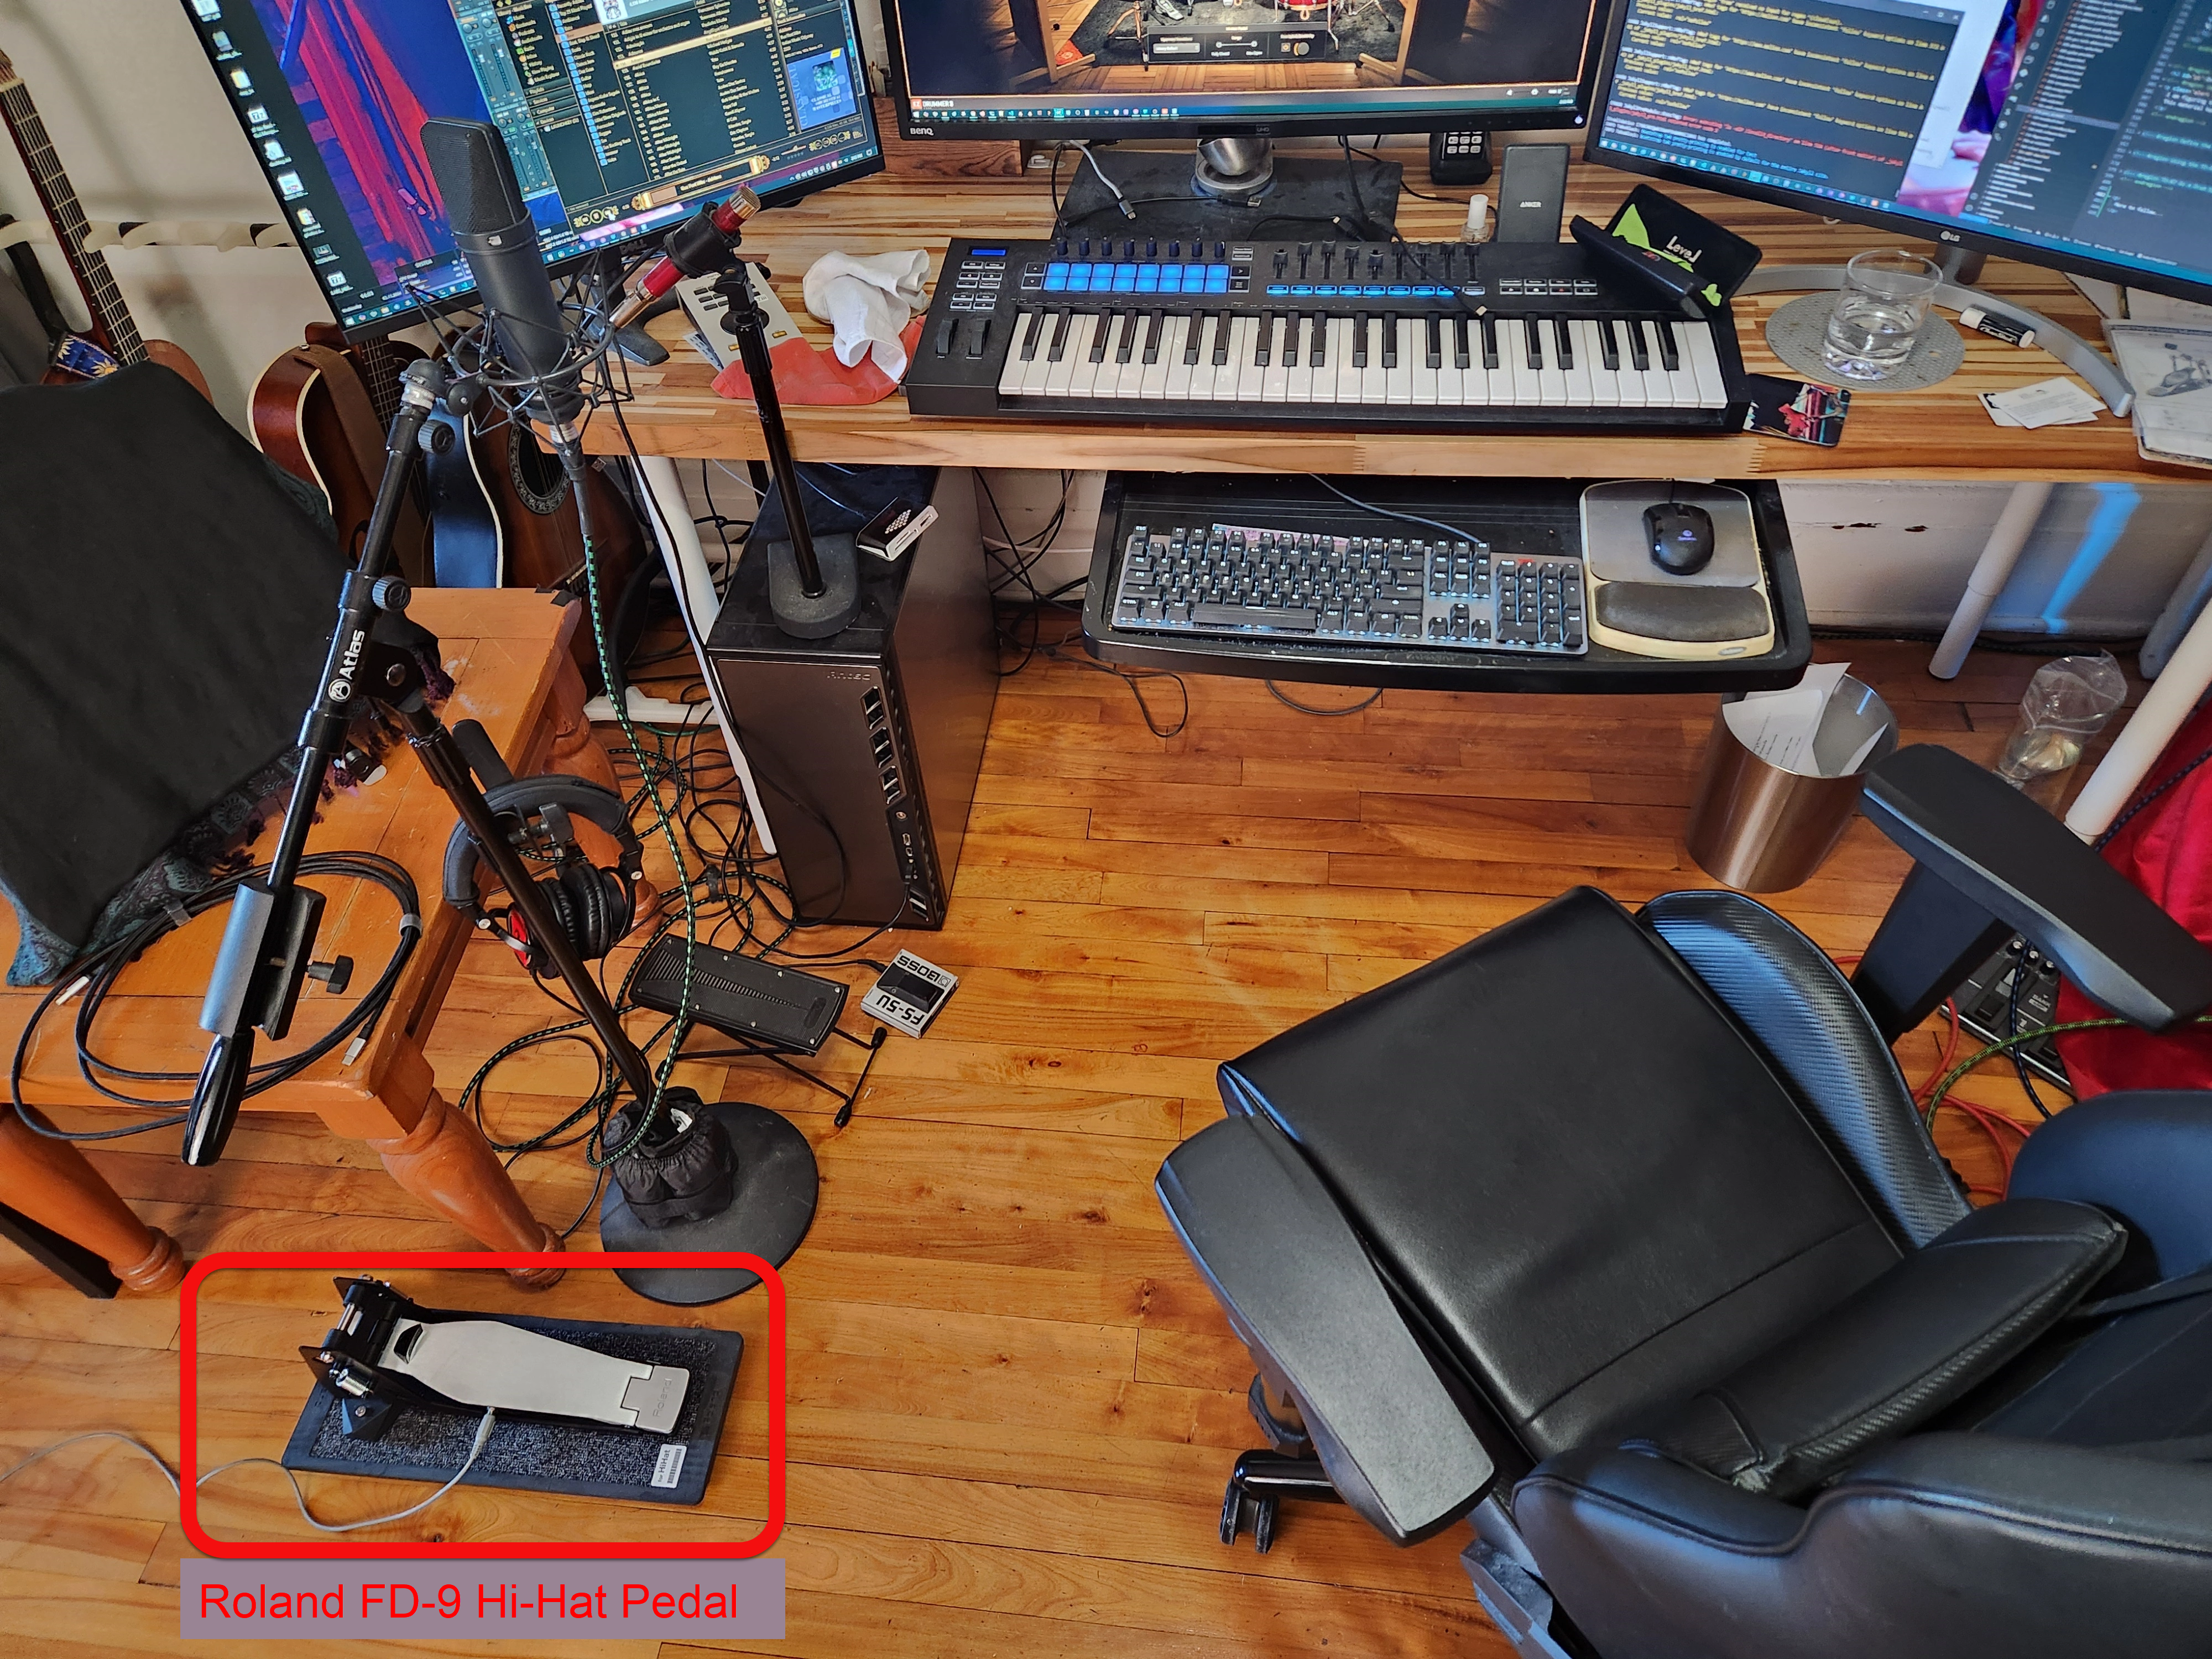
So I attached the Roland FD-9 hi-hat pedal to a mono 25' long, 1/4" TR extension cable. This allowed the pedal to be used across the room from where the rest of the drum kit resides. Anytime a noise is required to test something, I can press my foot on the hi-hat pedal next to me. No need for a second person.
New Windows Audio Device
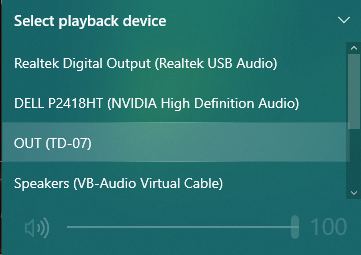
After installing the Roland TD-07 Windows drivers, I noticed a new audio device in the desktop tray. It was called OUT (TD‑07), as shown in the image to the right.
New Windows Menu Item
After the driver was installed, I noticed a new menu item called TD-07 in the Recently Added
column of the Windows 10 Start menu.
Clicking on it launched "C:\Program Files\Roland\TD-07 Driver\Files\RDDP1219.EXE", which looked like this:
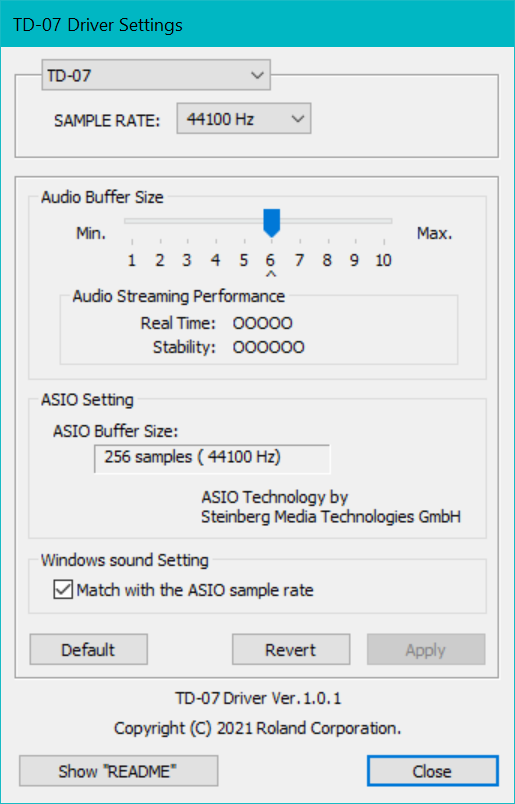
Choices for SAMPLE RAT were 44.1 kHz (the default), 48 kHz and 96 kHz.
Setting Audio Streaming Performance to the minimum value (1) caused the ASIO Buffer Size value to decrease to 48 samples, which I expected should work fine with my DAW.
Clicking on Show "README" displayed
C:\Program Files\ in the default web browser.
Default MIDI Settings
MIDI channel 10
Tx/Rx/Sw On
ProgChg Tx On
ProgChg Rx On
Local Ctrl On
Choke Shot On
Device ID 17
SysEx Tx Off
SysEx Rx On
Louder Drums
I found that the drum volume was OK on maximum through headphones, but when played through speakers, it was much quieter than other signal sources, such as my DAW. I increased the overall volume of the kit as follows:
| Press | Comment |
|---|---|

| Wait until Drum Kit is displayed. |
| Directly under power button Kit Edit | The display should show Kit Edit / Instrument⯈, and [Enter] should be flashing. |
| ⯈ | The display should show Kit Edit / Kit Volume, and [Enter] should be flashing. |
| ⎆ Enter | |
| ⯈ | The display should show Kit Volume / Kit -7.0dB⯈. |
| Rotate wheel clockwise | The display should show Kit Volume / Kit +6.0dB⯈. |
| ↺ Exit↺ Exit | The display should show Drum Kit again. |
The volume should be much louder now.
Local Control
When a MIDI device sends MIDI data to its internal synthesizer / sound generator, this is called local control. If you want the TD-07 to be recorded by a DAW, or to control another synthesizer, and you do not want to hear the built-in sounds from the TD-07, you have two choices:
- Turn the TD-07 volume all the way down.
- Disable local control.
To disable the TD-07 MIDI local control:
| Press | Comment |
|---|---|

| Wait until Drum Kit is displayed. |
| ⚙ Setup | The display should show Setup Pad ⯈, and [Enter] should be flashing. |
| ⯈ | The display should show Setup MIDI, and [Enter] should be flashing. |
| ⎆ Enter | The display should show MIDI Channel 10Ch⯈. |
| ⯈⯈⯈ | The display should show ⯇Local Ctrl ON⯈. |
| Turn the dial counterclockwise, until you see ⯇Local Ctrl OFF⯈. | |
| ⎆ Enter | |
| Press the large drum set button at the lower left. | The display should show Drum Kit again. |
DAW Directory Structure Creation
I made a test directory structure using my
song_create
script:
$ song_create roland_td07_test
Creating a new song subdirectory structure in '/mnt/e/media/songs/roland_td07_test'
  /mnt/e/media/songs/roland_td07_test/daw
  /mnt/e/media/songs/roland_td07_test/dvrArchives
  /mnt/e/media/songs/roland_td07_test/inputs/images
  /mnt/e/media/songs/roland_td07_test/inputs/videos
  /mnt/e/media/songs/roland_td07_test/outputs/mp3s
  /mnt/e/media/songs/roland_td07_test/outputs/stems
  /mnt/e/media/songs/roland_td07_test/outputs/youTube
Opening E:\media\songs\roland_td07_test
EZdrummer 3
-
Select the Settings / E-Drums/MIDI In menu.
A list of MIDI devices will be shown at the top left of the window.
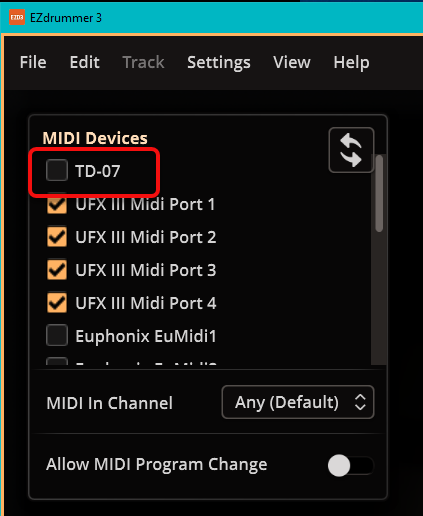
- Enable the TD-07 MIDI device.
-
From the Preset chooser at the top of the window, in the middle of the window,
select Roland and then choose one of the drum sound modules.
Unfortunately, the TD-07 is not one of the available choices.
Most of the choices provided are for obsolete Roland drum sound modules.
The TD-1 is the lowest common denominator, so I selected that one.
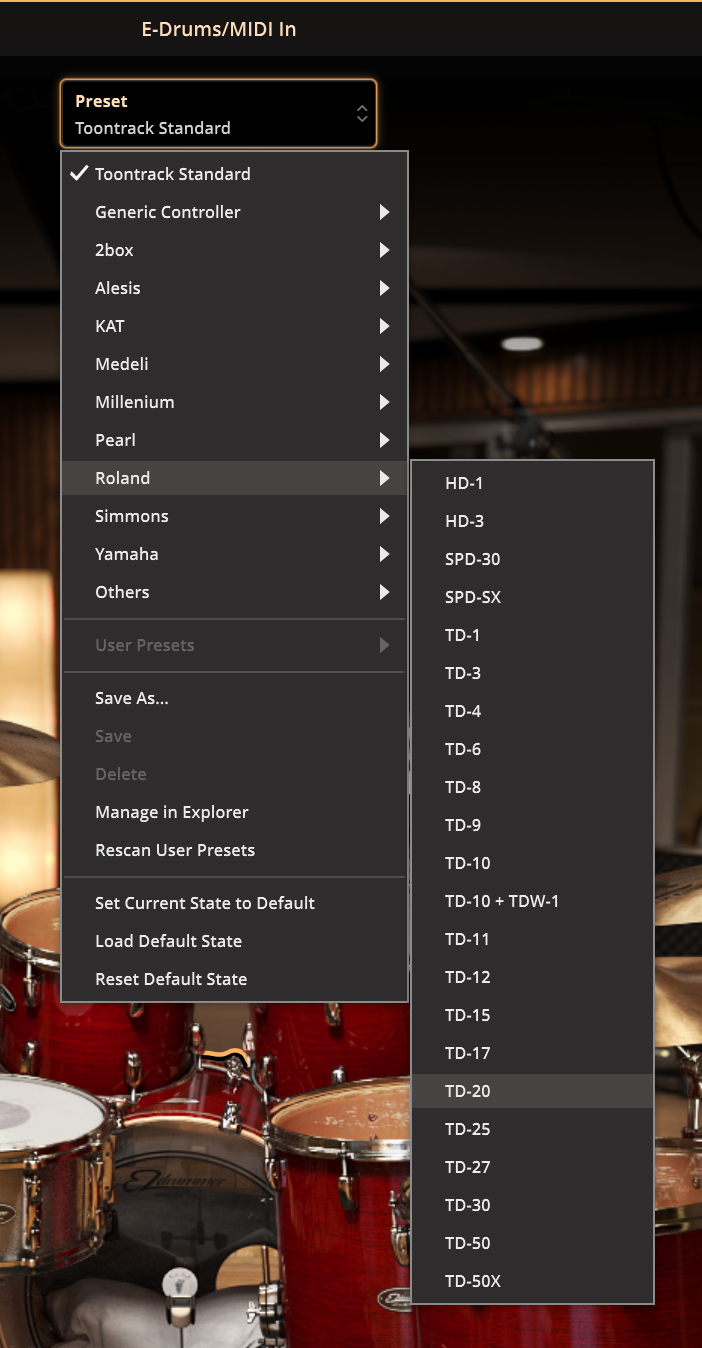
Success! Pressing on the hi-hat pedal caused EZdrummer 3 to respond by showing the on-screen hi-hat move in concert with my foot. EZdrummer 3 also generated the appropriate sounds.
I wish everything in life was this easy!
Ableton Live
This was written using Ableton 12.1 Suite on Windows.
Enable the TD-07 MIDI output as a MIDI input for Ableton Live.
- Start Ableton Live.
- Select the Options / Settings menu.
- Select Link, Tempo & MIDI.
-
Enable Input Ports / TD-07 / Remote.
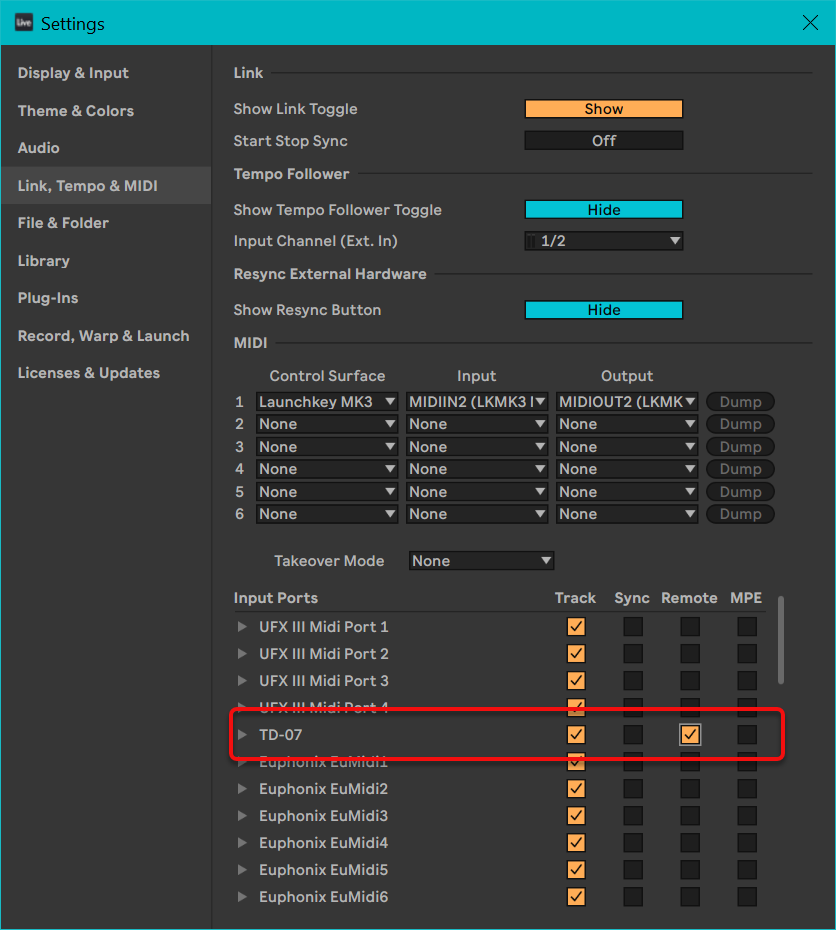
- There is no need to enable anything for Output Ports / TD-07.
Assign the MIDI input from the TD-07 to an Ableton Live MIDI track.
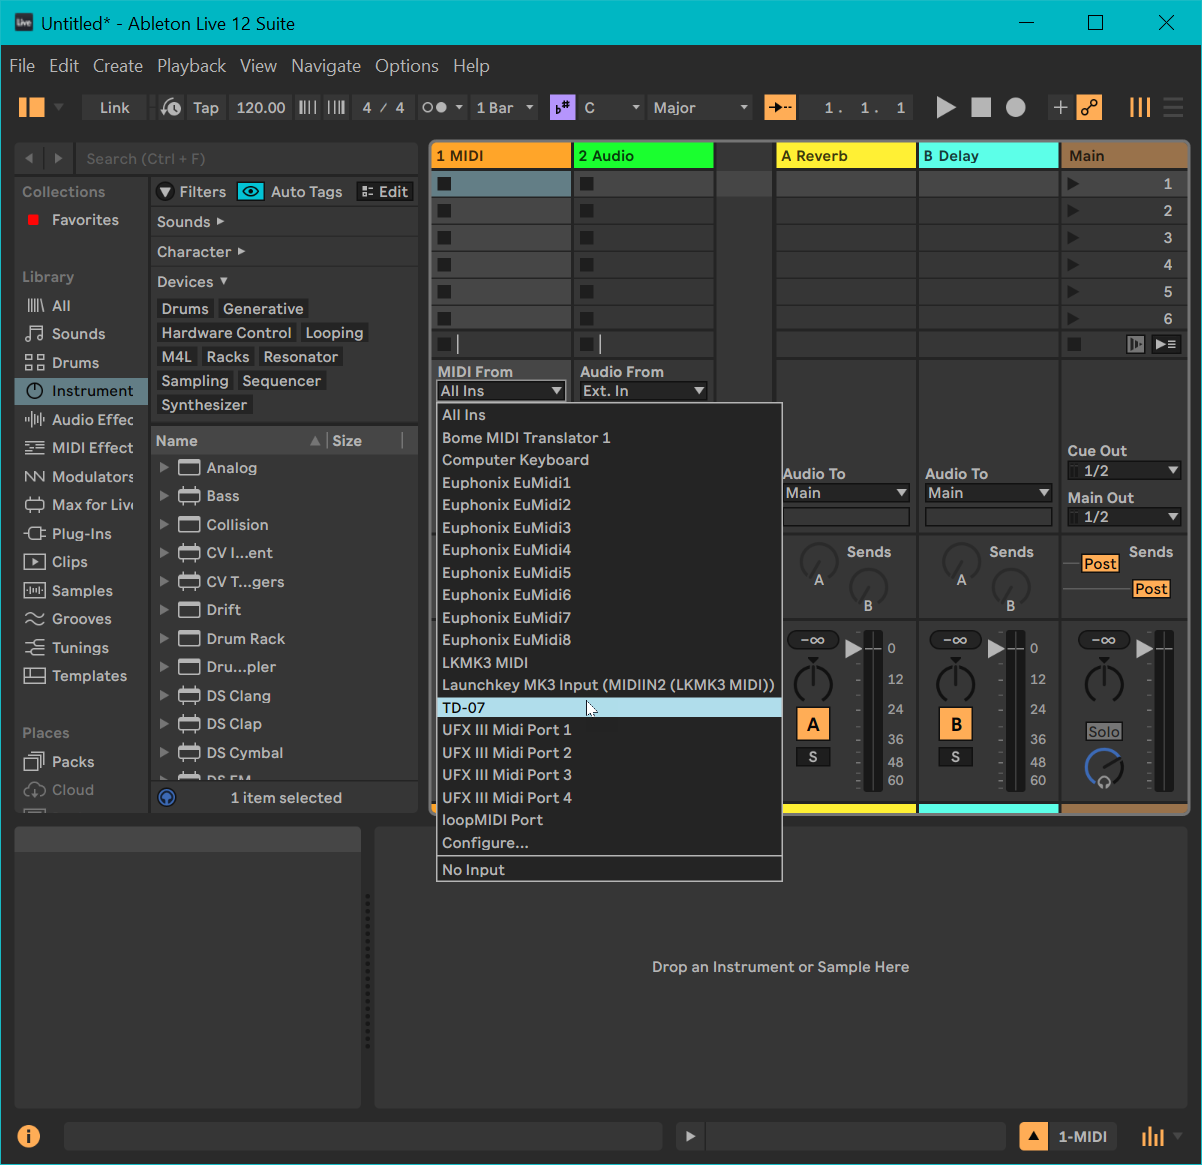
Assign an instrument, such as the Africa Drums drum rack, to the same Live MIDI track.
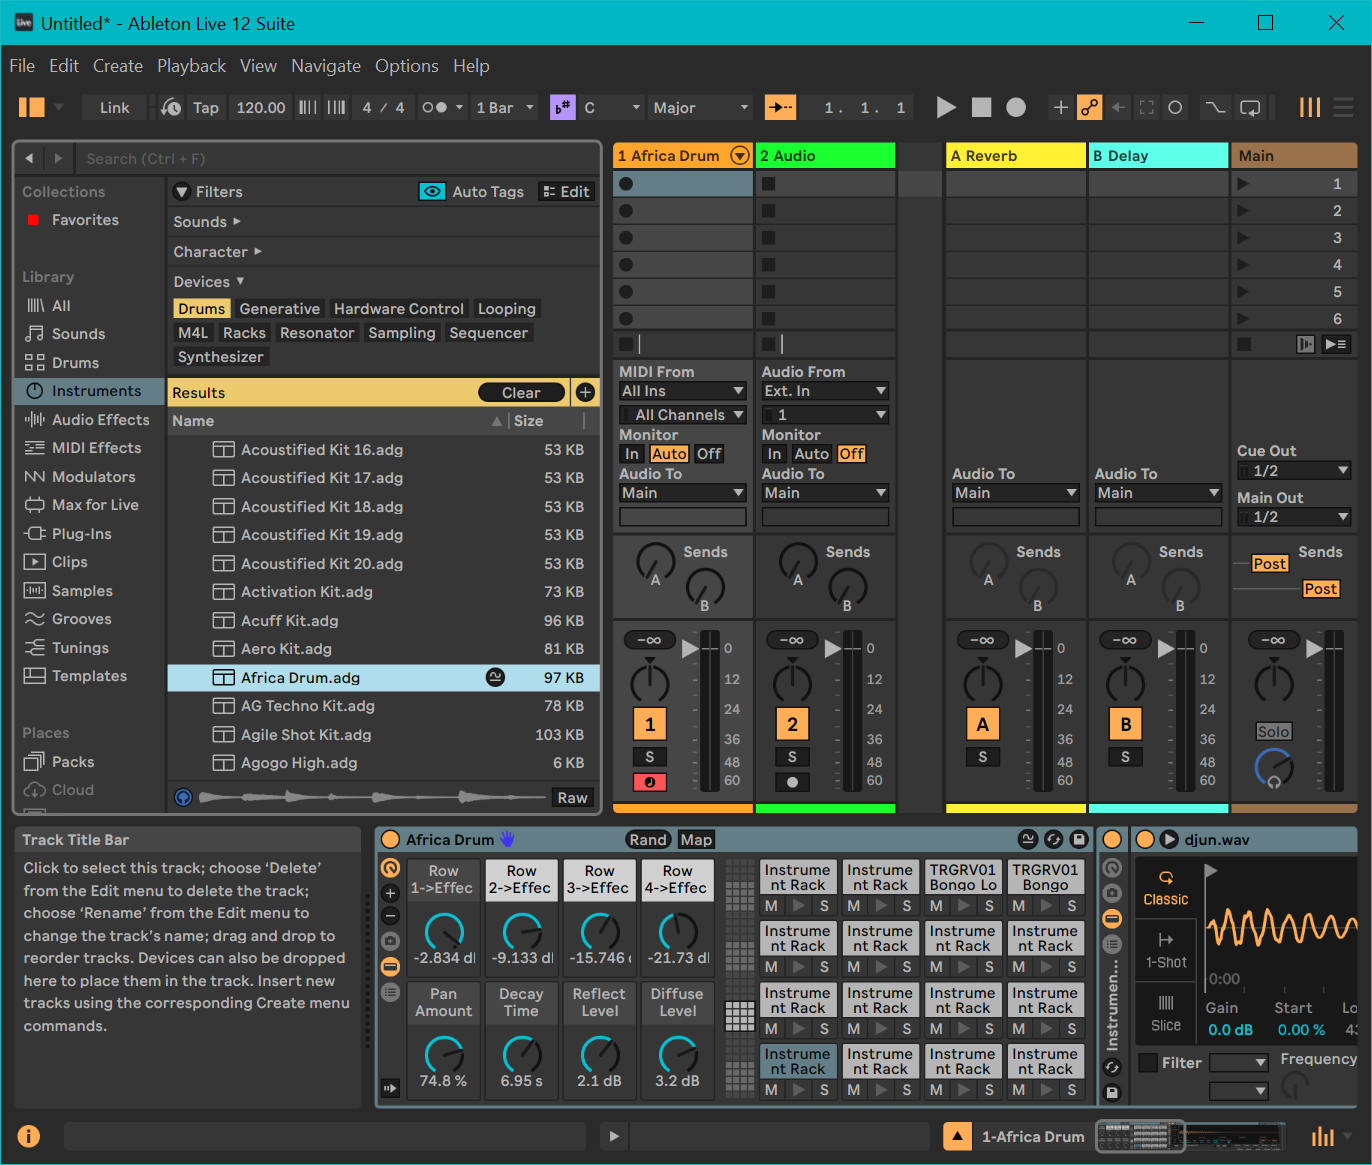
Now, when you play the Roland VQD-106 drum kit, Ableton Live will generate the sound.
Pro Tools
I have a Pro Tools Artist subscription. The current version of Pro Tools when this was written was 2024.10. Please see Pro Tools MIDI for information about Pro Tools and MIDI devices.
TD-7 instead of TD-07
Pro Tools does not provide support for current models of Roland v-drum kits. The supported models were discontinued about 20 years ago: TD-5, TD-7 and TD-10.
These 3 choices are old Roland products that were discontinued years ago. Note that the TD-7 is not the same as the TD-07. The Roland dealer who sold me the drum kit suggested that the TD-7 was the best choice; however, it might be better to somehow define a new model.
This is what the relevant portion of
%COMMONPROGRAMFILES%/
looks like:
<MIDIDeviceType Manufacturer="Roland"
  Model="TD-7"
  CanRoute="false"
  SupportsMMC="false"
  Image="OMS1027">
  <DeviceID Min="0" Max="127" Default="0" Base="0" />
  <Receives MaxChannels="16"
            MTC="false"
            Clock="false" />
</MIDIDeviceType>
The entries for the TD-7 and the TD-10 are identical.
The only difference between the TD-7 entry and the
Roland TD-5 entry is that the TD-5 entry only supports one channel.
I used the Pro Tools TD-7 MIDI device definition as the basis of my Pro Tools TD-07 MIDI device.
Define TD-07 MIDI
To define the TD-07 MIDI device:
- Select the Setup / MIDI / MIDI Studio Setup... menu.
- Push the Create button.
- Name the new instrument TD-07.
- For Manufacturer, select Roland.
- For Model, the most appropriate choices are TD-5, TD-7 and TD-10. I selected TD-7.
- For Input port, select TD-07 [Emulated].
- For Output port, select TD-07 [Emulated].
- I left all the Send Channels and Receive Channels selected. Perhaps that might need to be narrowed down in the future.
-
To save the configuration, press the Export button and save with file type
.dms. I saved toE:\media\ proTools\ midi_studio_setup.dms - Close the MIDI Studio Setup window.
The new Pro Tools TD-07 MIDI device is now available in all Pro Tools sessions.
Using TD-07 MIDI
The TD-07 MIDI device defined above allows you to play drum parts into a Pro Tools session and trigger a drum insert, for example, EZdrummer 3 or Xpand!2. You can create an instrument track for playback only, or you can create an aux track and an associated MIDI track for recording and playback. Instrument tracks and MIDI tracks can both accept input from the TD-07 MIDI device.
Pro Tools Options / MIDI Thru must be enabled.
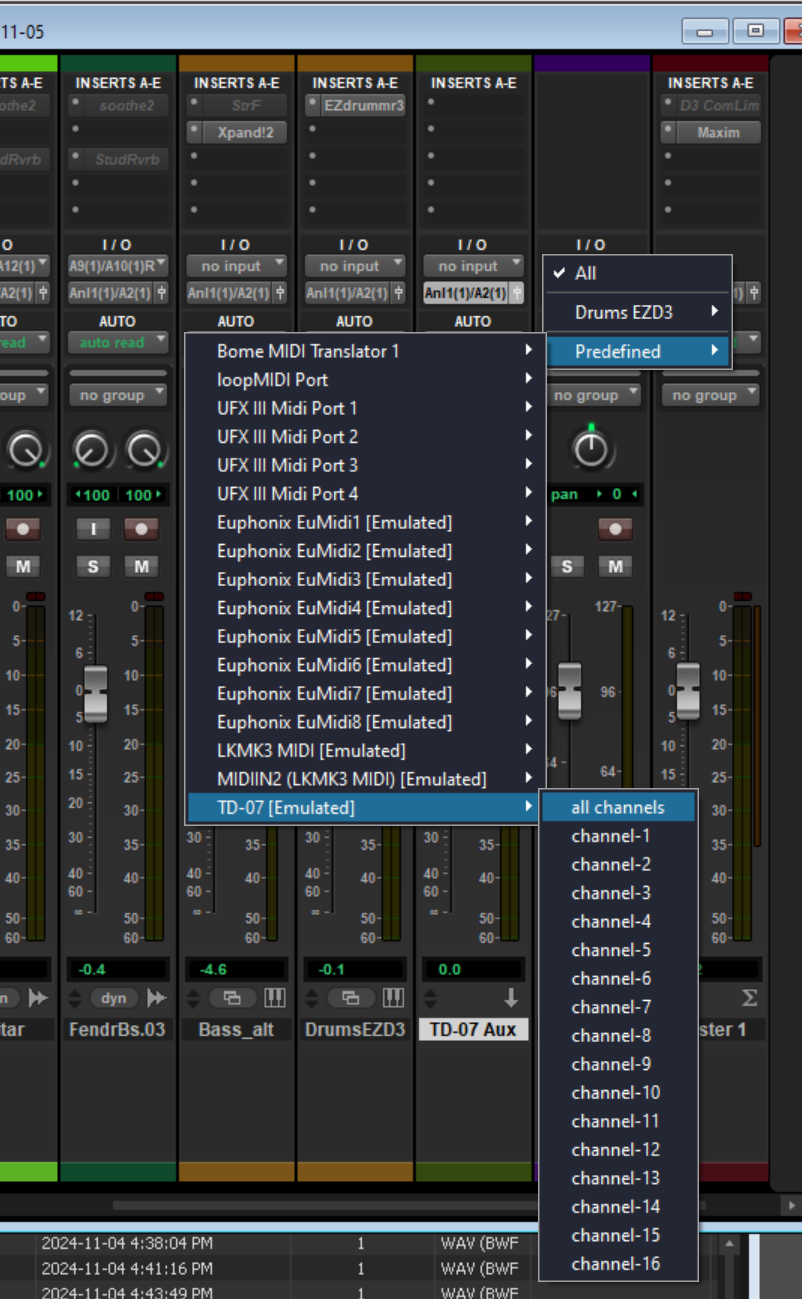
TD-07 Drum Synth
I am figuring the part out - it does not work yet. This material has been published so others can provide feedback.
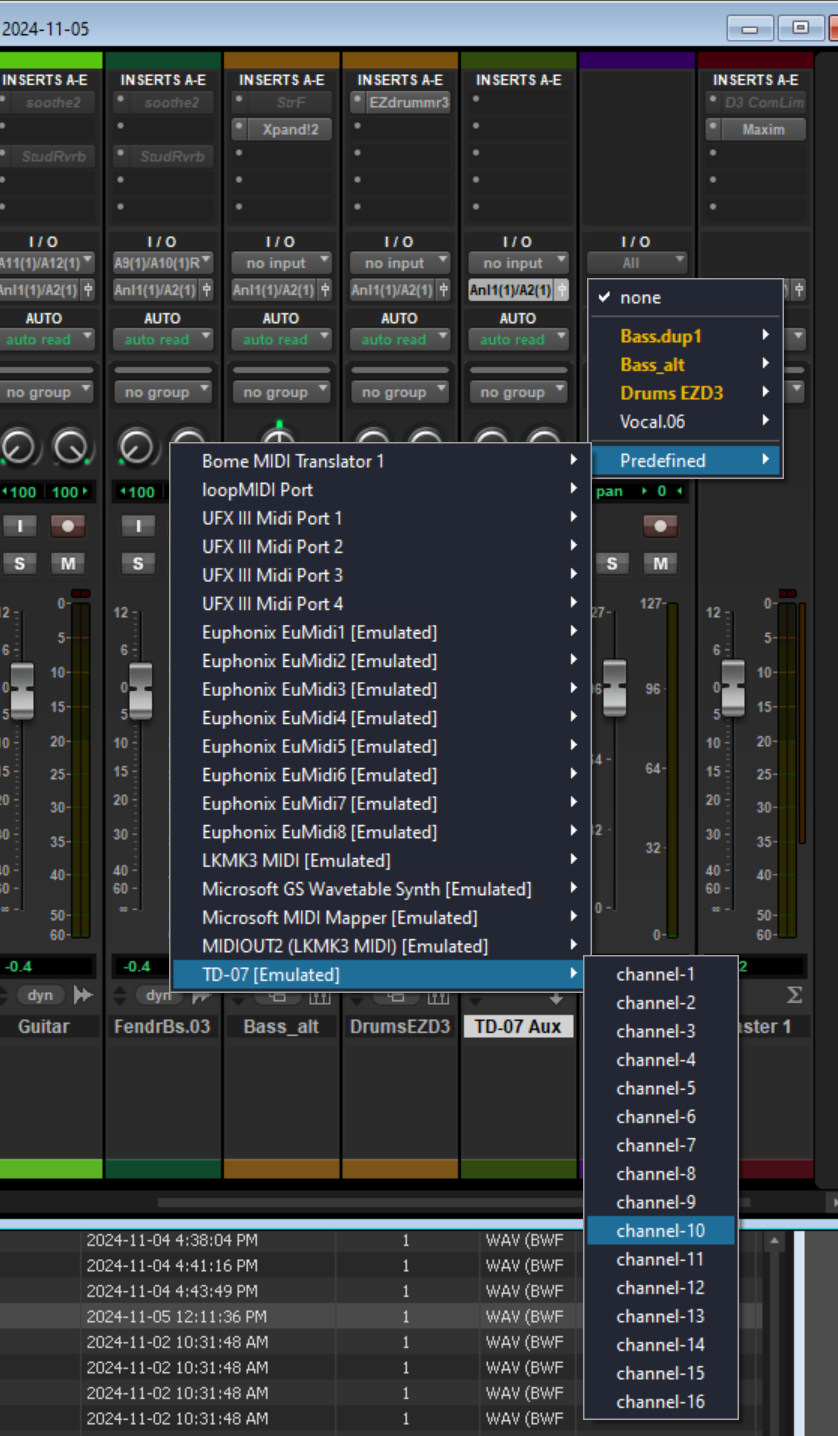
To use the drum sounds from the Roland module, first create a new MIDI track using ticks.

Now create a new stereo Aux track, also using ticks.

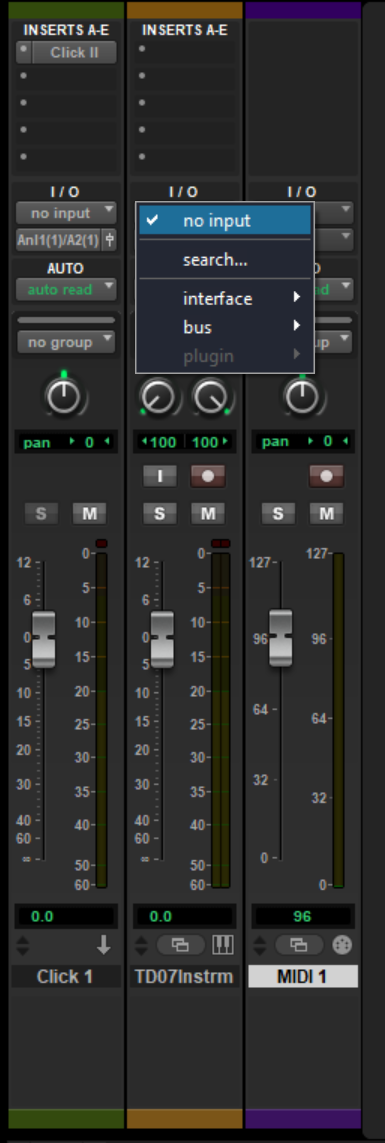
Assign the output of the MIDI track to the TD-07 MIDI device, like this:
Does Not Work With an Instrument Track
For example, let’s create a new stereo instrument track for the TD-07 MIDI device. Instrument tracks are usually created in ticks.

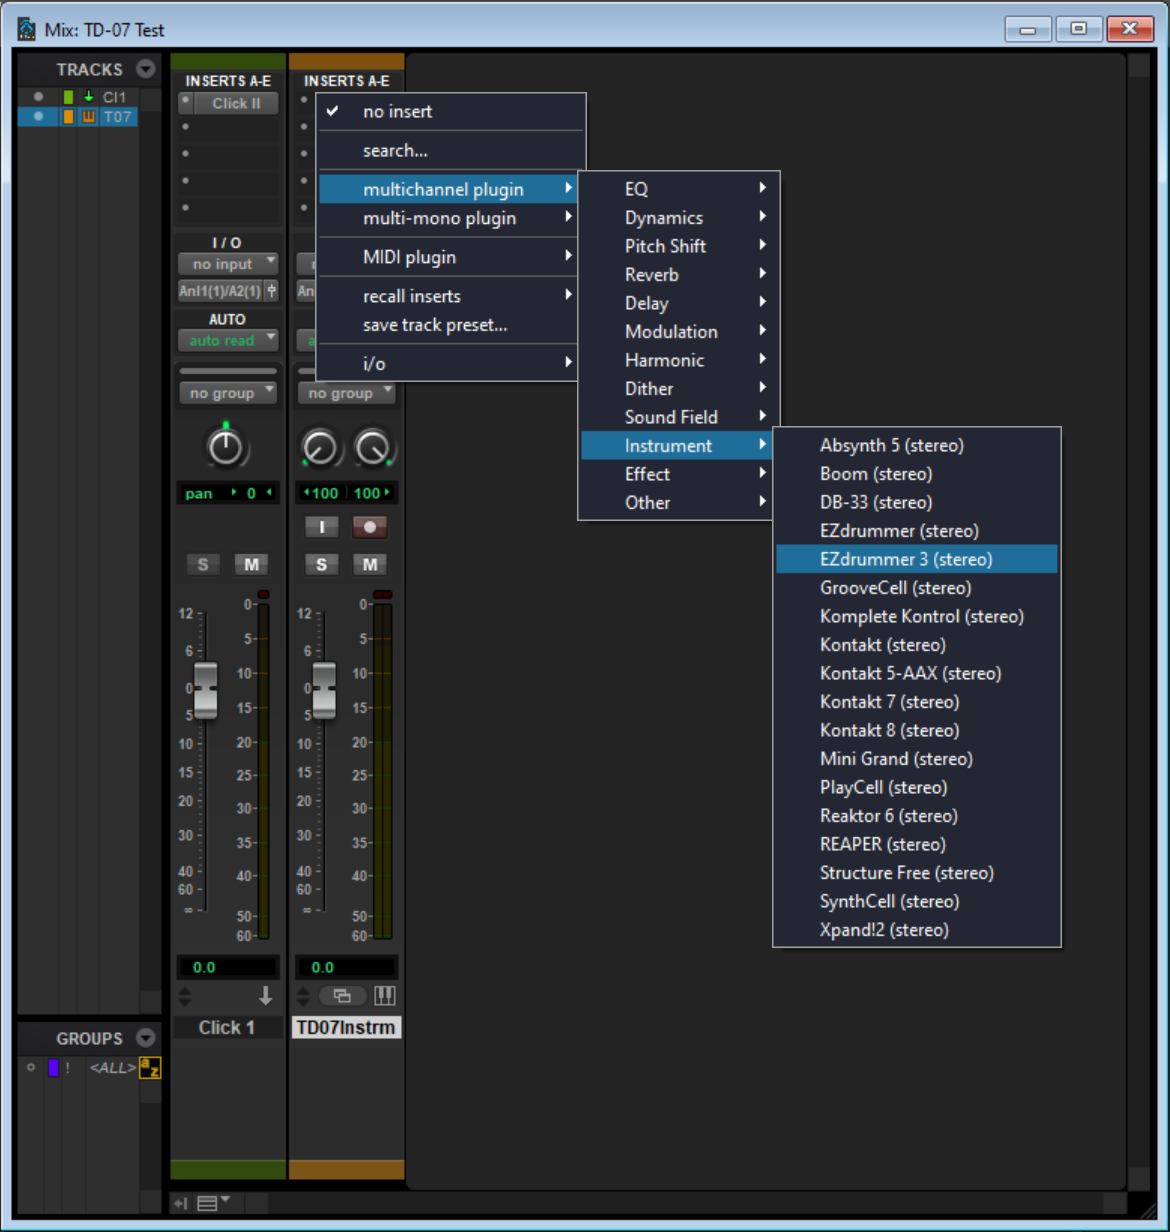
Now assign an insert to the new instrument track, so sound is generated from MIDI data. I used EZdrummer 3 (stereo), but any stereo instrument would work.
