Published 2020-03-01.
Last modified 2025-06-20.
Time to read: 6 minutes.
av_studio collection.
I have written eighteen articles about Pro Tools. They are somewhat ordered, but largely are meant to be read in any order.
- Pro Tools Overview
- Pro Tools Installation and Preferences
- HUI & MCU
- Pro Tools Keyboards and Hot Keys
- Avid Control, EuControl and EuCon
- Pro Tools Modes and States
- Pro Tools Sessions
- Pro Tools Beats, Bars and Click Tracks
- Pro Tools Operations
- Pro Tools Workspaces and Catalogs
- Pro Tools Sessions
- Pro Tools Editing
- Pro Tools Effects
- Pro Tools Automation
- Pro Tools MIDI
- Pro Tools GrooveCell & Xpand!2
- EZdrummer 3 & Pro Tools
- Pro Tools Issues
Numeric Keypads
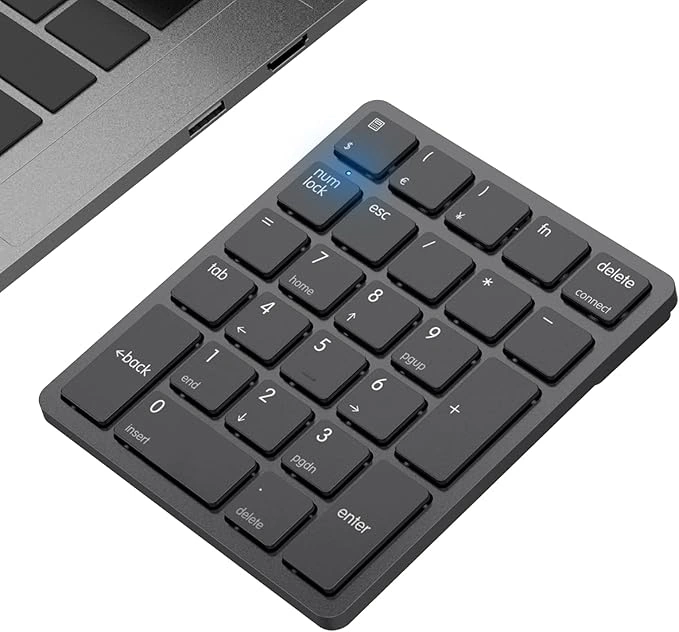
For best results when working with Pro Tools, use a full-size keyboard, or a smaller keyboard with an external numeric keypad. A numeric keypad is often referred to as a numpad.
If you have a laptop or a computer with a smaller keyhboard, you can connect an external numpad with a cable or wirelessly via Bluetooth.
Pro Tools treats the keys on a numpad differently from similarly labeled keys elsewhere on the keyboard. Unlike most other programs, a numpad enables important functionality for Pro Tools.


Windows keyboards usually label the numpad Enter key with ↵ or ↵ Enter.
Apple keyboards label use the symbol ⌤ or ⌅ on ISO and JIS keyboards, and ⌅ enter on ANSI US keyboards.
For example:
- The Enter key (on the numpad) is used to define a new marker, while the Return key is used to move the playhead to the start of the session.
- The numeric keys on the numpad are used to jump to markers, and for other purposes, while the numeric keys along the top of the keyboard have different functionality.
Keyboards
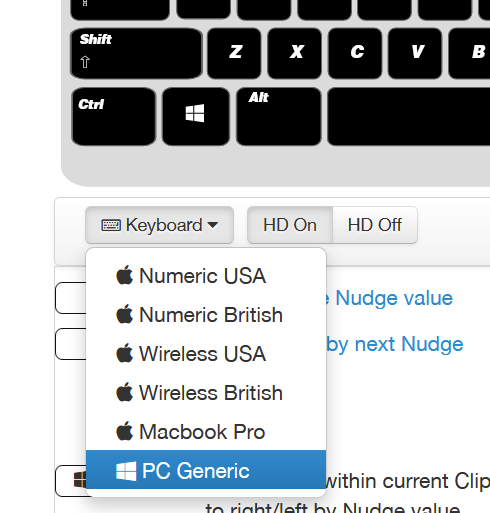
When you use a laptop, you usually do not want to plug in an external keyboard. You can learn the key bindings for your keyboard by referring to Pro Tools Keyboard Shortcuts.
For a 10keyless keyboard with Windows, select the PC Generic keyboard.
Starting with Pro Tools 2022.4, you can create your own custom key map. For Windows, press Windows-Shift-K to see and modify the key map. For Mac, press CTRL-Shift-K.
Windows Power Toys
Windows Power Toys allows you to remap keys. This is especially useful if you do not have a full-size keyboard.
Command Focus

You can use the keyboard to navigate; this is called command focus. Command focus is enabled by clicking on the A/Z Edit Key icon. The icon will display in yellow if it is enabled, or in black-and-white if not.
This icon appears in two places, and they are mutually exclusive because command focus can only apply to one area at a time.
- Edit window: In the upper right-hand corner of the edit area, to the right of the Clips area (if visible).
- In the Groups panel on the left of the Pro Tools window.
Command Focus Hotkeys
P Up.
; Down.
L Left.
, Right.
Tracks
ALT-click on a track’s volume slider knob Set the input level of the track to 0 dB.
CTRL-G Group selected tracks.
CTRL-Shift-N Create new track.
Win-P Select previous track.
Win-; Select next track.
Misc
ALT-keypad 7 Toggle the universe strip (the rainbow colored horizontal strip above tracks).
CTRL-= Toggle the Mix sub-window on top.
ALT-WIN-= Toggle the score editor.
CTRL-ALT-B Bounce mix (mixdown).
CTRL-D Duplicate selection.
CTRL-Shift-L Toggle looping.
CTRL-N Create a new session.
CTRL-Shift-W Close the session.
Recording
Return Return to the start of the session.
CTRL-Space Start recording.
Space Stop recording or toggle playback.
CTRL-. Stop recording and discard the take.
ALT-L Toggle loop recording.
CTRL-SHIFT-L Toggle playback looping.
Clips
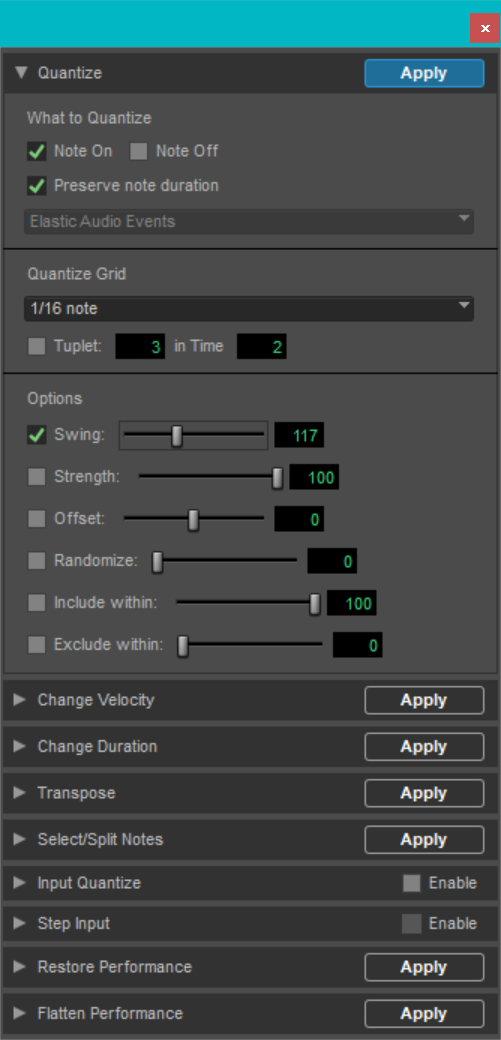
ALT-numpad 0 Open quantize dialog for selected notes / clips.
CTRL-, Add / remove sync point at cursor.
CTRL-E Cut clip at selection.
Clip List
See pages 40-41 of the official Clip List, Pro Tools Shortcuts Guide.
CTRL-SHIFT-B Select unused clips.
CTRL-SHIFT-U Clear (delete) unused clips.
ALT-click on selected clip(s) Delete (move to trash).
Edit Modes and Tools
` (backquote key) Cycle through edit modes.
F1 or ALT-1 Toggle shuffle mode.
F2 or ALT-2 Toggle slip mode.
F3 or ALT-3 Toggle spot mode.
SHIFT-F4 Enable snap to grid while in another edit mode.
F1-F4 simultaneously Enable snap to grid and shuffle modes.F2-F4 simultaneously Enable snap to grid and slip modes.
F3-F4 simultaneously Enable snap to grid and spot modes.
F5 or CTRL-1 Cycle the zoomer tool.
F6 or CTRL-2 Cycle the trimmer tool.
F7 or
CTRL-3
Cycle the selector tool.
F8 or CTRL-4 Select the grabber tool.
F9 or CTRL-5 Select the scrubber tool.
F10 or CTRL-6 Select the pencil tool.
F6-F7 simultaneously or CTRL-7 Select the smart tool.
ESC Cycle through edit tools.
CTRL-click Shuffle button Lock/unlock shuffle mode.
Tracks, Groups & Playlists
ALT-Shift-D Duplicate track.
Groups
Win-click Mute, solo and record only one track in a group.
CTRL-Shift-G Disable/enable all groups.
Playlists
ALT-Shift-N Move selection to new playlist.
Shift-S Solo playlists with cursor.
Win-ALT-v Copy selected portion of selected playlist to main playlist
CTRL-Win-\
Duplicate selected track to playlist.
CTRL-Win-ALT-\
Duplicate all tracks to playlists.
CTRL-Win-ALT-Shift-\
Duplicate selected tracks to playlists.
Win-\
Add a new playlist to one selected track.
Win-ALT-\
Create a new Pro Tools playlist on all tracks (including inactive ones).
Win-ALT-Shift-\
Create new playlists on selected tracks.
Grid Mode
CTRL-Mouse Slip tracks.
During Playback
Down arrow Start selection.
Up arrow Extend selection.
Transport
Enter Go to the start of this session.
Space Toggle playback or stop recording.
CTRL-Space or F12 Start recording.
Shift-R Record-enable the selected tracks.
Markers
Here are the Pro Tools keyboard shortcuts for working with markers:
Ctrl-Numpad 5 Open the Memory Locations window.
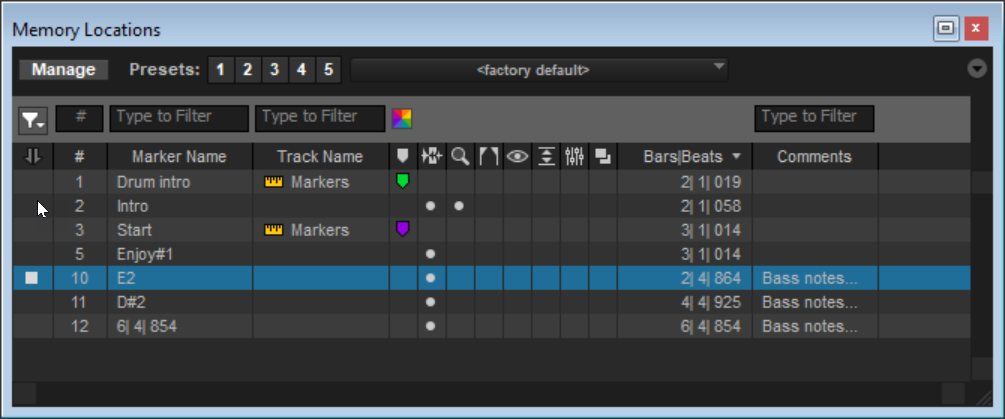
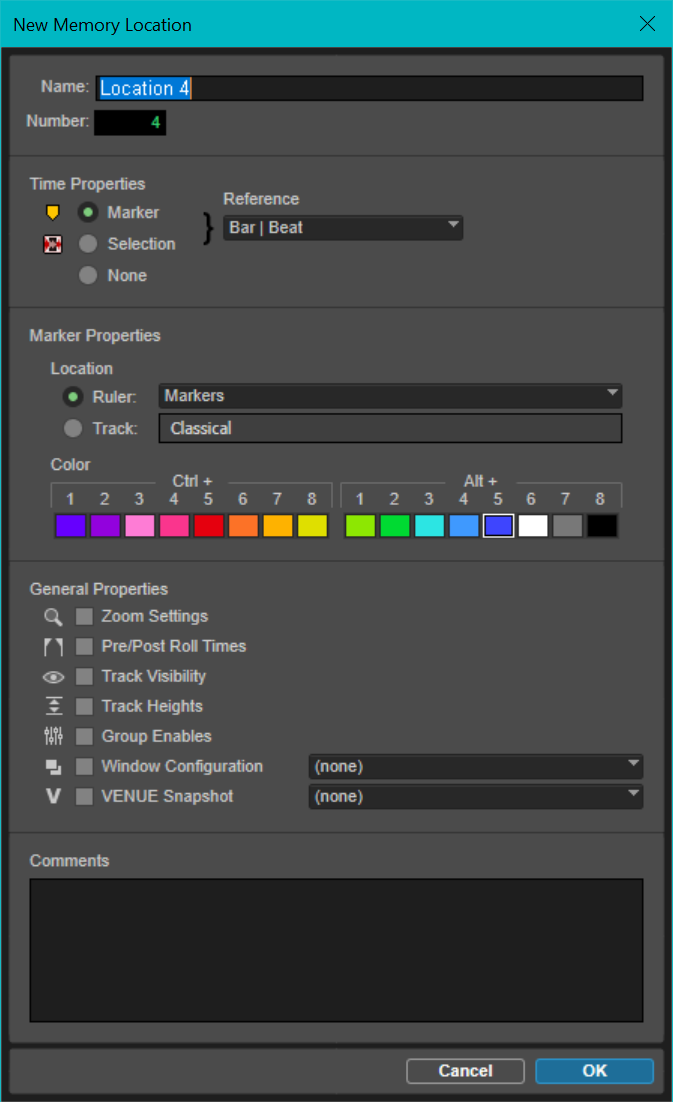
Numpad Enter Displays the New Memory Location dialog where you can define a new memory location.
. [1-9]+ .
(on the numpad: a period followed by the marker number, followed by another period)
Jump to marker.
- Or -
Click on the left-most column in the Memory Locations window.
Click in the marker ruler area, then Tab and Ctrl-Tab Move to the next/previous marker.
Shift-click on edit window Extend selection from marker to current location (selects all notes within the selection area).
Win-click on marker Edit a Memory Location.
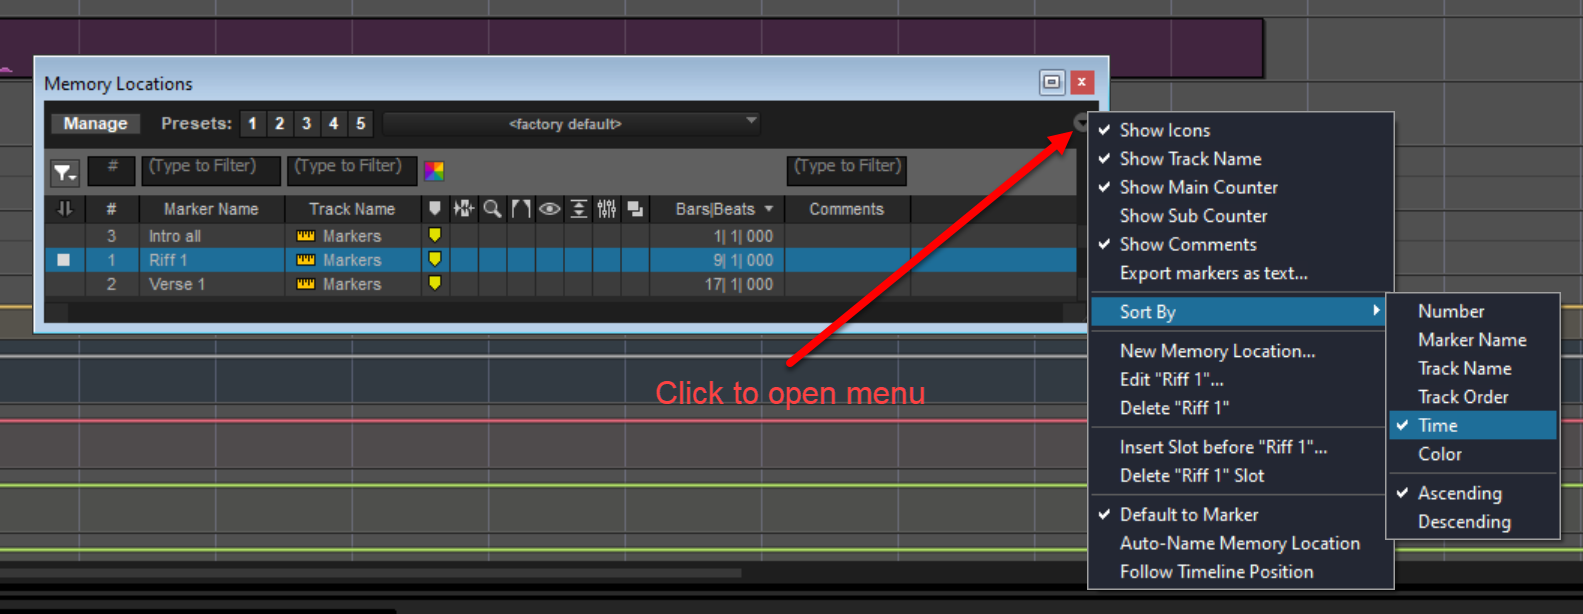
By default, memory locations are presented in the order they were defined. To sort memory locations by their timecode, open the pull-down menu to the right of the Memory Locations window, then select Sort By / Time. This is a per-user setting, affecting all Pro Tools sessions.
For further information:
Keyframes
ALT-Shift-click Insert a keyframe.
Click-drag To freely move a keyframe.
ALT-Shift-click-drag Move a keyframe left and right while keeping the value unchanged.
MIDI
Double-click on any Instrument or MIDI track Open it in the docked MIDI Editor pane in the lower portion of the Pro Tools window.
ALT-= Toggle the MIDI event list.
ALT-Win-Shift-= Toggle the MIDI Editor visibility.
In the MIDI editor, the right and left arrow keys move forward and back through the notes. Doubled notes can be noticed by the next visible MIDI note not being selected.
In the main editor:
Win-- Toggle the selected Instrument or MIDI track between the notes view and the clips view.
Alt-- Toggle all Instrument and MIDI tracks between the notes view and the clips view.
CTRL-SHIFT-] Vertical zoom in.
CTRL-SHIFT-[ Vertical zoom out.
CTRL-Shift-[ and CTRL-Shift-[ Vertical zoom in and out MIDI and Instrument (MIDI) panels
CTRL-Windows-[ and CTRL-Windows-] Vertical zoom to show all notes (lowest to highest) in MIDI and Instrument (MIDI) panels
CTRL-Windows-Shift-[ and CTRL-Windows-Shift-] Vertical zoom to show all notes (lowest to highest) in MIDI and Instrument (MIDI) panels
Zoom
ALT-A Fit all clips horizontally.
ALT-F Fit the selected clips vertically.
CTRL-[ Horizontal zoom out.
CTRL-] Horizontal zoom in.
References
I have written eighteen articles about Pro Tools. They are somewhat ordered, but largely are meant to be read in any order.
- Pro Tools Overview
- Pro Tools Installation and Preferences
- HUI & MCU
- Pro Tools Keyboards and Hot Keys
- Avid Control, EuControl and EuCon
- Pro Tools Modes and States
- Pro Tools Sessions
- Pro Tools Beats, Bars and Click Tracks
- Pro Tools Operations
- Pro Tools Workspaces and Catalogs
- Pro Tools Sessions
- Pro Tools Editing
- Pro Tools Effects
- Pro Tools Automation
- Pro Tools MIDI
- Pro Tools GrooveCell & Xpand!2
- EZdrummer 3 & Pro Tools
- Pro Tools Issues
