Published 2020-03-01.
Last modified 2024-12-24.
Time to read: 6 minutes.
av_studio collection.
I have written eighteen articles about Pro Tools. They are somewhat ordered, but largely are meant to be read in any order.
- Pro Tools Overview
- Pro Tools Installation and Preferences
- HUI & MCU
- Pro Tools Keyboards and Hot Keys
- Avid Control, EuControl and EuCon
- Pro Tools Modes and States
- Pro Tools Sessions
- Pro Tools Beats, Bars and Click Tracks
- Pro Tools Operations
- Pro Tools Workspaces and Catalogs
- Pro Tools Sessions
- Pro Tools Editing
- Pro Tools Effects
- Pro Tools Automation
- Pro Tools MIDI
- Pro Tools GrooveCell & Xpand!2
- EZdrummer 3 & Pro Tools
- Pro Tools Issues
Avid Link
Avid Link is the best way to update Avid software, including Pro Tools. When it first runs, it only appears in the desktop toolbar, and it might be hidden. Before it can be used, you must sign in with Microsoft user credentials.

Then, log in to Avid with your Avid credentials:


It is probably a good idea to enable Only Show Updates.

Sonic Drop
Sonic Drop is a program that delivers free instruments, samples, and loops to all Pro Tools monthly and annual subscribers, and perpetual license holders on an active plan, at no additional cost.
HiDpi Monitors
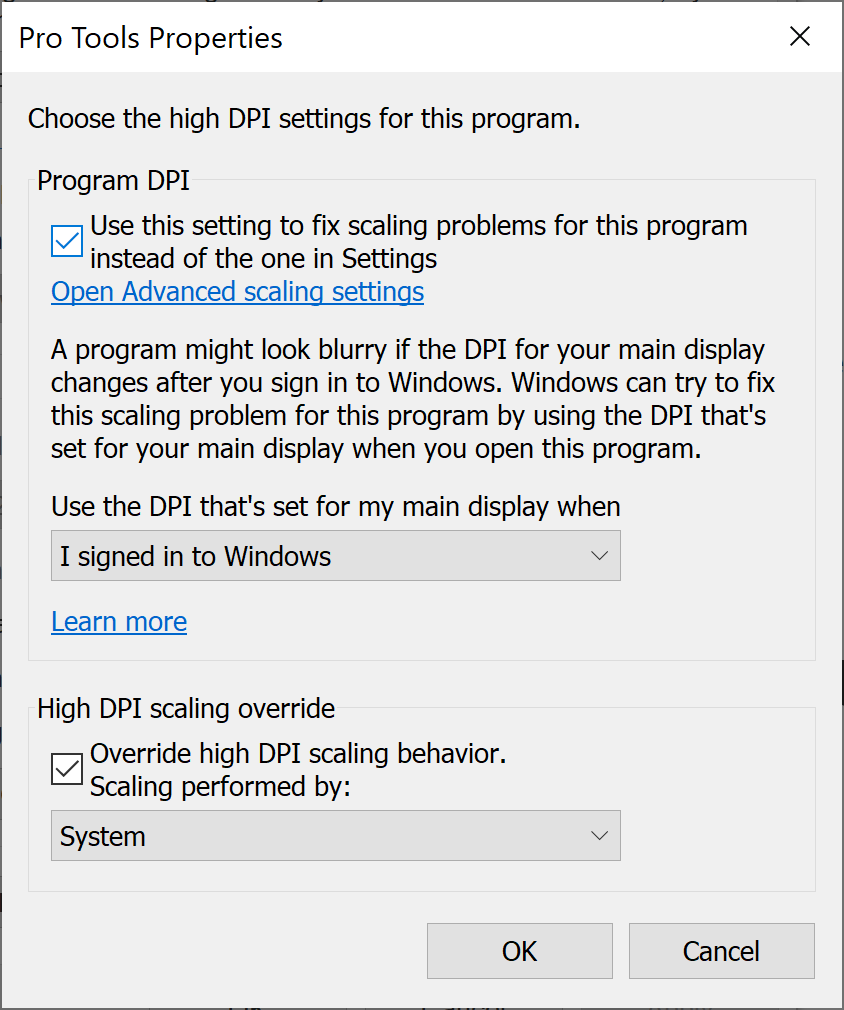
The Avid documentation is, as usual, annoying. Suggesting that users revert to 1080p is ridiculous. The following recommended settings work for me.
YouTube Misc
Pro Tools Preferences
This is how I configure Pro Tools.
-
In Setup / Preferences / Operation,
change Project Media Cache to
F:\proToolsMediaCache, and enable Automatically Create New Playlists When Loop Recording.

See the section entitled Automatically Create New Playlists When Loop Recording in the Pro Tools Reference Guide, p 706 for more information. -
In Setup / Preferences / Editing,
disable New Tracks Default to Tick Timebase and enable Suppress Name Dialog When Creating New Playlists.
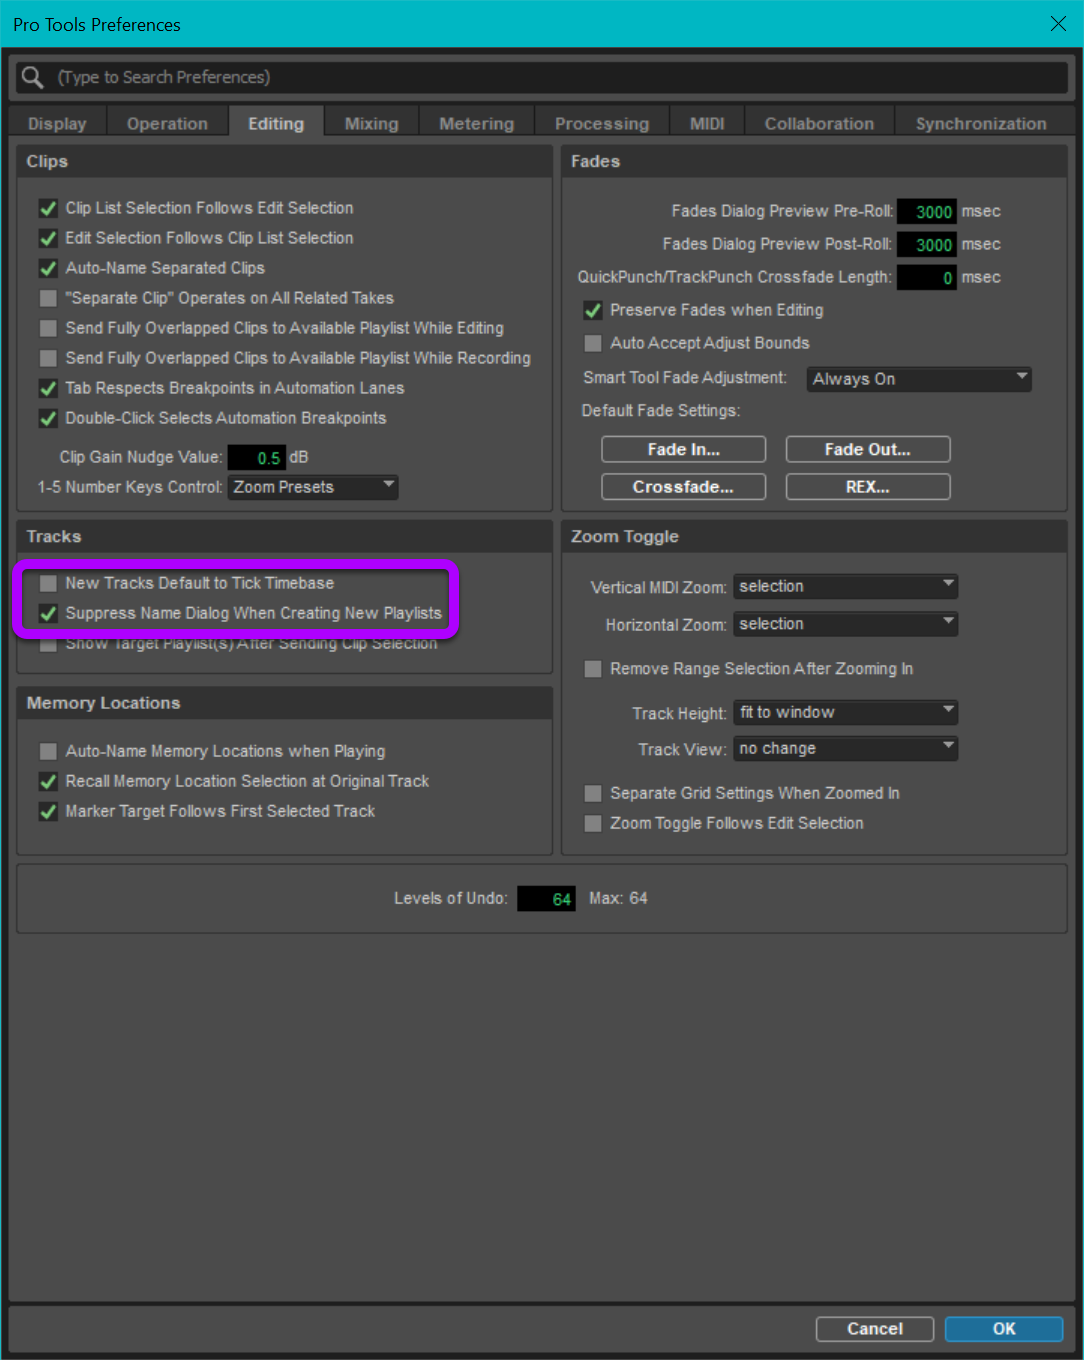
See the section entitled Tracks in the Pro Tools Reference Guide, p 141 for more information. -
Under Setup / Preferences / Processing, enable Automatically Copy Files on Import,
and also enable Convert Copied Files to Session Format.
The latter causes imported files to be converted to the sample rate,
bit depth and audio file format for the Pro Tools session.
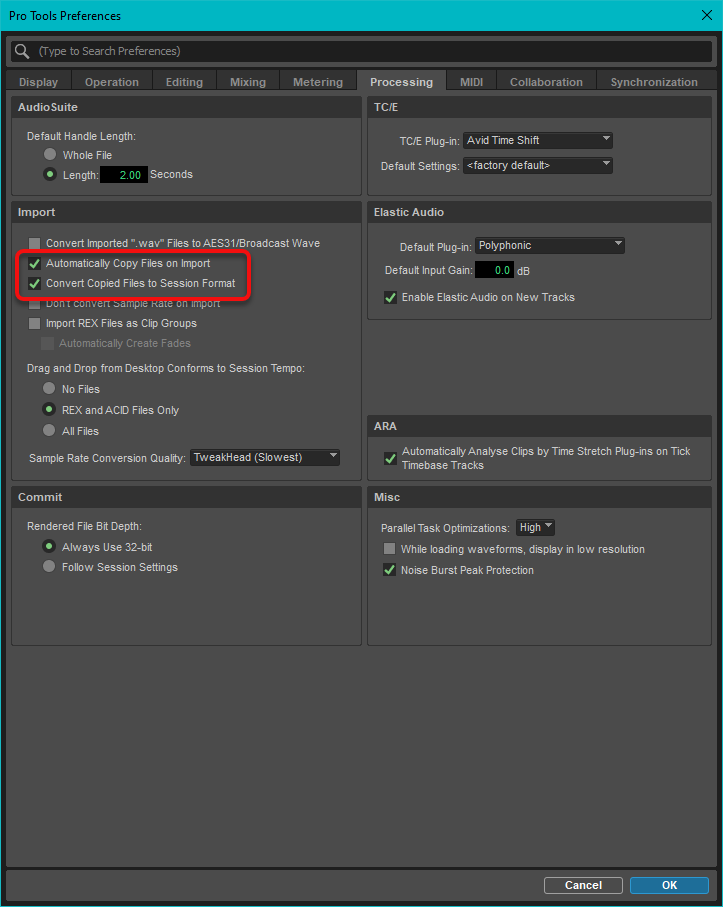
See the section entitled Automatically Copy Files on Import in the Pro Tools Reference Guide, p 155 for more information. -
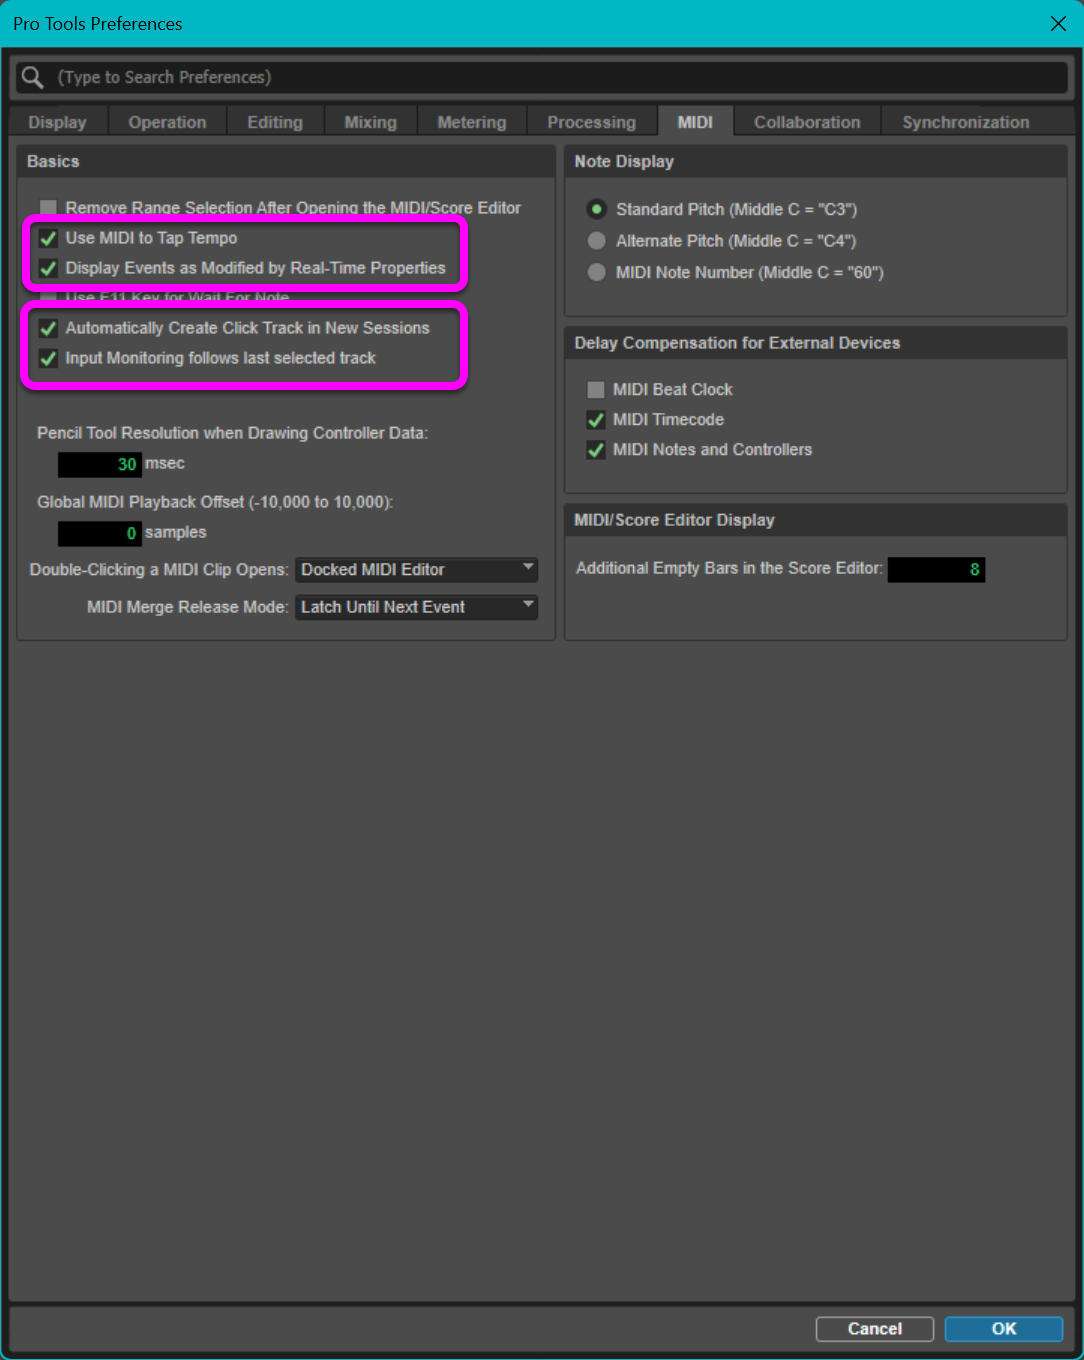
Under Setup / Preferences / MIDI,
enable:
- Use MIDI to Tap Tempo
- Display Events as Modified by Real-Time Properties
- Automatically Create Click Track in New Sessions.
- Input Monitoring follows last selected track
-
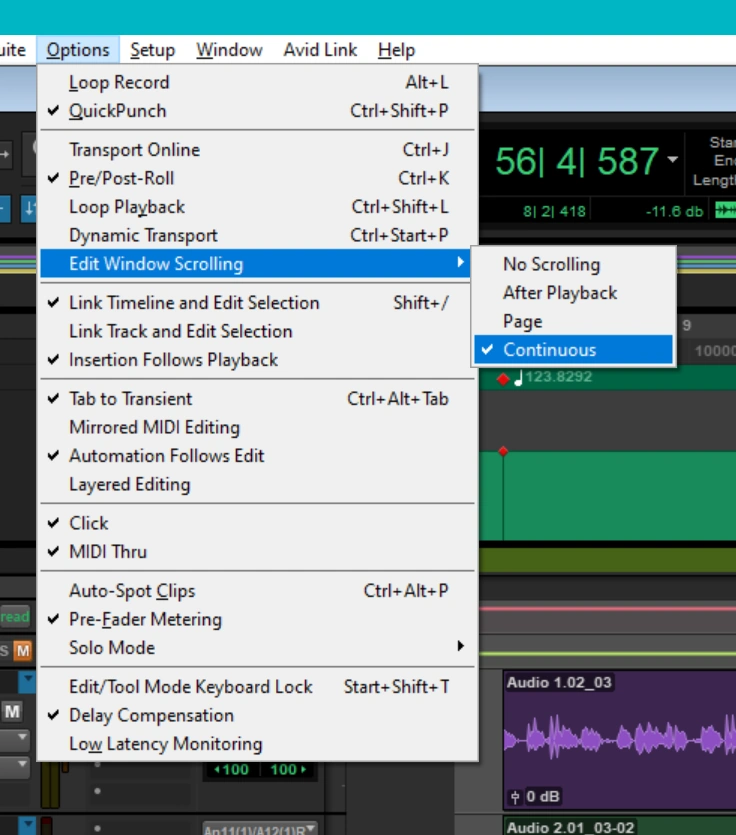
This setting only applies to the currently open session.
Enable Options / Edit Window Scrolling / Continuous.
Interleaved Audio Files
My Pro Tools templates all enable interleaved audio. Each time you create a new session you have the opportunity to control interleaving.
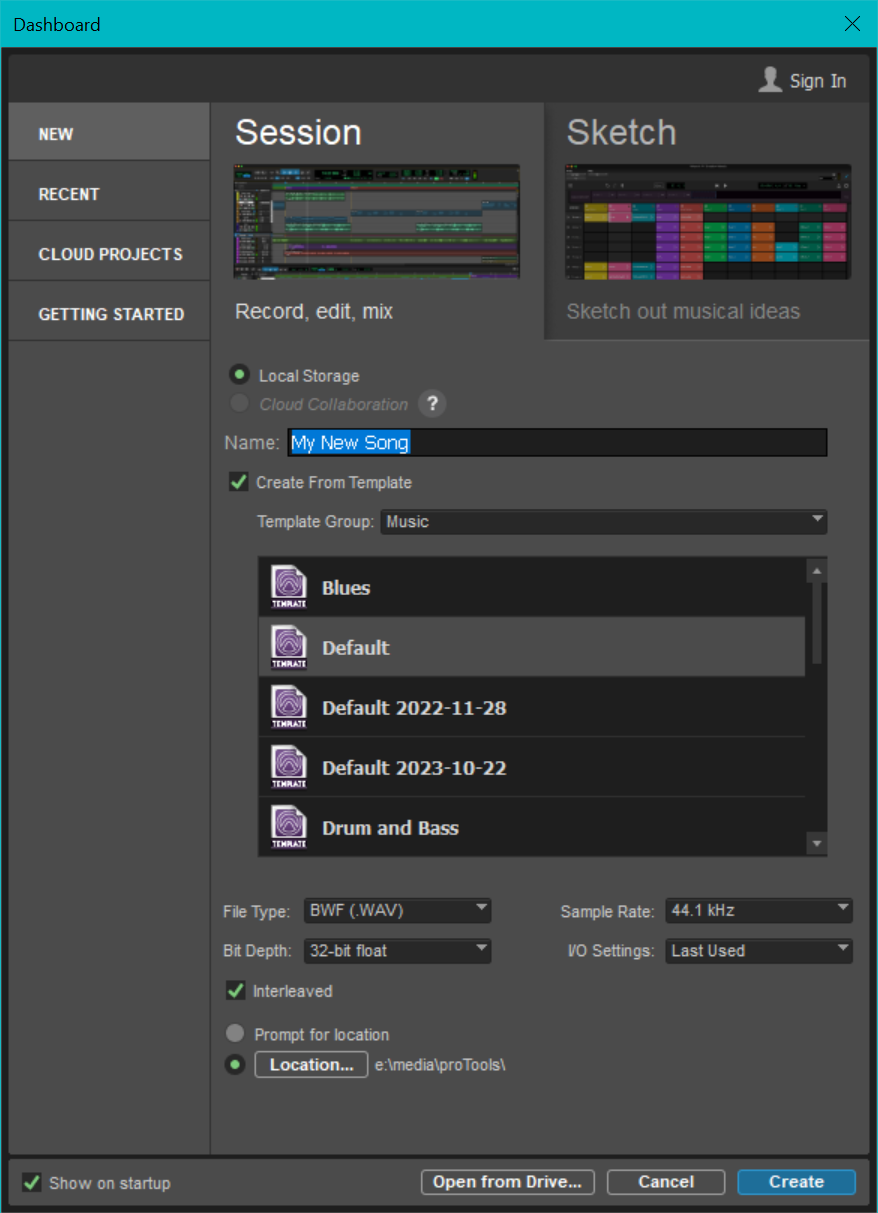
For stereo and greater-than-stereo multichannel audio, Pro Tools supports both interleaved multichannel audio files and multi-mono audio files.
An interleaved audio file contains all channel information, stored in an alternating single audio “stream.” Interleaving distributes and “interleaves” the consecutive bits of data. This helps protect against consecutive errors when the data is read back.
Multi-mono, or “split-mono” multi-channel audio files are separate mono audio files that are treated together as a multichannel group of audio files. This lets you each channel (file) independently. For example, with stereo files, two separate files are created, where one file contains the left channel, and the other file contains the right channel. The files are identified by the suffixes of “.L” and “.R”. The two files are linked, and are edited as a pair in stereo tracks in Pro Tools. However, you can decouple them and split them to individual mono audio tracks in Pro Tools so that the can be edited, processed, and mixed independently.
You can change the Interleaved setting for the currently open session or project in the Session Setup window. When this option is enabled, all newly recorded or imported (and converted) stereo or greaterthan-stereo multichannel files in the session will be interleaved audio files. To enable (or disable) interleaved audio files for the Pro Tools session or project:
- Choose Setup > Session, or press CTRL-Numeric 2.
- In the Session Setup window, select (or deselect) the Interleaved option.
Latency
Buffer Size
Real-time latency is minimized when the Pro Tools Playback Engine has the smallest possible buffer size. Pro Tools only accepts certain values for the buffer size, and you can only select the currently active buffer size.
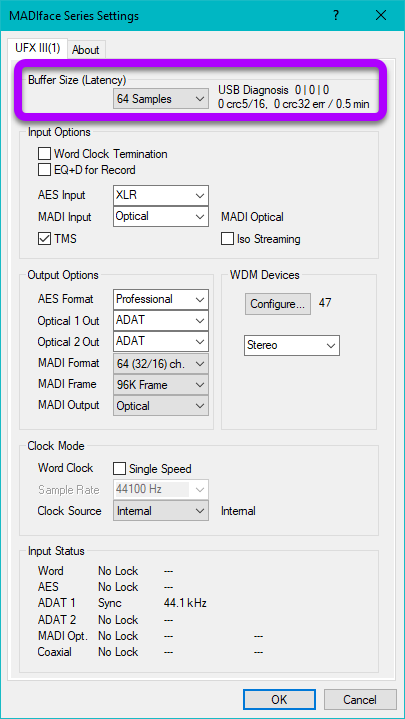
For my RME UFX III audio interface on a powerful DAW, I use a buffer size of 64 samples.
This value cannot be changed in Pro Tools, and must be changed in the RME Fireface USB Settings applet,
accessible from the Windows taskbar.
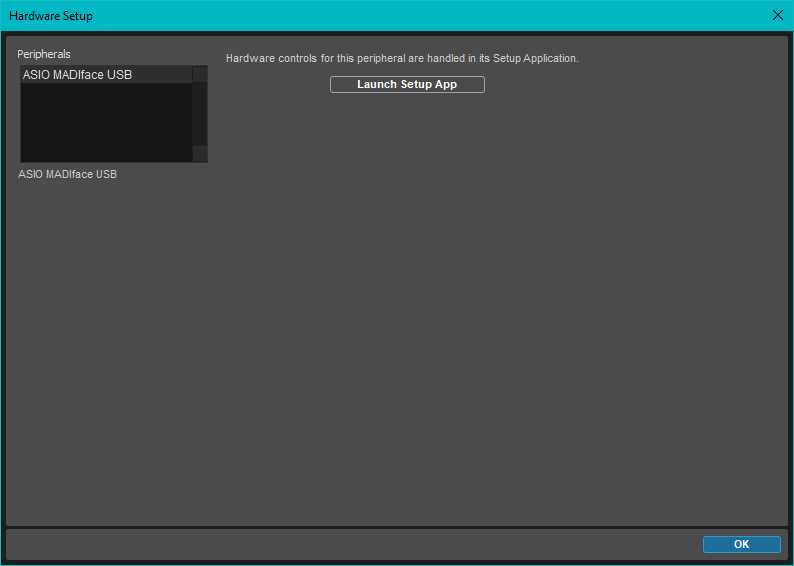
However, Pro Tools provides a link to the RME applet in Setup / Hardware.
Click on Launch Setup App to run the RME settings applet:
Depending on the RME audio interface you have, the appropriate settings applet will launch:
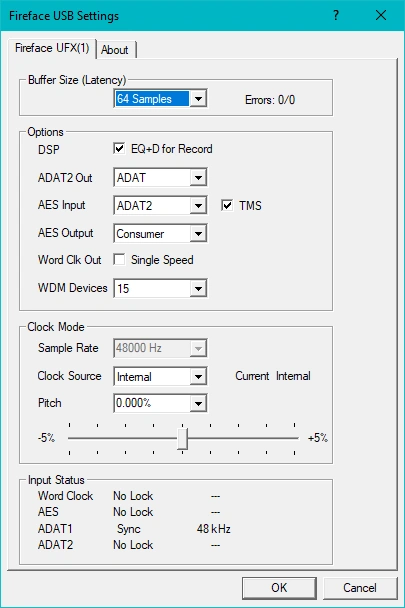
Pro Tools must be restarted after changing this value in order for the new value to be used by Pro Tools.
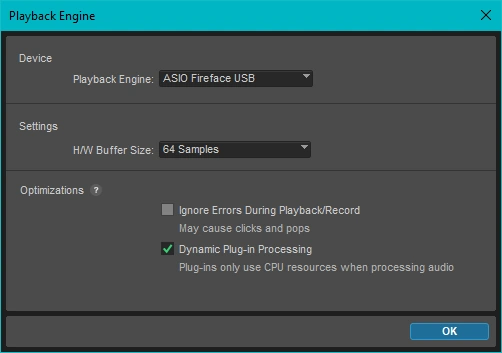
After restarting Pro Tools, go to Setup / Playback Engine and notice that the value has changed.
See the section entitled Hardware Buffer Size in the Pro Tools Reference Guide pp 114-115 for more information.
Delay Compensation
Disable Options / Delay Compensation to eliminate latency for external MIDI devices.
To make extra sure, disable all 3 Delay Compensation for External Devices settings under Setup / Preferences / MIDI.
See the section entitled Delay Compensation for External Devices Options in the Pro Tools Reference Guide, pages 160-161 and the section entitled Setting a Hardware Insert Delay Offset on page 1352 for more information.
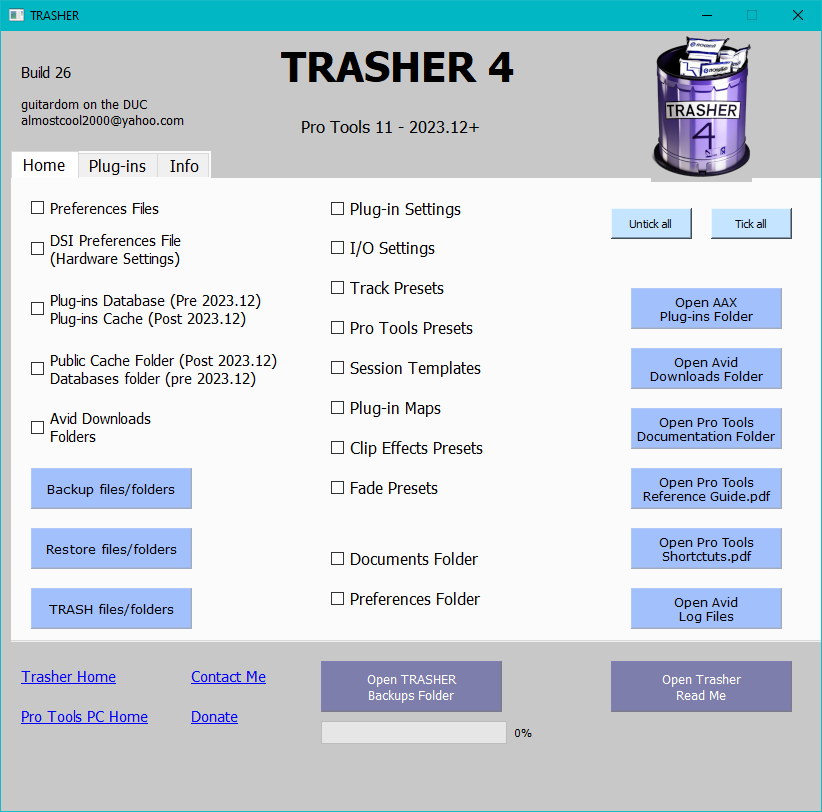
Save Preferences With Trasher
Use Trasher to save your preferences. Pro Tools will eventually have a problem and stop working. The typical solution is to use Trasher to delete the current preferences (just the Preferences Files) and restore from the backup. Pro Tools usually works after that.
Trashing preferences can solve intractable problems. I bought Trasher 3, then years later I purchased Trasher 4. It works well.
USB Selective Suspend
Many devices, such as fingerprint readers and other kinds of biometric scanners, only require power intermittently. Suspending such devices, when the device isn't in use, reduces overall power consumption.
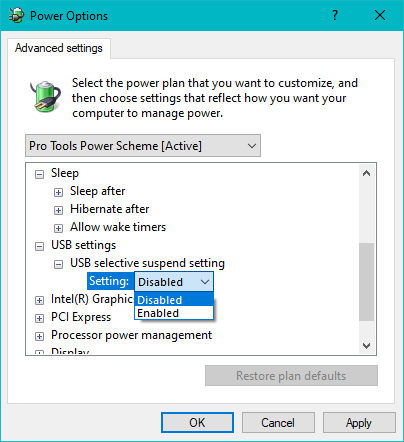
What Microsoft does not say is that some devices, such as MIDI keyboards that use the HUI protocol, will loose their connection to the DAW they are associated with when USB selective suspend activates.
I found that my Novation Launchkey 49 would stop working after I walked away from my DAW for a while. I had to relaunch my DAW for the USB port assigned to the Launchkey to be reinitialized.
After disabling USB selective suspend, the problem went away. (Windows 10 instructions., Windows 11 instructions.)
See also Fix USB-C Problems in Windows.
Setting Up Launchkey 49
The Novation Launchkey 49 is a versatile yet compact keyboard. To configure it with Pro Tools, such that the knobs and faders can control Pro Tools:
- Setup / Peripherals / MIDI Controllers
-
4 rows of parameters are displayed, one for each possible control surface.
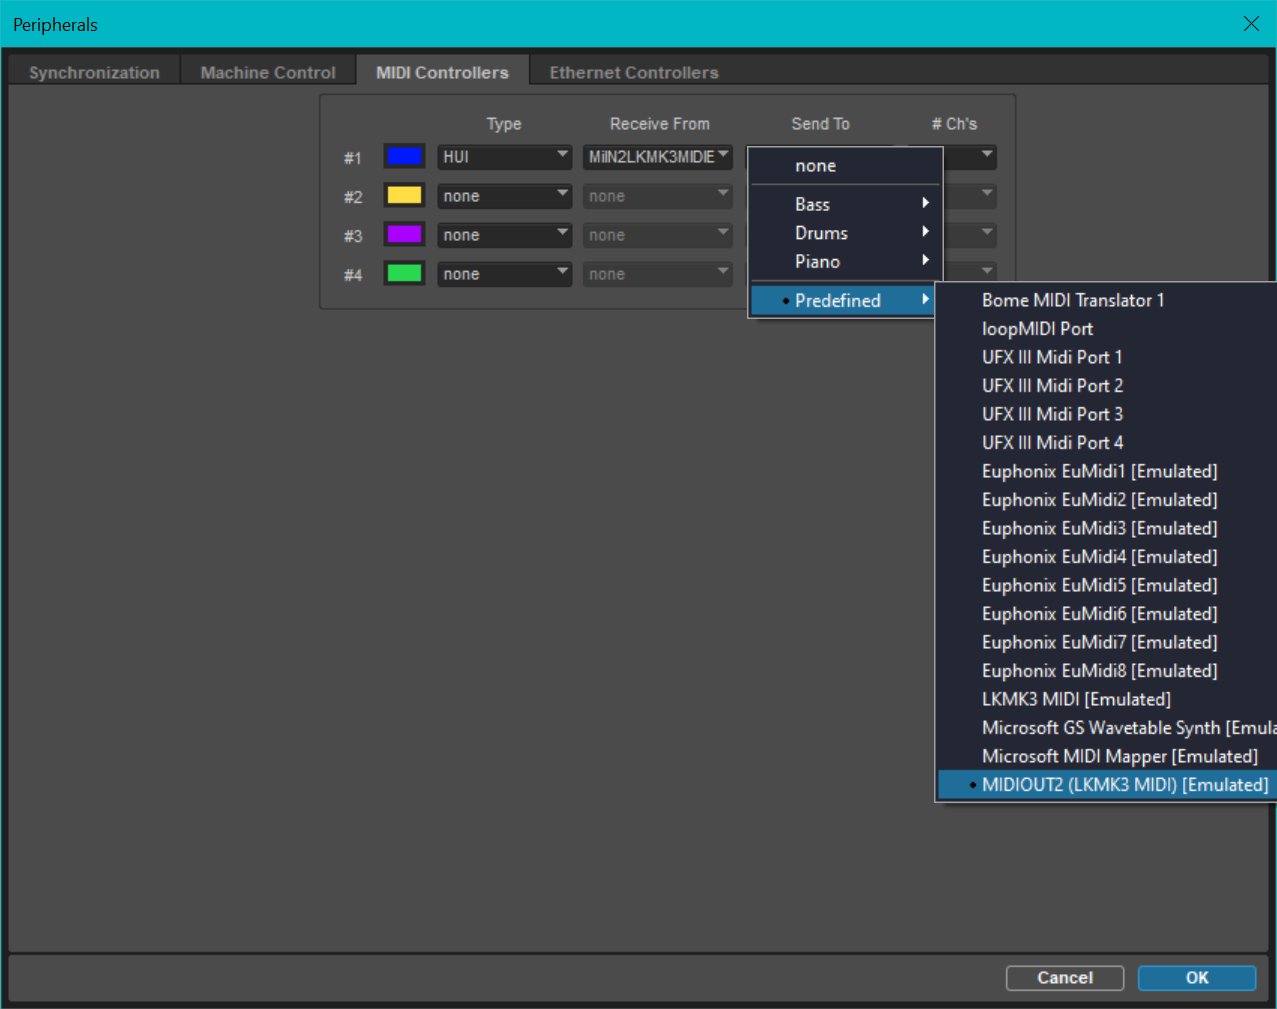
In an unused row, specify the following settings for the Launchkey 49:
Type Receive From Send To # Ch's HUI MIDIIN2 (LKMK3 MIDI) [Emulated] MIDIOUT2 (LKMK3 MIDI) [Emulated] 8 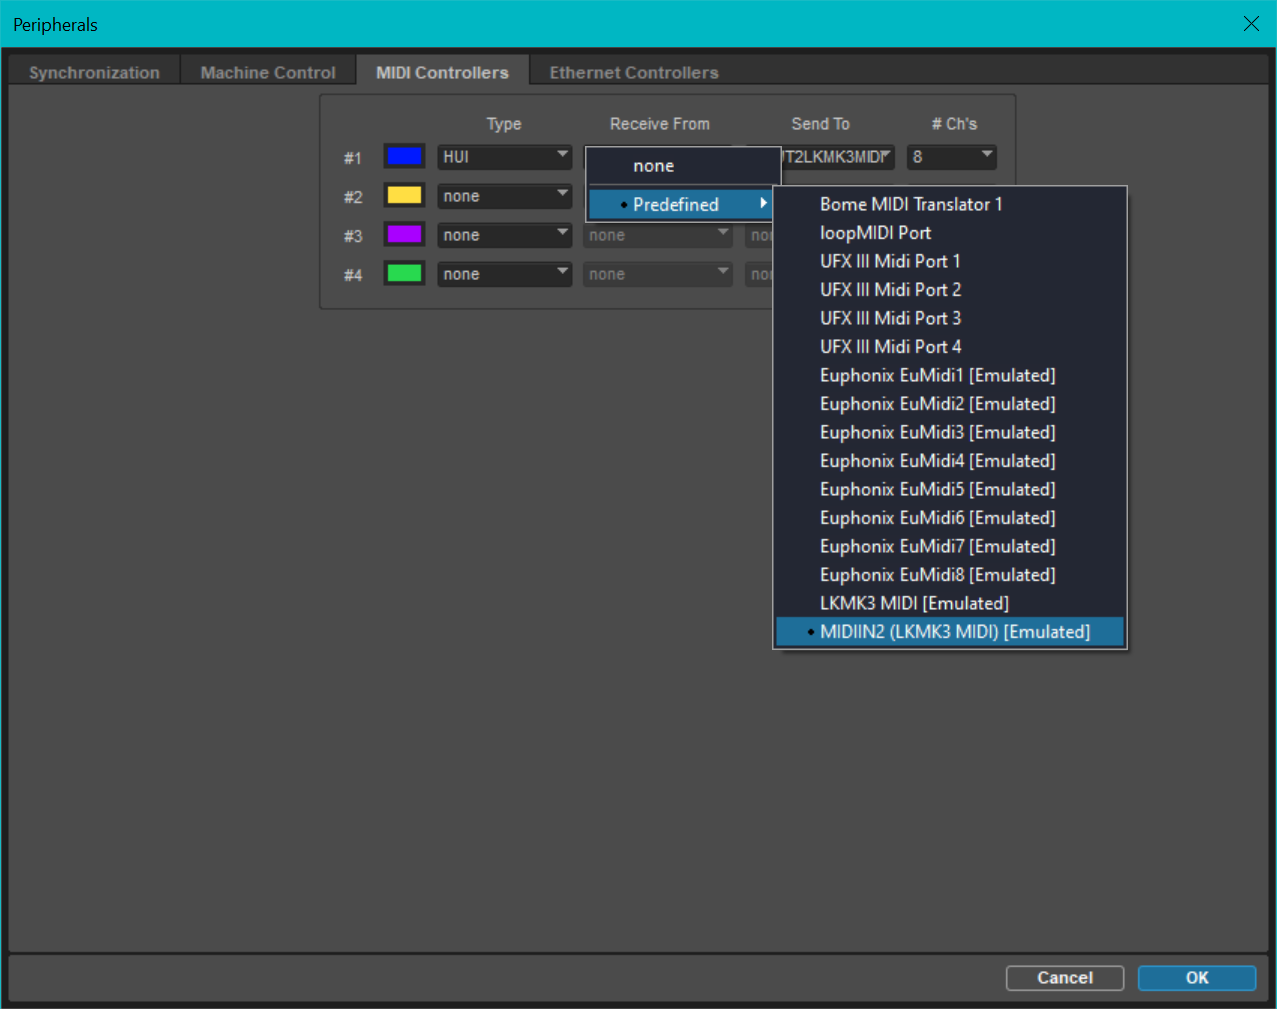
In the following video, the narrator’s strong accent is distracting, but the information is good:
Is it possible to assign the Launchkey MK3 49 Master fader to the Pro Tools Master fader?
EuCon
See the EuCon article for EuCon installation and configuration.
Standard Track Colors
No universal color-coding standard exists.
This is the color scheme that I use. Color shades generally indicate frequency content.
| Groups: Gray. | |
| Lyrics: Mauve. | |
| Synth Bass: Dark blue. | |
| Bass guitar: Medium blue. | |
| Drums: Dark brown. | |
| Percussion: Medium brown. | |
| Click: Light brown. | |
| Electric guitar: Light green. | |
| Classical guitar: Medium green. | |
| Jazz guitar: Dark green. | |
| Keyboard: Aquamarines. | |
| Push 3: Pinks. | |
| Master: Dark red. | |
| Alto sax: Light orange. | |
| Tenor sax: medium orange. | |
| Vocals: Oranges. | |
| Subgroups share the colour of the instrument feeding them. |
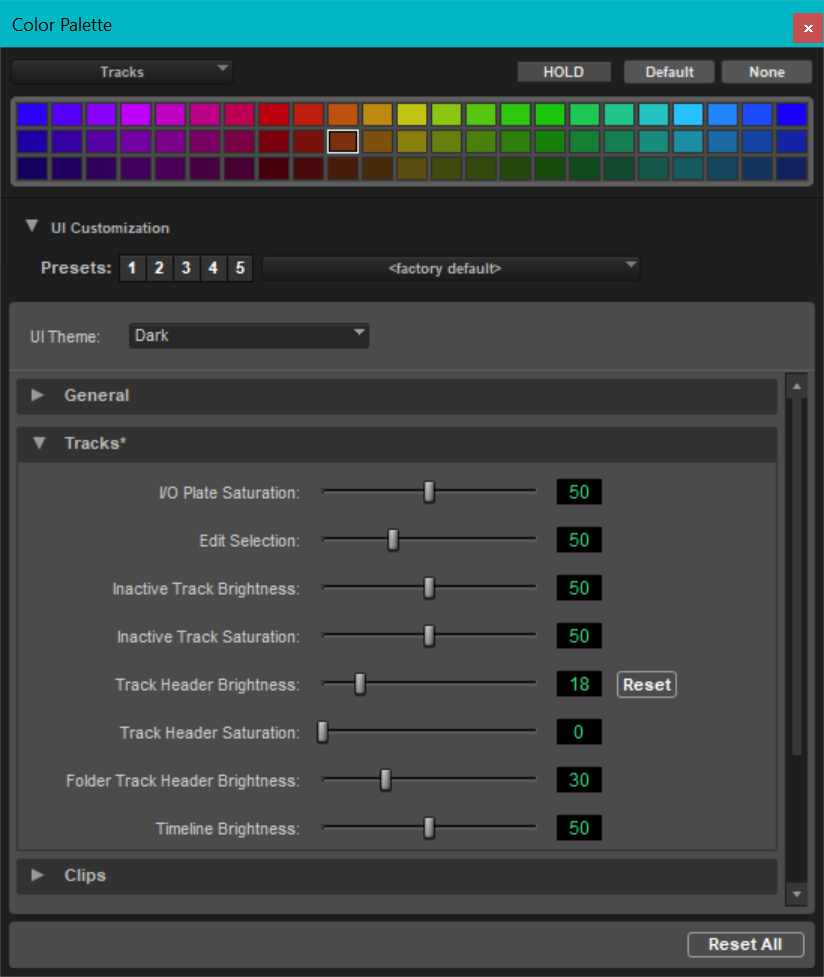
See the section entitled Color Coding for Tracks, Clips, Markers, and Groups in the Pro Tools Reference Guide, p 332 for more information.
WorkFlows
One day, I hope this section will mature to describe a useable workflow, as per the Avid File-Based Workflows Guide.
I have written eighteen articles about Pro Tools. They are somewhat ordered, but largely are meant to be read in any order.
- Pro Tools Overview
- Pro Tools Installation and Preferences
- HUI & MCU
- Pro Tools Keyboards and Hot Keys
- Avid Control, EuControl and EuCon
- Pro Tools Modes and States
- Pro Tools Sessions
- Pro Tools Beats, Bars and Click Tracks
- Pro Tools Operations
- Pro Tools Workspaces and Catalogs
- Pro Tools Sessions
- Pro Tools Editing
- Pro Tools Effects
- Pro Tools Automation
- Pro Tools MIDI
- Pro Tools GrooveCell & Xpand!2
- EZdrummer 3 & Pro Tools
- Pro Tools Issues


