
Published 2024-06-12.
Last modified 2024-09-21.
Time to read: 12 minutes.
Mini-Series
This article can be read standalone; however, is part of a mini-series that discusses how to increase the storage capacity and performance of the Ableton Push 3 Standalone (P3S). If you own a P3S, or are thinking of purchasing one, you might want to first read my review.
The articles in this mini-series are:
This article discusses how to clone a Linux drive containing partitions with ext4 file systems.
If the original drive has the same storage capacity as the clone,
your task is complete, and you do not need to read this article.
Because a Linux file system is being modified, Linux must be used to perform the modification. It does not matter if the Linux OS runs on a physical machine or in a virtualized machine, so long as the file system to be modified is accessible from Linux. I wrote this article using an Ubuntu instance running in VirtualBox, as described in VirtualBox Setup. It does not matter which OS you use to run VirtualBox; Windows, Mac and Linux all work equally well in this regard.
Two Scenarios
This article works through the following scenarios when working with a cloned Linux drive that has more storage capacity than the original drive:
-
Modestly enlarge a partition
containing an
ext4file system. -
Supersize a partition containing a
ext4file system by recreating it such that the resulting file system is much larger than the original.
But first, some important technical details.
Enlarging a File System
After testing to verify that a drive has been successfully cloned to a larger storage device, at least one of the partitions on the newly cloned NVMe drive must be enlarged, or the extra storage capacity of the larger drive will not be used. The file system within the partition also needs to be enlarged. However, there are limits to how much a file system should be enlarged instead of recreating it in the new and larger partition.
Tiny file systems like the default file system in a Push 3 Standalone, which uses 1K blocks, should not be enlarged much, if at all. Instead, tiny file systems should be recreated at the size they will be used. See the next section for an explanation of the technical details of the Linux file system internals behind this statement.
Linux File System Internals
Theodore Tso is
a maintainer for the ext4 file system.
He is also one of the two authors of
e2fsprogs,
a collection of 31 commands for manipulating Linux ext3 and ext4 file systems.
Theodore is one of the best authorities that one might wish for regarding how to work with ext4 file systems.
ext4 journal to reduce file system overhead.
But both of these changes have significant performance impacts—which might not matter
if the file system is meant for a small, slow USB thumb drive, but if you are trying to use
this for a higher-performance system, you'll be sorry.
We also don't enable 64-bit block numbers, since this increases metadata overhead. But like the 1K block size, this limits the maximum size that is supported by the base file system, and it is not at all simple to change the fundamental aspects of the file system so that the file system is scalable and performant. So this idea of "drop a small file system on a device" and then blowing it up to a huge size is a Really, REALLY, REALLY bad idea.
There are some ways that this can be mitigated (you can give options to
mke2fs to use a
4k block size, enable 64k blocksize, and force a larger journal size),
but if the file system has some files placed in the small file system,
the block placement of the small file system will not be optimal after the file system is
blown up to a large size.
Theodore also explains why a tiny file system like the one shipped with the Push 3 Standalone should not be resized past 1 TB:
Group 0: (Blocks 1-8192) csum 0x0e73 Primary superblock at 1, Group descriptors at 2-8193
and so when the backup superblock is written, it trashes the block group descriptors:
Group 1: (Blocks 8193-16384) csum 0x98cc [INODE_UNINIT] Backup superblock at 8193, Group descriptors at 8194-16385
With the above in mind, let’s work through resizing the file system on a partition. We will consider both of the scenarios introduced at the beginning of this article.
Installing Gparted
The Linux gparted GUI program can change the size of a drive partition,
and will attempt to enlarge or shrink the file system as required.
I was able to run gparted on a WSL instance;
however, I did not know how to map USB drives to the WSL VM,
so gparted could work its magic.
Maybe one day I will fight through the issues involved,
but there is no reason for me to work that hard for no benefit.
Instead, I installed Ubuntu Desktop 24.04 in a new virtual machine.
Please see the article I wrote on VirtualBox for details.
Once Ubuntu was running in a VM,
I started a terminal session and installed gparted on the new Ubuntu VM with this incantation:
$ yes | sudo apt install gparted
Gparted Help
The help message for gparted is:
$ man gparted
GPARTED(8)                  GParted Manual                  GPARTED(8)

NAME
        gparted  -  GNOME Partition Editor for manipulating disk parti‐
        tions.

SYNOPSIS
        gparted [device]...

DESCRIPTION
        The gparted application is the GNOME partition editor for  cre‐
        ating, reorganizing, and deleting disk partitions.

        A  disk  device  can be subdivided into one or more partitions.
        The gparted application enables you to change the partition or‐
        ganization on a disk device while preserving  the  contents  of
        the partition.

        With gparted you can accomplish the following tasks:
        - Create a partition table on a disk device.
        - Enable and disable partition flags such as boot and hidden.
        -  Perform  actions with partitions such as create, delete, re‐
        size, move, check, label, copy, and paste.

        More documentation can be found in the application help manual,
        and online at:
        https://gparted.org

EXAMPLES
        You can run gparted from a command line and specify one or more
        disk devices.

        For example, to start gparted with  the  devices  /dev/sda  and
        /dev/sdc you would use the following command:

        gparted /dev/sda /dev/sdc

NOTES
        Editing partitions has the potential to cause LOSS of DATA.

        The  gparted application is designed to enable you to edit par‐
        titions while reducing the risk of data loss.  The  application
        is  carefully  tested  and is used by the GParted project team.
        However, loss of data might occur due to software  bugs,  hard‐
        ware problems, or power failure.

        You can help to reduce the risk of data loss by not mounting or
        unmounting  partitions outside of the gparted application while
        gparted is running.

        You are advised to BACKUP your DATA before  using  the  gparted
        application.

REPORTING BUGS
        Report bugs at:
        https://gparted.org/bugs.php

AUTHOR
        Manual page written by Curtis Gedak <gedakc@users.sf.net>

SEE ALSO
        parted(8), fdisk(8), mkfs(8), ntfsprogs(8)

gparted                     Jan 16th, 2011                  GPARTED(8)
To expand on what the gparted help information says,
gparted does not just resize partitions,
it also runs e2fsk before doing the resize to verify that the partition was successfully cloned,
then if that succeeds, it tries to run resize2fs to resize the file system in the partition
and thereby complete the job.
This means that if one of the steps in the above sequence fails, the remaining steps do not get executed. So the partition might resize, and the file system could successfully verify its integrity, but the file system resize could fail. If you clone a 256 GB NVMe drive to a 2 TB NVMe drive or larger, then you are likely to encouter this problem. The Recreating a File System section later in this article demonstrates the solution to that problem.
Practicalities
Gparted has no problem enlarging a 256 GB partition with a 1K block size to 500 GB.
However, resizing the partition/file system to a much larger partition, for example, 3 TB,
will fail.
However, as Theodore Tso has already informed us, it would be unwise to expand a tiny file system at all, and also unwise to supersize a medium-sized file system to a much larger file system.
When enlarging a file system is not possible or advisable, the file system must be recreated and then the contents of the old file system must be copied file-by-file to the new file system.
Running Gparted
In Clonezilla,
I showed how the 256 GB NVMe from an Ableton Push 3 Standalone could be cloned to a 4 TB NVMe.
After cloning, the data partition should be enlarged to use all available space.
This is a job for gparted!
If the data partition is not enlarged,
then the extra space on the drive would never be used.
Running gparted showed the VM drive used by Ubuntu as /dev/sda,
and the 4 TB NVMe drive as /dev/sdb:
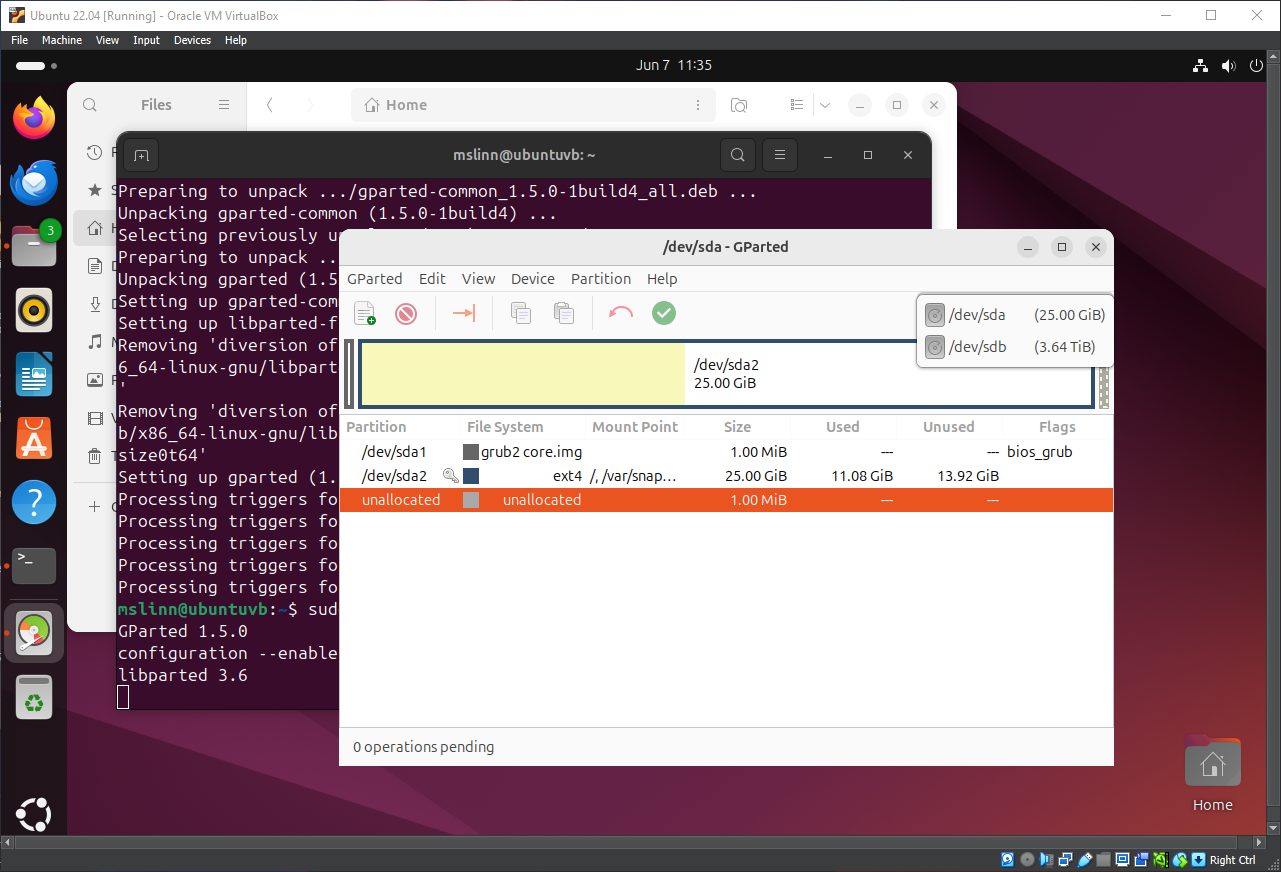
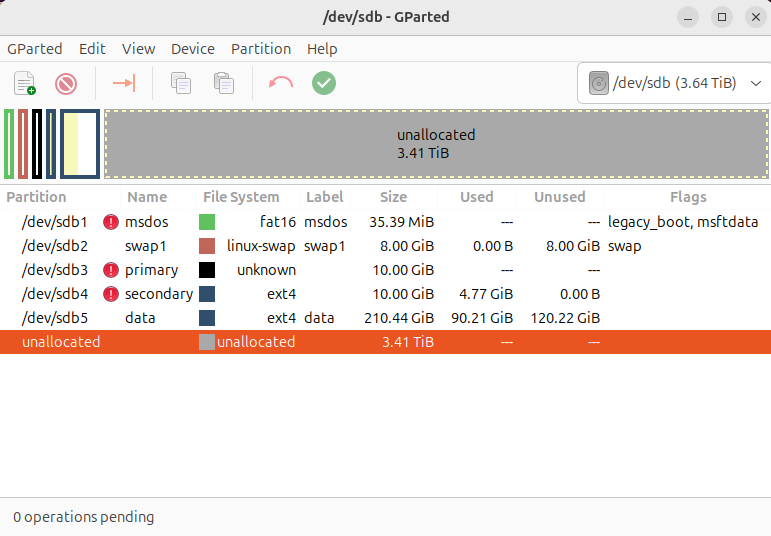
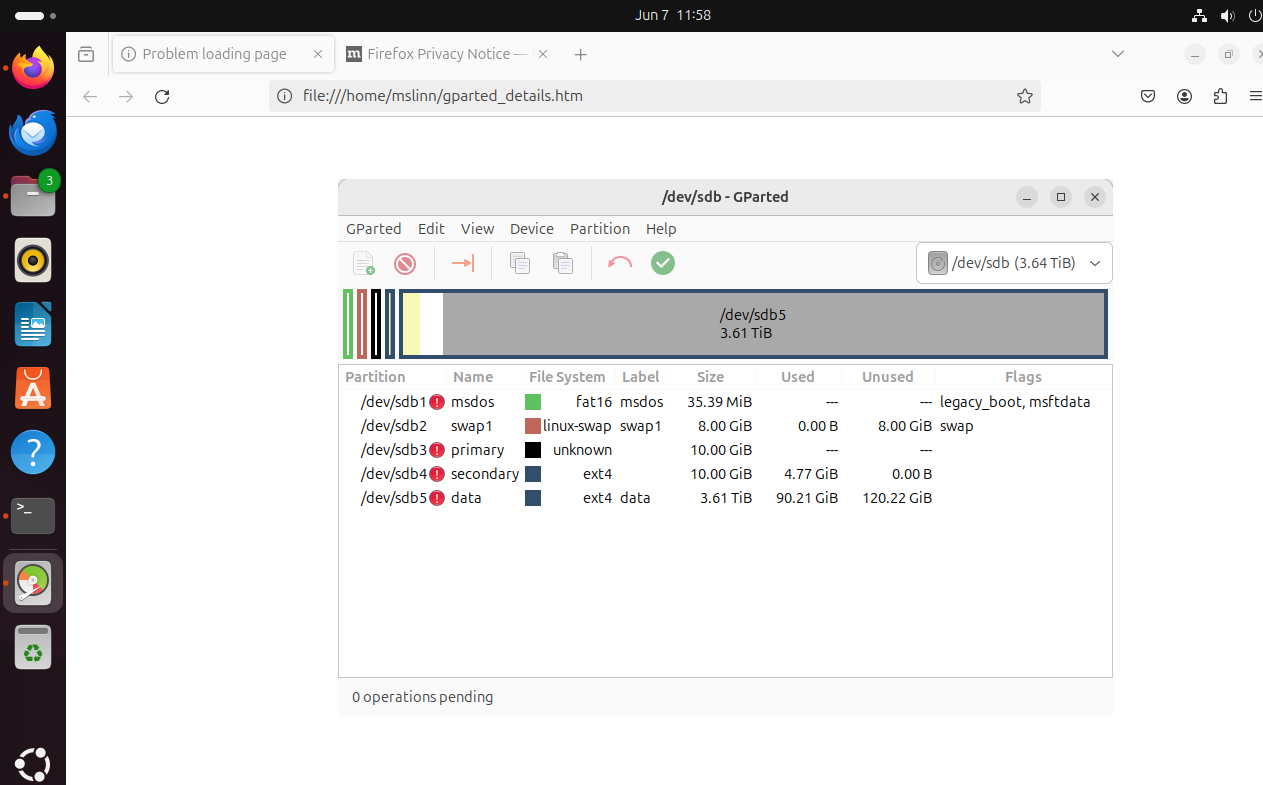
Selecting /dev/sdb showed 5 partitions:
-
The
msdospartition has two flags:legacy_bootandmsftdata. This partition’s file system is FAT16. UEFI boot partitions (Windows calls these EFI system partitions) are always formatted withFAT16orFAT32file systems. There should be no reason to ever modify this partition. -
The
swap1partition has one flag:swap. This swap partition is equal to the amount of RAM in the P3S. There should no reason to ever modify this partition. - I do not know what the
primarypartition is for or why its file system type is unknown. -
The
secondarypartition contains the Linux operating system for the P3S. This partition is 47.7% full; most users will probably not need to modify it. -
The
datapartition is where all user data is stored. This partition should be expanded to utilize all available space. - 3.41 TB of unused space follows. If you clone a P3S NVMe drive to an NVMe with different capacity, say 1 TB, the amount of unused space will differ.
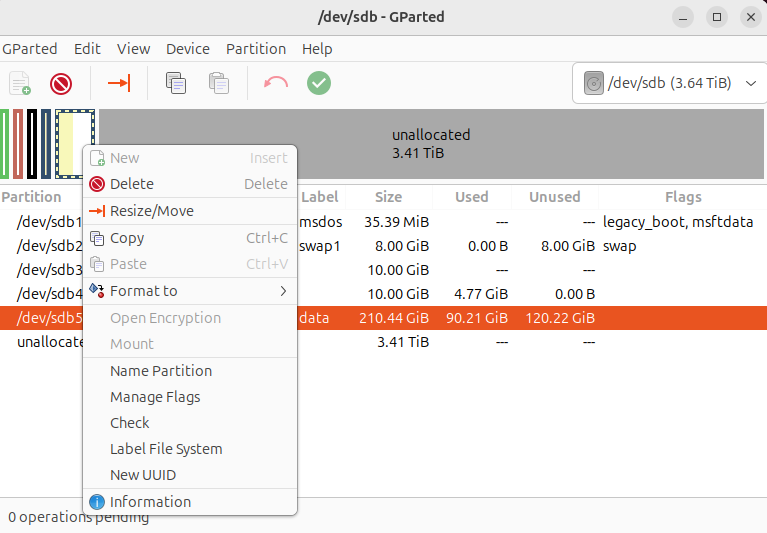
Right-clicking on the data partition displayed the Resize/Move menu item, which I selected:
I dragged the right-most handle to the far right.
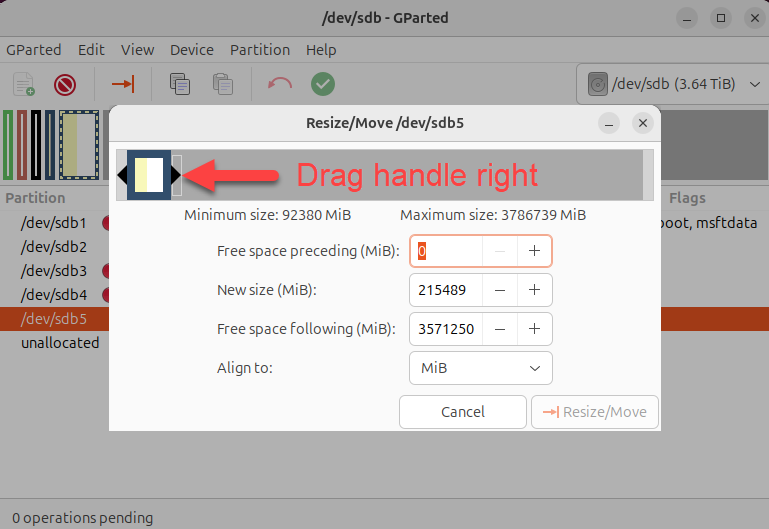
The data partition was now set to include all available free space on the drive:
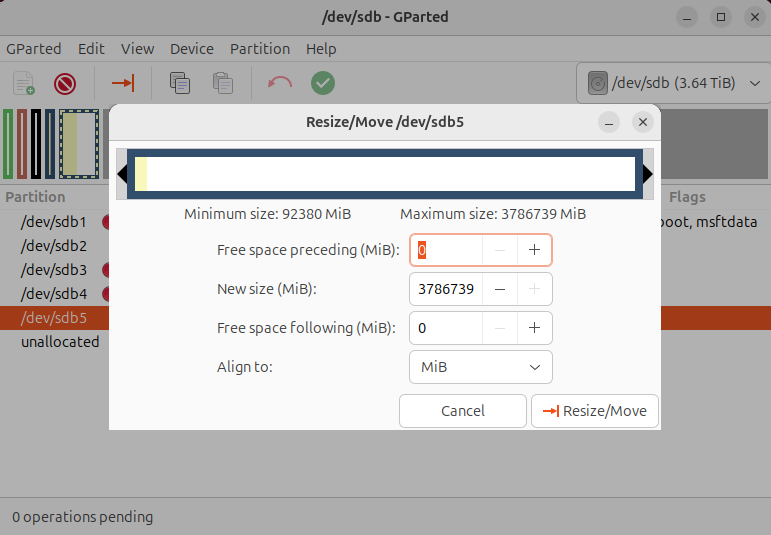
I pressed the Resize/Move button, then I pressed the green checkbox icon to actually resize the data partition.
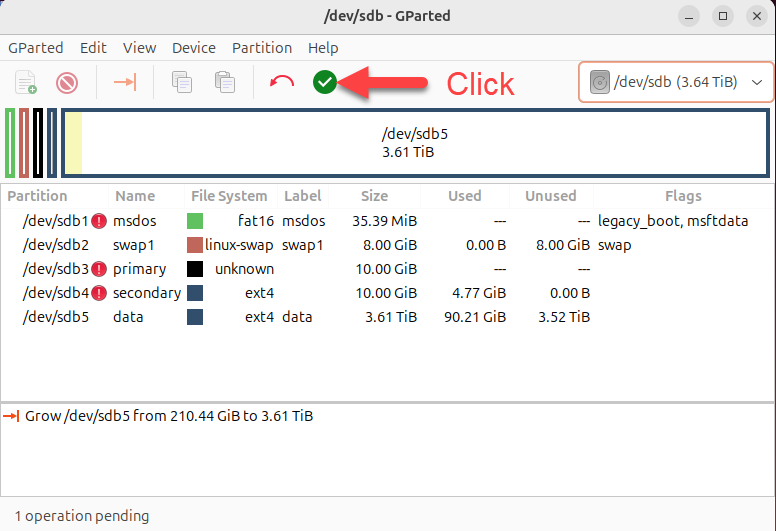
Finally, I pressed the Apply button:
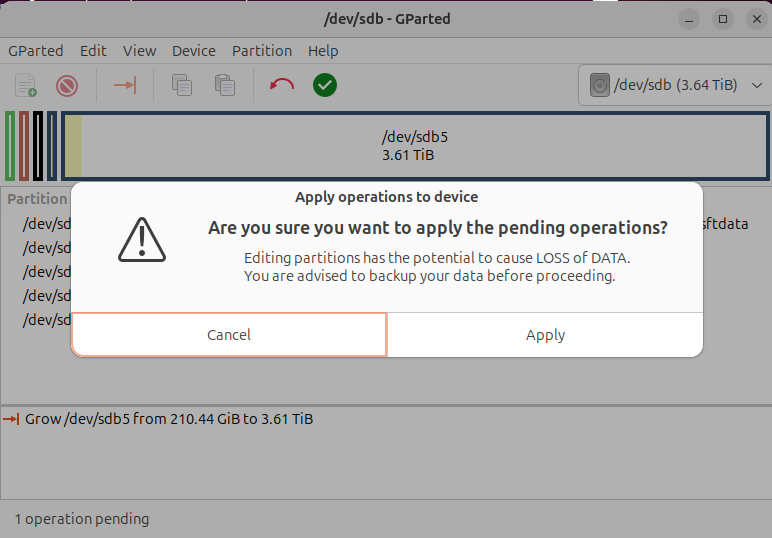
The resize operation first verified the integrity of the contents of the data partition,
which took about 5 minutes.
Then it aborted with the following error before resizing the file system:
resize2fs: New size results in too many block group descriptors.
The data partition had been resized, but its file system had not.
Gparted shows the unused portion of /dev/sdb5 in gray:
Not to worry, the partition is fine. The error message tells us that we must recreate the file system inside the partition, and that will necessitate copying all the files and directories into the file system once it has been recreated.
Modestly Enlarging the Filesystem
A file system can be resized to utilize all the space in the newly expanded partition, subject to the limitations that have already been discussed.
This section shows how I enlarged a partition and its file system after cloning a 256 GB NVMe drive to a 500 GB NVMe drive. As previously mentioned, I suggest that you not enlarge tiny file systems, so if you are reading this because you have a P3S and want to clone the 256 GB NVMe drive that it came with to a larger drive, you should skip this section and read the Recreating a File System section.

We can use the standard Linux command resize2fs to resize the filesystem.
As the documentation says, resize2fs can expand the size of an ext4 mounted file system.
Since I discourage people from running with scissors, I suggest you first unmount any drives whose file systems will be resized.
Before running resize2fs it is a good idea to verify the integrity of the partition to be resized.
The e2fsck is the command normally used to do that.
$ man e2fsck E2FSCK(8) System Manager's Manual E2FSCK(8)
NAME e2fsck - check a Linux ext2/ext3/ext4 file system
SYNOPSIS e2fsck [ -pacnyrdfkvtDFV ] [ -b superblock ] [ -B blocksize ] [ -l|-L bad_blocks_file ] [ -C fd ] [ -j external-journal ] [ -E extended_options ] [ -z undo_file ] device
DESCRIPTION e2fsck is used to check the ext2/ext3/ext4 family of file sys‐ tems. For ext3 and ext4 file systems that use a journal, if the system has been shut down uncleanly without any errors, normally, after replaying the committed transactions in the journal, the file system should be marked as clean. Hence, for file systems that use journaling, e2fsck will normally re‐ play the journal and exit, unless its superblock indicates that further checking is required.
device is a block device (e.g., /dev/sdc1) or file containing the file system.
Note that in general it is not safe to run e2fsck on mounted file systems. The only exception is if the -n option is speci‐ fied, and -c, -l, or -L options are not specified. However, even if it is safe to do so, the results printed by e2fsck are not valid if the file system is mounted. If e2fsck asks whether or not you should check a file system which is mounted, the only correct answer is ``no''. Only experts who really know what they are doing should consider answering this ques‐ tion in any other way.
If e2fsck is run in interactive mode (meaning that none of -y, -n, or -p are specified), the program will ask the user to fix each problem found in the file system. A response of 'y' will fix the error; 'n' will leave the error unfixed; and 'a' will fix the problem and all subsequent problems; pressing Enter will proceed with the default response, which is printed before the question mark. Pressing Control-C terminates e2fsck imme‐ diately.
OPTIONS -a This option does the same thing as the -p option. It is provided for backwards compatibility only; it is sug‐ gested that people use -p option whenever possible.
-b superblock Instead of using the normal superblock, use an alterna‐ tive superblock specified by superblock. This option is normally used when the primary superblock has been cor‐ rupted. The location of backup superblocks is dependent on the file system's blocksize, the number of blocks per group, and features such as sparse_super.
Additional backup superblocks can be determined by using the mke2fs program using the -n option to print out where the superblocks exist, supposing mke2fs is sup‐ plied with arguments that are consistent with the file system's layout (e.g. blocksize, blocks per group, sparse_super, etc.).
If an alternative superblock is specified and the file system is not opened read-only, e2fsck will make sure that the primary superblock is updated appropriately upon completion of the file system check.
-B blocksize Normally, e2fsck will search for the superblock at vari‐ ous different block sizes in an attempt to find the ap‐ propriate block size. This search can be fooled in some cases. This option forces e2fsck to only try locating the superblock at a particular blocksize. If the su‐ perblock is not found, e2fsck will terminate with a fa‐ tal error.
-c This option causes e2fsck to use badblocks(8) program to do a read-only scan of the device in order to find any bad blocks. If any bad blocks are found, they are added to the bad block inode to prevent them from being allo‐ cated to a file or directory. If this option is speci‐ fied twice, then the bad block scan will be done using a non-destructive read-write test.
-C fd This option causes e2fsck to write completion informa‐ tion to the specified file descriptor so that the progress of the file system check can be monitored. This option is typically used by programs which are run‐ ning e2fsck. If the file descriptor number is negative, then absolute value of the file descriptor will be used, and the progress information will be suppressed ini‐ tially. It can later be enabled by sending the e2fsck process a SIGUSR1 signal. If the file descriptor speci‐ fied is 0, e2fsck will print a completion bar as it goes about its business. This requires that e2fsck is run‐ ning on a video console or terminal.
-d Print debugging output (useless unless you are debugging e2fsck).
-D Optimize directories in file system. This option causes e2fsck to try to optimize all directories, either by re- indexing them if the file system supports directory in‐ dexing, or by sorting and compressing directories for smaller directories, or for file systems using tradi‐ tional linear directories.
Even without the -D option, e2fsck may sometimes opti‐ mize a few directories --- for example, if directory in‐ dexing is enabled and a directory is not indexed and would benefit from being indexed, or if the index struc‐ tures are corrupted and need to be rebuilt. The -D op‐ tion forces all directories in the file system to be op‐ timized. This can sometimes make them a little smaller and slightly faster to search, but in practice, you should rarely need to use this option.
The -D option will detect directory entries with dupli‐ cate names in a single directory, which e2fsck normally does not enforce for performance reasons.
-E extended_options Set e2fsck extended options. Extended options are comma separated, and may take an argument using the equals ('=') sign. The following options are supported:
ea_ver=extended_attribute_version Set the version of the extended attribute blocks which e2fsck will require while checking the file system. The version num‐ ber may be 1 or 2. The default extended at‐ tribute version format is 2.
journal_only Only replay the journal if required, but do not perform any further checks or repairs.
fragcheck During pass 1, print a detailed report of any discontiguous blocks for files in the file system.
discard Attempt to discard free blocks and unused inode blocks after the full file system check (discarding blocks is useful on solid state devices and sparse / thin-provisioned storage). Note that discard is done in pass 5 AFTER the file system has been fully checked and only if it does not contain rec‐ ognizable errors. However there might be cases where e2fsck does not fully recognize a problem and hence in this case this option may prevent you from further manual data re‐ covery.
nodiscard Do not attempt to discard free blocks and unused inode blocks. This option is exactly the opposite of discard option. This is set as default.
no_optimize_extents Do not offer to optimize the extent tree by eliminating unnecessary width or depth. This can also be enabled in the options sec‐ tion of /etc/e2fsck.conf.
optimize_extents Offer to optimize the extent tree by elimi‐ nating unnecessary width or depth. This is the default unless otherwise specified in /etc/e2fsck.conf.
inode_count_fullmap Trade off using memory for speed when check‐ ing a file system with a large number of hard-linked files. The amount of memory re‐ quired is proportional to the number of in‐ odes in the file system. For large file systems, this can be gigabytes of memory. (For example, a 40TB file system with 2.8 billion inodes will consume an additional 5.7 GB memory if this optimization is en‐ abled.) This optimization can also be en‐ abled in the options section of /etc/e2fsck.conf.
no_inode_count_fullmap Disable the inode_count_fullmap optimiza‐ tion. This is the default unless otherwise specified in /etc/e2fsck.conf.
readahead_kb Use this many KiB of memory to pre-fetch metadata in the hopes of reducing e2fsck runtime. By default, this is set to the size of two block groups' inode tables (typ‐ ically 4MiB on a regular ext4 file system); if this amount is more than 1/50th of total physical memory, readahead is disabled. Set this to zero to disable readahead entirely.
bmap2extent Convert block-mapped files to extent-mapped files.
fixes_only Only fix damaged metadata; do not optimize htree directories or compress extent trees. This option is incompatible with the -D and -E bmap2extent options.
check_encoding Force verification of encoded filenames in case-insensitive directories. This is the default mode if the file system has the strict flag enabled.
unshare_blocks If the file system has shared blocks, with the shared blocks read-only feature enabled, then this will unshare all shared blocks and unset the read-only feature bit. If there is not enough free space then the operation will fail. If the file system does not have the read-only feature bit, but has shared blocks anyway, then this option will have no effect. Note when using this option, if there is no free space to clone blocks, there is no prompt to delete files and in‐ stead the operation will fail.
Note that unshare_blocks implies the "-f" option to ensure that all passes are run. Additionally, if "-n" is also specified, e2fsck will simulate trying to allocate enough space to deduplicate. If this fails, the exit code will be non-zero.
-f Force checking even if the file system seems clean.
-F Flush the file system device's buffer caches before be‐ ginning. Only really useful for doing e2fsck time tri‐ als.
-j external-journal Set the pathname where the external-journal for this file system can be found.
-k When combined with the -c option, any existing bad blocks in the bad blocks list are preserved, and any new bad blocks found by running badblocks(8) will be added to the existing bad blocks list.
-l filename Add the block numbers listed in the file specified by filename to the list of bad blocks. The format of this file is the same as the one generated by the bad‐ blocks(8) program. Note that the block numbers are based on the blocksize of the file system. Hence, bad‐ blocks(8) must be given the blocksize of the file system in order to obtain correct results. As a result, it is much simpler and safer to use the -c option to e2fsck, since it will assure that the correct parameters are passed to the badblocks program.
-L filename Set the bad blocks list to be the list of blocks speci‐ fied by filename. (This option is the same as the -l option, except the bad blocks list is cleared before the blocks listed in the file are added to the bad blocks list.)
-n Open the file system read-only, and assume an answer of `no' to all questions. Allows e2fsck to be used non-in‐ teractively. This option may not be specified at the same time as the -p or -y options.
-p Automatically repair ("preen") the file system. This option will cause e2fsck to automatically fix any file system problems that can be safely fixed without human intervention. If e2fsck discovers a problem which may require the system administrator to take additional cor‐ rective action, e2fsck will print a description of the problem and then exit with the value 4 logically or'ed into the exit code. (See the EXIT CODE section.) This option is normally used by the system's boot scripts. It may not be specified at the same time as the -n or -y options.
-r This option does nothing at all; it is provided only for backwards compatibility.
-t Print timing statistics for e2fsck. If this option is used twice, additional timing statistics are printed on a pass by pass basis.
-v Verbose mode.
-V Print version information and exit.
-y Assume an answer of `yes' to all questions; allows e2fsck to be used non-interactively. This option may not be specified at the same time as the -n or -p op‐ tions.
-z undo_file Before overwriting a file system block, write the old contents of the block to an undo file. This undo file can be used with e2undo(8) to restore the old contents of the file system should something go wrong. If the empty string is passed as the undo_file argument, the undo file will be written to a file named e2fsck-de‐ vice.e2undo in the directory specified via the E2FSPROGS_UNDO_DIR environment variable.
WARNING: The undo file cannot be used to recover from a power or system crash.
EXIT CODE The exit code returned by e2fsck is the sum of the following conditions: 0 - No errors 1 - File system errors corrected 2 - File system errors corrected, system should be rebooted 4 - File system errors left uncorrected 8 - Operational error 16 - Usage or syntax error 32 - E2fsck canceled by user request 128 - Shared library error
SIGNALS The following signals have the following effect when sent to e2fsck.
SIGUSR1 This signal causes e2fsck to start displaying a comple‐ tion bar or emitting progress information. (See discus‐ sion of the -C option.)
SIGUSR2 This signal causes e2fsck to stop displaying a comple‐ tion bar or emitting progress information.
REPORTING BUGS Almost any piece of software will have bugs. If you manage to find a file system which causes e2fsck to crash, or which e2fsck is unable to repair, please report it to the author.
Please include as much information as possible in your bug re‐ port. Ideally, include a complete transcript of the e2fsck run, so I can see exactly what error messages are displayed. (Make sure the messages printed by e2fsck are in English; if your system has been configured so that e2fsck's messages have been translated into another language, please set the LC_ALL environment variable to C so that the transcript of e2fsck's output will be useful to me.) If you have a writable file system where the transcript can be stored, the script(1) program is a handy way to save the output of e2fsck to a file.
It is also useful to send the output of dumpe2fs(8). If a spe‐ cific inode or inodes seems to be giving e2fsck trouble, try running the debugfs(8) command and send the output of the stat(1u) command run on the relevant inode(s). If the inode is a directory, the debugfs dump command will allow you to extract the contents of the directory inode, which can sent to me after being first run through uuencode(1). The most useful data you can send to help reproduce the bug is a compressed raw image dump of the file system, generated using e2image(8). See the e2image(8) man page for more details.
Always include the full version string which e2fsck displays when it is run, so I know which version you are running.
ENVIRONMENT E2FSCK_CONFIG Determines the location of the configuration file (see e2fsck.conf(5)).
AUTHOR This version of e2fsck was written by Theodore Ts'o <tytso@mit.edu>.
SEE ALSO e2fsck.conf(5), badblocks(8), dumpe2fs(8), debugfs(8), e2im‐ age(8), mke2fs(8), tune2fs(8)
E2fsprogs version 1.47.0 February 2023 E2FSCK(8)
Here is the documentation for resize2fs:
$ man resize2fs
RESIZE2FS(8)            System Manager's Manual           RESIZE2FS(8)

NAME
        resize2fs - ext2/ext3/ext4 file system resizer

SYNOPSIS
        resize2fs  [ -fFpPMbs ] [ -d debug-flags ] [ -S RAID-stride ] [
        -z undo_file ] device [ size ]

DESCRIPTION
        The resize2fs program will resize ext2, ext3, or ext4 file sys‐
        tems.  It can be used to enlarge or shrink  an  unmounted  file
        system  located  on  device.  If the file system is mounted, it
        can be used to expand the size of the mounted file system,  as‐
        suming  the  kernel and the file system supports on-line resiz‐
        ing.  (Modern Linux 2.6 kernels will support on-line resize for
        file systems mounted using ext3 and  ext4;  ext3  file  systems
        will require the use of file systems with the resize_inode fea‐
        ture enabled.)

        The size parameter specifies the requested new size of the file
        system.  If no units are specified, the units of the size para‐
        meter  shall  be  the file system blocksize of the file system.
        Optionally, the size parameter may be suffixed by  one  of  the
        following  units designators: 'K', 'M', 'G', 'T' (either upper-
        case  or  lower-case)  or  's'  for   power-of-two   kilobytes,
        megabytes,  gigabytes,  terabytes  or  512 byte sectors respec‐
        tively. The size of the file system may never  be  larger  than
        the size of the partition.  If size parameter is not specified,
        it will default to the size of the partition.

        The  resize2fs  program  does not manipulate the size of parti‐
        tions.  If you wish to enlarge a file  system,  you  must  make
        sure you can expand the size of the underlying partition first.
        This  can  be done using fdisk(8) by deleting the partition and
        recreating it with a  larger  size  or  using  lvextend(8),  if
        you're  using the logical volume manager lvm(8).  When recreat‐
        ing the partition, make sure you create it with the same start‐
        ing disk cylinder as before!  Otherwise, the  resize  operation
        will certainly not work, and you may lose your entire file sys‐
        tem.   After running fdisk(8), run resize2fs to resize the ext2
        file system to use all the space in the newly enlarged  par‐
        tition.

        If you wish to shrink an ext2 partition, first use resize2fs to
        shrink  the  size of file system.  Then you may use fdisk(8) to
        shrink the size of the partition.  When shrinking the  size  of
        the  partition,  make  sure you do not make it smaller than the
        new size of the ext2 file system!

        The -b and -s options enable and disable the 64bit feature, re‐
        spectively.  The resize2fs program will, of course,  take  care
        of  resizing  the block group descriptors and moving other data
        blocks out of the way, as needed.  It is not possible to resize
        the file system concurrent with changing the 64bit status.

OPTIONS
        -b     Turns on the 64bit feature, resizes the  group  descrip‐
              tors  as  necessary, and moves other metadata out of the
              way.

        -d debug-flags
              Turns on various resize2fs debugging features,  if  they
              have  been compiled into the binary.  debug-flags should
              be computed by adding the numbers of  the  desired  fea‐
              tures from the following list:
                    2    - Debug block relocations
                    4    - Debug inode relocations
                    8    - Debug moving the inode table
                    16   - Print timing information
                    32   - Debug minimum file system size (-M) calcula‐
              tion

        -f     Forces  resize2fs to proceed with the file system resize
              operation, overriding some safety checks which resize2fs
              normally enforces.

        -F     Flush the file system device's buffer caches before  be‐
              ginning.   Only  really  useful for doing resize2fs time
              trials.

        -M     Shrink the file system to minimize its size as  much  as
              possible, given the files stored in the file system.

        -p     Print  out percentage completion bars for each resize2fs
              phase during an offline (non-trivial) resize  operation,
              so  that  the user can keep track of what the program is
              doing.  (For very fast resize  operations,  no  progress
              bars may be displayed.)

        -P     Print an estimate of the number of file system blocks in
              the file system if it is shrunk using resize2fs's -M op‐
              tion and then exit.

        -s     Turns off the 64bit feature and frees blocks that are no
              longer in use.

        -S RAID-stride
              The  resize2fs  program will heuristically determine the
              RAID stride that was specified when the file system  was
              created.   This  option  allows  the  user to explicitly
              specify a RAID stride setting to be  used  by  resize2fs
              instead.

        -z undo_file
              Before  overwriting  a  file system block, write the old
              contents of the block to an undo file.  This  undo  file
              can  be  used with e2undo(8) to restore the old contents
              of the file system should something go  wrong.   If  the
              empty  string  is  passed as the undo_file argument, the
              undo file will be written to a file named  resize2fs-de‐
              vice.e2undo   in   the   directory   specified  via  the
              E2FSPROGS_UNDO_DIR environment variable.

              WARNING: The undo file cannot be used to recover from  a
              power or system crash.

KNOWN BUGS
        The  minimum  size of the file system as estimated by resize2fs
        may be incorrect, especially for file systems with  1k  and  2k
        blocksizes.

AUTHOR
        resize2fs was written by Theodore Ts'o <tytso@mit.edu>.

COPYRIGHT
        Resize2fs  is  Copyright  1998 by Theodore Ts'o and PowerQuest,
        Inc.  All rights reserved.  As of April, 2000 Resize2fs may  be
        redistributed under the terms of the GPL.

SEE ALSO
        fdisk(8), e2fsck(8), mke2fs(8), lvm(8), lvextend(8)

E2fsprogs version 1.47.0     February 2023                RESIZE2FS(8)
Now let’s finally get the job done.
First, we verify and optimize the filesystem on the data partition:
$ sudo e2fsck -Dfp /dev/sdb5
data: 48424/27583488 files (2.1% non-contiguous), 98269049/220661060 blocks
The file system is good, and very little of it is non-continuous, so let’s go ahead and resize it.
$ sudo resize2fs /dev/sdb5
resize2fs 1.47.0 (5-Feb-2023)
The filesystem is already 458988544 (1k) blocks long.  Nothing to do!
You are done, time to clean up.
Recreating a File System
When resizing an existing file system is either impossible or inadvisable,
a new file system should be created using mke2fs,
and the contents of the old file system copied to the new file system.
This is the help information for mke2fs:
MKE2FS(8) System Manager's Manual MKE2FS(8)
NAME mke2fs - create an ext2/ext3/ext4 file system
SYNOPSIS mke2fs [ -c | -l filename ] [ -b block-size ] [ -C cluster-size ] [ -d root-directory ] [ -D ] [ -g blocks-per-group ] [ -G number-of-groups ] [ -i bytes-per-inode ] [ -I inode-size ] [ -j ] [ -J journal-options ] [ -N number-of-inodes ] [ -n ] [ -m reserved-blocks-percentage ] [ -o creator-os ] [ -O [^]fea‐ ture[,...] ] [ -q ] [ -r fs-revision-level ] [ -E extended-op‐ tions ] [ -v ] [ -F ] [ -L volume-label ] [ -M last-mounted-di‐ rectory ] [ -S ] [ -t fs-type ] [ -T usage-type ] [ -U UUID ] [ -V ] [ -e errors-behavior ] [ -z undo_file ] device [ fs-size ]
mke2fs -O journal_dev [ -b block-size ] [ -L volume-label ] [ -n ] [ -q ] [ -v ] external-journal [ fs-size ]
DESCRIPTION mke2fs is used to create an ext2, ext3, or ext4 file system, usually in a disk partition (or file) named by device.
The file system size is specified by fs-size. If fs-size does not have a suffix, it is interpreted as power-of-two kilobytes, unless the -b blocksize option is specified, in which case fs- size is interpreted as the number of blocksize blocks. If the fs-size is suffixed by 'k', 'm', 'g', 't' (either upper-case or lower-case), then it is interpreted in power-of-two kilobytes, megabytes, gigabytes, terabytes, etc. If fs-size is omitted, mke2fs will create the file system based on the device size.
If mke2fs is run as mkfs.XXX (i.e., mkfs.ext2, mkfs.ext3, or mkfs.ext4) the option -t XXX is implied; so mkfs.ext3 will cre‐ ate a file system for use with ext3, mkfs.ext4 will create a file system for use with ext4, and so on.
The defaults of the parameters for the newly created file sys‐ tem, if not overridden by the options listed below, are con‐ trolled by the /etc/mke2fs.conf configuration file. See the mke2fs.conf(5) manual page for more details.
OPTIONS -b block-size Specify the size of blocks in bytes. Valid block-size values are powers of two from 1024 up to 65536 (however note that the kernel is able to mount only file systems with block-size smaller or equal to the system page size - 4k on x86 systems, up to 64k on ppc64 or aarch64 de‐ pending on kernel configuration). If omitted, block- size is heuristically determined by the file system size and the expected usage of the file system (see the -T option). In most common cases, the default block size is 4k. If block-size is preceded by a negative sign ('-'), then mke2fs will use heuristics to determine the appropriate block size, with the constraint that the block size will be at least block-size bytes. This is useful for certain hardware devices which require that the blocksize be a multiple of 2k.
-c Check the device for bad blocks before creating the file system. If this option is specified twice, then a slower read-write test is used instead of a fast read- only test.
-C cluster-size Specify the size of cluster in bytes for file systems using the bigalloc feature. Valid cluster-size values are from 2048 to 256M bytes per cluster. This can only be specified if the bigalloc feature is enabled. (See the ext4 (5) man page for more details about bigalloc.) The default cluster size if bigalloc is enabled is 16 times the block size.
-d root-directory Copy the contents of the given directory into the root directory of the file system.
-D Use direct I/O when writing to the disk. This avoids mke2fs dirtying a lot of buffer cache memory, which may impact other applications running on a busy server. This option will cause mke2fs to run much more slowly, however, so there is a tradeoff to using direct I/O.
-e error-behavior Change the behavior of the kernel code when errors are detected. In all cases, a file system error will cause e2fsck(8) to check the file system on the next boot. error-behavior can be one of the following:
continue Continue normal execution.
remount-ro Remount file system read-only.
panic Cause a kernel panic.
-E extended-options Set extended options for the file system. Extended op‐ tions are comma separated, and may take an argument us‐ ing the equals ('=') sign. The -E option used to be -R in earlier versions of mke2fs. The -R option is still accepted for backwards compatibility, but is deprecated. The following extended options are supported:
encoding=encoding-name Enable the casefold feature in the super block and set encoding-name as the encoding to be used. If encoding-name is not speci‐ fied, the encoding defined in mke2fs.conf(5) is used.
encoding_flags=encoding-flags Define parameters for file name character encoding operations. If a flag is not changed using this parameter, its default value is used. encoding-flags should be a comma-separated lists of flags to be en‐ abled. To disable a flag, add it to the list with the prefix "no".
The only flag that can be set right now is strict which means that invalid strings should be rejected by the file system. In the default configuration, the strict flag is disabled.
mmp_update_interval=interval Adjust the initial MMP update interval to interval seconds. Specifying an interval of 0 means to use the default interval. The specified interval must be less than 300 seconds. Requires that the mmp feature be enabled.
stride=stride-size Configure the file system for a RAID array with stride-size file system blocks. This is the number of blocks read or written to disk before moving to the next disk, which is sometimes referred to as the chunk size. This mostly affects placement of file system metadata like bitmaps at mke2fs time to avoid placing them on a single disk, which can hurt performance. It may also be used by the block allocator.
stripe_width=stripe-width Configure the file system for a RAID array with stripe-width file system blocks per stripe. This is typically stride-size * N, where N is the number of data-bearing disks in the RAID (e.g. for RAID 5 there is one parity disk, so N will be the number of disks in the array minus 1). This allows the block allocator to prevent read-modify- write of the parity in a RAID stripe if pos‐ sible when the data is written.
offset=offset Create the file system at an offset from the beginning of the device or file. This can be useful when creating disk images for vir‐ tual machines.
resize=max-online-resize Reserve enough space so that the block group descriptor table can grow to support a file system that has max-online-resize blocks.
lazy_itable_init[= <0 to disable, 1 to enable>] If enabled and the uninit_bg feature is en‐ abled, the inode table will not be fully initialized by mke2fs. This speeds up file system initialization noticeably, but it re‐ quires the kernel to finish initializing the file system in the background when the file system is first mounted. If the option value is omitted, it defaults to 1 to enable lazy inode table zeroing.
lazy_journal_init[= <0 to disable, 1 to enable>] If enabled, the journal inode will not be fully zeroed out by mke2fs. This speeds up file system initialization noticeably, but carries some small risk if the system crashes before the journal has been over‐ written entirely one time. If the option value is omitted, it defaults to 1 to enable lazy journal inode zeroing.
assume_storage_prezeroed[= <0 to disable, 1 to en‐ able>] If enabled, mke2fs assumes that the storage device has been prezeroed, skips zeroing the journal and inode tables, and annotates the block group flags to signal that the inode table has been zeroed.
no_copy_xattrs Normally mke2fs will copy the extended at‐ tributes of the files in the directory hier‐ archy specified via the (optional) -d op‐ tion. This will disable the copy and leaves the files in the newly created file system without any extended attributes.
num_backup_sb=<0|1|2> If the sparse_super2 file system feature is enabled this option controls whether there will be 0, 1, or 2 backup superblocks cre‐ ated in the file system.
packed_meta_blocks[= <0 to disable, 1 to enable>] Place the allocation bitmaps and the inode table at the beginning of the disk. This option requires that the flex_bg file system feature to be enabled in order for it to have effect, and will also create the jour‐ nal at the beginning of the file system. This option is useful for flash devices that use SLC flash at the beginning of the disk. It also maximizes the range of contiguous data blocks, which can be useful for certain specialized use cases, such as supported Shingled Drives.
root_owner[=uid:gid] Specify the numeric user and group ID of the root directory. If no UID:GID is specified, use the user and group ID of the user run‐ ning mke2fs. In mke2fs 1.42 and earlier the UID and GID of the root directory were set by default to the UID and GID of the user running the mke2fs command. The root_owner= option allows explicitly specifying these values, and avoid side-effects for users that do not expect the contents of the file system to change based on the user running mke2fs.
test_fs Set a flag in the file system superblock in‐ dicating that it may be mounted using exper‐ imental kernel code, such as the ext4dev file system.
orphan_file_size=size Set size of the file for tracking unlinked but still open inodes and inodes with trun‐ cate in progress. Larger file allows for better scalability, reserving a few blocks per cpu is ideal.
discard Attempt to discard blocks at mkfs time (dis‐ carding blocks initially is useful on solid state devices and sparse / thin-provisioned storage). When the device advertises that discard also zeroes data (any subsequent read after the discard and before write re‐ turns zero), then mark all not-yet-zeroed inode tables as zeroed. This significantly speeds up file system initialization. This is set as default.
nodiscard Do not attempt to discard blocks at mkfs time.
quotatype Specify the which quota types (usrquota, grpquota, prjquota) which should be enabled in the created file system. The argument of this extended option should be a colon sepa‐ rated list. This option has effect only if the quota feature is set. The default quota types to be initialized if this option is not specified is both user and group quo‐ tas. If the project feature is enabled that project quotas will be initialized as well.
-F Force mke2fs to create a file system, even if the speci‐ fied device is not a partition on a block special de‐ vice, or if other parameters do not make sense. In or‐ der to force mke2fs to create a file system even if the file system appears to be in use or is mounted (a truly dangerous thing to do), this option must be specified twice.
-g blocks-per-group Specify the number of blocks in a block group. There is generally no reason for the user to ever set this para‐ meter, as the default is optimal for the file system. (For administrators who are creating file systems on RAID arrays, it is preferable to use the stride RAID pa‐ rameter as part of the -E option rather than manipulat‐ ing the number of blocks per group.) This option is generally used by developers who are developing test cases.
If the bigalloc feature is enabled, the -g option will specify the number of clusters in a block group.
-G number-of-groups Specify the number of block groups that will be packed together to create a larger virtual block group (or "flex_bg group") in an ext4 file system. This improves meta-data locality and performance on meta-data heavy workloads. The number of groups must be a power of 2 and may only be specified if the flex_bg file system feature is enabled.
-i bytes-per-inode Specify the bytes/inode ratio. mke2fs creates an inode for every bytes-per-inode bytes of space on the disk. The larger the bytes-per-inode ratio, the fewer inodes will be created. This value generally shouldn't be smaller than the blocksize of the file system, since in that case more inodes would be made than can ever be used. Be warned that it is not possible to change this ratio on a file system after it is created, so be care‐ ful deciding the correct value for this parameter. Note that resizing a file system changes the number of inodes to maintain this ratio.
-I inode-size Specify the size of each inode in bytes. The inode-size value must be a power of 2 larger or equal to 128. The larger the inode-size the more space the inode table will consume, and this reduces the usable space in the file system and can also negatively impact performance. It is not possible to change this value after the file system is created.
File systems with an inode size of 128 bytes do not sup‐ port timestamps beyond January 19, 2038. Inodes which are 256 bytes or larger will support extended time‐ stamps, project id's, and the ability to store some ex‐ tended attributes in the inode table for improved per‐ formance.
The default inode size is controlled by the mke2fs.conf(5) file. In the mke2fs.conf file shipped with e2fsprogs, the default inode size is 256 bytes for most file systems, except for small file systems where the inode size will be 128 bytes.
-j Create the file system with an ext3 journal. If the -J option is not specified, the default journal parameters will be used to create an appropriately sized journal (given the size of the file system) stored within the file system. Note that you must be using a kernel which has ext3 support in order to actually make use of the journal.
-J journal-options Create the ext3 journal using options specified on the command-line. Journal options are comma separated, and may take an argument using the equals ('=') sign. The following journal options are supported:
size=journal-size Create an internal journal (i.e., stored in‐ side the file system) of size journal-size megabytes. The size of the journal must be at least 1024 file system blocks (i.e., 1MB if using 1k blocks, 4MB if using 4k blocks, etc.) and may be no more than 10,240,000 file system blocks or half the total file system size (whichever is smaller)
fast_commit_size=fast-commit-size Create an additional fast commit journal area of size fast-commit-size kilobytes. This option is only valid if fast_commit feature is enabled on the file system. If this option is not specified and if fast_commit feature is turned on, fast com‐ mit area size defaults to journal-size / 64 megabytes. The total size of the journal with fast_commit feature set is journal-size + ( fast-commit-size * 1024) megabytes. The total journal size may be no more than 10,240,000 file system blocks or half the total file system size (whichever is smaller).
location=journal-location Specify the location of the journal. The argument journal-location can either be specified as a block number, or if the num‐ ber has a units suffix (e.g., 'M', 'G', etc.) interpret it as the offset from the beginning of the file system.
device=external-journal Attach the file system to the journal block device located on external-journal. The ex‐ ternal journal must already have been cre‐ ated using the command
mke2fs -O journal_dev external-journal
Note that external-journal must have been created with the same block size as the new file system. In addition, while there is support for attaching multiple file systems to a single external journal, the Linux ker‐ nel and e2fsck(8) do not currently support shared external journals yet.
Instead of specifying a device name di‐ rectly, external-journal can also be speci‐ fied by either LABEL=label or UUID=UUID to locate the external journal by either the volume label or UUID stored in the ext2 su‐ perblock at the start of the journal. Use dumpe2fs(8) to display a journal device's volume label and UUID. See also the -L op‐ tion of tune2fs(8).
Only one of the size or device options can be given for a file system.
-l filename Read the bad blocks list from filename. Note that the block numbers in the bad block list must be generated using the same block size as used by mke2fs. As a re‐ sult, the -c option to mke2fs is a much simpler and less error-prone method of checking a disk for bad blocks be‐ fore formatting it, as mke2fs will automatically pass the correct parameters to the badblocks program.
-L new-volume-label Set the volume label for the file system to new-volume- label. The maximum length of the volume label is 16 bytes.
-m reserved-blocks-percentage Specify the percentage of the file system blocks re‐ served for the super-user. This avoids fragmentation, and allows root-owned daemons, such as syslogd(8), to continue to function correctly after non-privileged processes are prevented from writing to the file system. The default percentage is 5%.
-M last-mounted-directory Set the last mounted directory for the file system. This might be useful for the sake of utilities that key off of the last mounted directory to determine where the file system should be mounted.
-n Causes mke2fs to not actually create a file system, but display what it would do if it were to create a file system. This can be used to determine the location of the backup superblocks for a particular file system, so long as the mke2fs parameters that were passed when the file system was originally created are used again. (With the -n option added, of course!)
-N number-of-inodes Overrides the default calculation of the number of in‐ odes that should be reserved for the file system (which is based on the number of blocks and the bytes-per-inode ratio). This allows the user to specify the number of desired inodes directly.
-o creator-os Overrides the default value of the "creator operating system" field of the file system. The creator field is set by default to the name of the OS the mke2fs exe‐ cutable was compiled for.
-O [^]feature[,...] Create a file system with the given features (file sys‐ tem options), overriding the default file system op‐ tions. The features that are enabled by default are specified by the base_features relation, either in the [defaults] section in the /etc/mke2fs.conf configuration file, or in the [fs_types] subsections for the usage types as specified by the -T option, further modified by the features relation found in the [fs_types] subsec‐ tions for the file system and usage types. See the mke2fs.conf(5) manual page for more details. The file system type-specific configuration setting found in the [fs_types] section will override the global default found in [defaults].
The file system feature set will be further edited using either the feature set specified by this option, or if this option is not given, by the default_features rela‐ tion for the file system type being created, or in the [defaults] section of the configuration file.
The file system feature set is comprised of a list of features, separated by commas, that are to be enabled. To disable a feature, simply prefix the feature name with a caret ('^') character. Features with dependen‐ cies will not be removed successfully. The pseudo-file system feature "none" will clear all file system fea‐ tures.
For more information about the features which can be set, please see the manual page ext4(5).
-q Quiet execution. Useful if mke2fs is run in a script.
-r revision Set the file system revision for the new file system. Note that 1.2 kernels only support revision 0 file sys‐ tems. The default is to create revision 1 file systems.
-S Write superblock and group descriptors only. This is an extreme measure to be taken only in the very unlikely case that all the superblock and backup superblocks are corrupted, and a last-ditch recovery method is de‐ sired by experienced users. It causes mke2fs to reini‐ tialize the superblock and group descriptors, while not touching the inode table and the block and inode bitmaps. The e2fsck program should be run immediately after this option is used, and there is no guarantee that any data will be salvageable. Due to the wide va‐ riety of possible options to mke2fs that affect the on- disk layout, it is critical to specify exactly the same format options, such as blocksize, fs-type, feature flags, and other tunables when using this option, or the file system will be further corrupted. In some cases, such as file systems that have been resized, or have had features enabled after format time, it is impossible to overwrite all the superblocks correctly, and at least some file system corruption will occur. It is best to run this on a full copy of the file system so other op‐ tions can be tried if this doesn't work.
-t fs-type Specify the file system type (i.e., ext2, ext3, ext4, etc.) that is to be created. If this option is not specified, mke2fs will pick a default either via how the command was run (for example, using a name of the form mkfs.ext2, mkfs.ext3, etc.) or via a default as defined by the /etc/mke2fs.conf file. This option controls which file system options are used by default, based on the fstypes configuration stanza in /etc/mke2fs.conf.
If the -O option is used to explicitly add or remove file system options that should be set in the newly cre‐ ated file system, the resulting file system may not be supported by the requested fs-type. (e.g., "mke2fs -t ext3 -O extent /dev/sdXX" will create a file system that is not supported by the ext3 implementation as found in the Linux kernel; and "mke2fs -t ext3 -O ^has_journal /dev/hdXX" will create a file system that does not have a journal and hence will not be supported by the ext3 file system code in the Linux kernel.)
-T usage-type[,...] Specify how the file system is going to be used, so that mke2fs can choose optimal file system parameters for that use. The usage types that are supported are de‐ fined in the configuration file /etc/mke2fs.conf. The user may specify one or more usage types using a comma separated list.
If this option is is not specified, mke2fs will pick a single default usage type based on the size of the file system to be created. If the file system size is less than 3 megabytes, mke2fs will use the file system type floppy. If the file system size is greater than or equal to 3 but less than 512 megabytes, mke2fs(8) will use the file system type small. If the file system size is greater than or equal to 4 terabytes but less than 16 terabytes, mke2fs(8) will use the file system type big. If the file system size is greater than or equal to 16 terabytes, mke2fs(8) will use the file system type huge. Otherwise, mke2fs(8) will use the default file system type default.
-U UUID Set the universally unique identifier (UUID) of the file system to UUID. The format of the UUID is a series of hex digits separated by hyphens, like this: "c1b9d5a2-f162-11cf-9ece-0020afc76f16". The UUID para‐ meter may also be one of the following:
clear clear the file system UUID
random generate a new randomly-generated UUID
time generate a new time-based UUID
-v Verbose execution.
-V Print the version number of mke2fs and exit.
-z undo_file Before overwriting a file system block, write the old contents of the block to an undo file. This undo file can be used with e2undo(8) to restore the old contents of the file system should something go wrong. If the empty string is passed as the undo_file argument, the undo file will be written to a file named mke2fs-de‐ vice.e2undo in the directory specified via the E2FSPROGS_UNDO_DIR environment variable or the undo_dir directive in the configuration file.
WARNING: The undo file cannot be used to recover from a power or system crash.
ENVIRONMENT MKE2FS_SYNC If set to non-zero integer value, its value is used to determine how often sync(2) is called during inode table initialization.
MKE2FS_CONFIG Determines the location of the configuration file (see mke2fs.conf(5)).
MKE2FS_FIRST_META_BG If set to non-zero integer value, its value is used to determine first meta block group. This is mostly for de‐ bugging purposes.
MKE2FS_DEVICE_SECTSIZE If set to non-zero integer value, its value is used to determine logical sector size of the device.
MKE2FS_DEVICE_PHYS_SECTSIZE If set to non-zero integer value, its value is used to determine physical sector size of the device.
MKE2FS_SKIP_CHECK_MSG If set, do not show the message of file system automatic check caused by mount count or check interval.
AUTHOR This version of mke2fs has been written by Theodore Ts'o <tytso@mit.edu>.
AVAILABILITY mke2fs is part of the e2fsprogs package and is available from http://e2fsprogs.sourceforge.net.
SEE ALSO mke2fs.conf(5), badblocks(8), dumpe2fs(8), e2fsck(8), tune2fs(8), ext4(5)
E2fsprogs version 1.47.0 February 2023 MKE2FS(8)
Journaling
The mke2fs command will create an ext4
journal
when creating an ext4 file system.
There is no mke2fs option to specify that an ext4 journal should be created;
instead, an ext4 journal is created by default.
Unfortunately, lots of the ‘advice’ you can find on the interwebs advise people to
issue options for the mke2fs command that create a journal … however,
those commands create ext3 journals, not ext4 journals.
This is undesirable because ext4 journals are better than ext3 journals.
UUID
File systems are best mounted by specifying their UUID. In contrast, specifying the drive to be mounted by their device name is problematic when device assignments shift as hardware is modified.
When you clone a drive, you should also replicate the original UUIDs of the file systems that should be mounted. That allows you to replace the original drive with the clone without modifying the system.
You can obtain the original file system UUID for /dev/sdb5
whether or not it is mounted with the following incantation:
$ lsblk -no UUID /dev/sdb5
64f5365e-edfc-4781-a285-9a053e6937fa
The above shows that the UUID for /dev/sdb5 on my virtualized Ubuntu system was
64f5365e-edfc-4781-a285-9a053e6937fa.
Let’s store the file system UUID in an environment variable called UUID
for convenience in the next step:
$ UUID="$( lsblk -no UUID /dev/sdb5 )"

$ echo $UUID
64f5365e-edfc-4781-a285-9a053e6937fa
Mke2fs Examples
As an example, let’s consider the case of cloning the NVMe drive of an Ableton P3S
to a larger NVMe drive.
The data partition is the only partition that should be enlarged,
and it should be enlarged to utilize all available storage capacity.
Before we throw away the file system on /dev/sdb5 we need to unmount it:
$ sudo umount /dev/sdb5
Let’s use mke2fs to create an optimal file system in the
data partition, mapped as /dev/sdb5.
This file system will automatically be optimized to use all available space,
with the same UUID as the original file system.
The mke2fs command is destructive.
It places a new, formatted filesystem onto the specified partition.
Typing the wrong device name will wipe all existing data in that device!
We can use the -n option to do a
dry run
to see what would happen:
$ sudo mke2fs \
  -n \
  -c \
  -L data \
  -O filetype,extents \
  -t ext4 \
  -U "$UUID" \
  /dev/sdb5
mke2fs 1.47.0 (5-Feb-2023)
/dev/sdb5 contains a ext4 file system labelled 'data'
      last mounted on /media/mslinn/data1 on Thu Jun 20 06:18:21 2024
Proceed anyway? (y,N) y
Creating filesystem with 969404928 4k blocks and 242352128 inodes
Filesystem UUID: 64f5365e-edfc-4781-a285-9a053e6937fa
Superblock backups stored on blocks:
      32768, 98304, 163840, 229376, 294912, 819200, 884736, 1605632, 2654208,
      4096000, 7962624, 11239424, 20480000, 23887872, 71663616, 78675968,
      102400000, 214990848, 512000000, 550731776, 644972544
The options used above are briefly summarized below. For more detail, please read the complete help message above.
| Option | Explanation |
|---|---|
-n
| Dry run (only simulate the action) |
-c
| Check the device for bad blocks before creating the file system. This causes the command to take several days to run, because checking a 2 or 4 TB partition for bad blocks is extremely slow. If this option is specified twice, then an even slower read-write test is used instead of the read-only test. |
-L
| Set the volume label for the file system. The maximum length of the volume label is 16 bytes. |
-O
| Create a file system with the given features (file system options), overriding the default file system options. |
-t
| Specifies the file system type. |
-U
| Specify the universally unique identifier (UUID) of the file system. |
This invocation uses the -c option, so it may take days to complete:
$ sudo mke2fs \
  -c \
  -L data \
  -O filetype,extents \
  -t ext4 \
  -U "$UUID" \
  /dev/sdb5
mke2fs 1.47.0 (5-Feb-2023)
/dev/sdb5 contains a ext4 file system labelled 'data'
      last mounted on /media/mslinn/data1 on Thu Jun 20 06:18:21 2024
Proceed anyway? (y,N) y
Creating filesystem with 969404928 4k blocks and 242352128 inodes
Filesystem UUID: 64f5365e-edfc-4781-a285-9a053e6937fa
Superblock backups stored on blocks:
      32768, 98304, 163840, 229376, 294912, 819200, 884736, 1605632, 2654208,
      4096000, 7962624, 11239424, 20480000, 23887872, 71663616, 78675968,
      102400000, 214990848, 512000000, 550731776, 644972544
Without the -c option, this invocation would only take a few minutes:
$ sudo mke2fs \
  -L data \
  -O filetype,extents \
  -t ext4 -U "$UUID" \
  /dev/sdb5
mke2fs 1.47.0 (5-Feb-2023)
/dev/sdb5 contains a ext4 file system labelled 'data'
last mounted on /media/mslinn/data1 on Thu Jun 20 06:18:21 2024
Proceed anyway? (y,N) y
Creating filesystem with 969404928 4k blocks and 242352128 inodes
Filesystem UUID: 64f5365e-edfc-4781-a285-9a053e6937fa
Superblock backups stored on blocks:
32768, 98304, 163840, 229376, 294912, 819200, 884736, 1605632, 2654208,
4096000, 7962624, 11239424, 20480000, 23887872, 71663616, 78675968,
102400000, 214990848, 512000000, 550731776, 644972544
Now the data partition contains an optimized file system that is completely empty.
We need to copy the files and directories from the data partition of the original drive
to the empty data partition on the clone.
Copying Files and Directories
Partitions need to be mounted before files and directories can be copied to them, or from them. I inserted the original P3S NVMe drive into my second Sabrent NVMe / USB enclosure, and connected the enclosure to the computer. The VirtualBox VM for the Ubuntu instance I was working with already knew to take control of both Sabrent USB devices.
Mounting via Nautilus
Once plugged in, the virtualized Ubuntu instance running in VirtualBox presented me with
all the file systems on both of the NVMe drives in Sabrent enclosures,
including the file systems called data found on each of the NVMe drives.
Clicking on each of the file systems labeled data in the Ubuntu file manager mounted them on
/media/ and /media/.
If you were able to follow this procedure, skip to the findmnt section.
Mounting Manually
If Ubuntu does not display the NVMe ext4 file systems for some reason,
manually create a mount point for the data partitions on each NVMe drive,
and use the mount command.
The following creates mount points at /mnt/b and /mnt/c,
then mounts /dev/sdb5 on /mnt/b,
and mounts /dev/sdc5 on /mnt/c:
$ sudo mkdir /mnt/{b,c}

$ sudo mount /dev/sdb5 /mnt/b

$ sudo mount /dev/sdc5 /mnt/c
For my setup, the data partition on the original drive (now mounted as /dev/sdc5)
contained all the files and directories to be copied,
and the data partition on the clone (still mounted as /dev/sdb5) was empty
because its file system had just been recreated.
Skip to the Cut and Paste section.
Findmnt
If you prefer to use the command line instead of drag and drop,
or if you used drag and drop, but an error occurred after copying some files,
you should use the rsync command to complete the copy.
Before you can use rsync, however,
you need to know the mount points for the file systems in both data partitions.
The findmnt command shows information about mounted file systems.
Here is the man page:
FINDMNT(8)               System Administration              FINDMNT(8)

NAME
      findmnt - find a filesystem

SYNOPSIS
      findmnt [options]

      findmnt [options] device|mountpoint

      findmnt [options] [--source] device [--target path|--mountpoint
      mountpoint]

DESCRIPTION
      findmnt will list all mounted filesystems or search for a
      filesystem. The findmnt command is able to search in
      /etc/fstab, /etc/mtab or /proc/self/mountinfo. If device or
      mountpoint is not given, all filesystems are shown.

      The device may be specified by device name, major:minor
      numbers, filesystem label or UUID, or partition label or UUID.
      Note that findmnt follows mount(8) behavior where a device name
      may be interpreted as a mountpoint (and vice versa) if the
      --target, --mountpoint or --source options are not specified.

      The command-line option --target accepts any file or directory
      and then findmnt displays the filesystem for the given path.

      The command prints all mounted filesystems in the tree-like
      format by default. The default output, is subject to change. So
      whenever possible, you should avoid using default output in
      your scripts. Always explicitly define expected columns by
      using --output columns-list in environments where a stable
      output is required.

      The relationship between block devices and filesystems is not
      always one-to-one. The filesystem may use more block devices.
      This is why findmnt provides  SOURCE and SOURCES (pl.) columns.
      The column SOURCES displays all devices where it is possible to
      find the same filesystem  UUID (or another tag specified in
      fstab when executed with --fstab and --evaluate).

OPTIONS
      -A, --all
            Disable all built-in filters and print all filesystems.

      -a, --ascii
            Use ascii characters for tree formatting.

      -b, --bytes
            Print the sizes in bytes rather than in a human-readable
            format.

            By default, the unit, sizes are expressed in, is byte, and
            unit prefixes are in power of 2^10 (1024). Abbreviations of
            symbols are exhibited truncated in order to reach a better
            readability, by exhibiting alone the first letter of them;
            examples: "1 KiB" and "1 MiB" are respectively exhibited as
            "1 K" and "1 M", then omitting on purpose the mention "iB",
            which is part of these abbreviations.

      -C, --nocanonicalize
            Do not canonicalize paths at all. This option affects the
            comparing of paths and the evaluation of tags (LABEL, UUID,
            etc.).

      -c, --canonicalize
            Canonicalize all printed paths.

      --deleted
            Print filesystems where target (mountpoint) is marked as
            deleted by kernel.

      -D, --df
            Imitate the output of df(1). This option is equivalent to
            -o SOURCE,FSTYPE,SIZE,USED,AVAIL,USE%,TARGET but excludes
            all pseudo filesystems. Use --all to print all filesystems.

      -d, --direction word
            The search direction, either forward or backward.

      -e, --evaluate
            Convert all tags (LABEL, UUID, PARTUUID, or PARTLABEL) to
            the corresponding device names for the SOURCE column. It’s
            an unusual situation, but the same tag may be duplicated
            (used for more devices). For this purpose, there is SOURCES
            (pl.) column. This column displays by multi-line cell all
            devices where the tag is detected by libblkid. This option
            makes sense for fstab only.

      -F, --tab-file path
            Search in an alternative file. If used with --fstab, --mtab
            or --kernel, then it overrides the default paths. If
            specified more than once, then tree-like output is disabled
            (see the --list option).

      -f, --first-only
            Print the first matching filesystem only.

      -i, --invert
            Invert the sense of matching.

      -J, --json
            Use JSON output format.

      -k, --kernel
            Search in /proc/self/mountinfo. The output is in the
            tree-like format. This is the default. The output contains
            only mount options maintained by kernel (see also --mtab).

      -l, --list
            Use the list output format. This output format is
            automatically enabled if the output is restricted by the
            -t, -O, -S or -T option and the option --submounts is not
            used or if more that one source file (the option -F) is
            specified.

      -M, --mountpoint path
            Explicitly define the mountpoint file or directory. See
            also --target.

      -m, --mtab
            Search in /etc/mtab. The output is in the list format by
            default (see --tree). The output may include user space
            mount options.

      -N, --task tid
            Use alternative namespace /proc/<tid>/mountinfo rather than
            the default /proc/self/mountinfo. If the option is
            specified more than once, then tree-like output is disabled
            (see the --list option). See also the unshare(1) command.

      -n, --noheadings
            Do not print a header line.

      -O, --options list
            Limit the set of printed filesystems. More than one option
            may be specified in a comma-separated list. The -t and -O
            options are cumulative in effect. It is different from -t
            in that each option is matched exactly; a leading no at the
            beginning does not have global meaning. The "no" can used
            for individual items in the list. The "no" prefix
            interpretation can be disabled by "+" prefix.

      -o, --output list
            Define output columns. See the --help output to get a list
            of the currently supported columns. The TARGET column
            contains tree formatting if the --list or --raw options are
            not specified.

            The default list of columns may be extended if list is
            specified in the format +list (e.g., findmnt -o
            +PROPAGATION).

      --output-all
            Output almost all available columns. The columns that
            require --poll are not included.

      -P, --pairs
            Produce output in the form of key="value" pairs. All
            potentially unsafe value characters are hex-escaped
            (\x<code>). See also option --shell.

      -p, --poll[=list]
            Monitor changes in the /proc/self/mountinfo file. Supported
            actions are: mount, umount, remount and move. More than one
            action may be specified in a comma-separated list. All
            actions are monitored by default.

            The time for which --poll will block can be restricted with
            the --timeout or --first-only options.

            The standard columns always use the new version of the
            information from the mountinfo file, except the umount
            action which is based on the original information cached by
            findmnt. The poll mode allows using extra columns:

            ACTION
                  mount, umount, move or remount action name; this column
                  is enabled by default

            OLD-TARGET
                  available for umount and move actions

            OLD-OPTIONS
                  available for umount and remount actions

      --pseudo
            Print only pseudo filesystems.

      --shadow
            Print only filesystems over-mounted by another filesystem.

      -R, --submounts
            Print recursively all submounts for the selected
            filesystems. The restrictions defined by options -t, -O,
            -S, -T and --direction are not applied to submounts. All
            submounts are always printed in tree-like order. The option
            enables the tree-like output format by default. This option
            has no effect for --mtab or --fstab.

      -r, --raw
            Use raw output format. All potentially unsafe characters
            are hex-escaped (\x<code>).

      --real
            Print only real filesystems.

      -S, --source spec
            Explicitly define the mount source. Supported
            specifications are device, maj:min, LABEL=label, UUID=uuid,
            PARTLABEL=label and PARTUUID=uuid.

      -s, --fstab
            Search in /etc/fstab. The output is in the list format (see
            --list).

      -T, --target path
            Define the mount target. If path is not a mountpoint file
            or directory, then findmnt checks the path elements in
            reverse order to get the mountpoint (this feature is
            supported only when searching in kernel files and
            unsupported for --fstab). It’s recommended to use the
            option --mountpoint when checks of path elements are
            unwanted and path is a strictly specified mountpoint.

      -t, --types list
            Limit the set of printed filesystems. More than one type
            may be specified in a comma-separated list. The list of
            filesystem types can be prefixed with no to specify the
            filesystem types on which no action should be taken. For
            more details see mount(8).

      --tree
            Enable tree-like output if possible. The options is
            silently ignored for tables where is missing child-parent
            relation (e.g., fstab).

      --shadowed
            Print only filesystems over-mounted by another filesystem.

      -U, --uniq
            Ignore filesystems with duplicate mount targets, thus
            effectively skipping over-mounted mount points.

      -u, --notruncate
            Do not truncate text in columns. The default is to not
            truncate the TARGET, SOURCE, UUID, LABEL, PARTUUID,
            PARTLABEL columns. This option disables text truncation
            also in all other columns.

      -v, --nofsroot
            Do not print a [/dir] in the SOURCE column for bind mounts
            or btrfs subvolumes.

      -w, --timeout milliseconds
            Specify an upper limit on the time for which --poll will
            block, in milliseconds.

      -x, --verify
            Check mount table content. The default is to verify
            /etc/fstab parsability and usability. It’s possible to use
            this option also with --tab-file. It’s possible to specify
            source (device) or target (mountpoint) to filter mount
            table. The option --verbose forces findmnt to print more
            details.

      --verbose
            Force findmnt to print more information (--verify only for
            now).

      --vfs-all
            When used with VFS-OPTIONS column, print all VFS
            (fs-independent) flags. This option is designed for
            auditing purposes to list also default VFS kernel mount
            options which are normally not listed.

      -y, --shell
            The column name will be modified to contain only characters
            allowed for shell variable identifiers. This is usable, for
            example, with --pairs. Note that this feature has been
            automatically enabled for --pairs in version 2.37, but due
            to compatibility issues, now it’s necessary to request this
            behavior by --shell.

      -h, --help
            Display help text and exit.

      -V, --version
            Print version and exit.

EXIT STATUS
      The exit value is 0 if there is something to display, or 1 on
      any error (for example if no filesystem is found based on the
      user’s filter specification, or the device path or mountpoint
      does not exist).

ENVIRONMENT
      LIBMOUNT_FSTAB=<path>
            overrides the default location of the fstab file

      LIBMOUNT_MTAB=<path>
            overrides the default location of the mtab file

      LIBMOUNT_DEBUG=all
            enables libmount debug output

      LIBSMARTCOLS_DEBUG=all
            enables libsmartcols debug output

      LIBSMARTCOLS_DEBUG_PADDING=on
            use visible padding characters.

EXAMPLES
      findmnt --fstab -t nfs
            Prints all NFS filesystems defined in /etc/fstab.

      findmnt --fstab /mnt/foo
            Prints all /etc/fstab filesystems where the mountpoint
            directory is /mnt/foo. It also prints bind mounts where
            /mnt/foo is a source.

      findmnt --fstab --target /mnt/foo
            Prints all /etc/fstab filesystems where the mountpoint
            directory is /mnt/foo.

      findmnt --fstab --evaluate
            Prints all /etc/fstab filesystems and converts LABEL= and
            UUID= tags to the real device names.

      findmnt -n --raw --evaluate --output=target LABEL=/boot
            Prints only the mountpoint where the filesystem with label
            "/boot" is mounted.

      findmnt --poll --mountpoint /mnt/foo
            Monitors mount, unmount, remount and move on /mnt/foo.

      findmnt --poll=umount --first-only --mountpoint /mnt/foo
            Waits for /mnt/foo unmount.

      findmnt --poll=remount -t ext3 -O ro
            Monitors remounts to read-only mode on all ext3
            filesystems.

AUTHORS
      Karel Zak <kzak@redhat.com>

SEE ALSO
      fstab(5), mount(8)

REPORTING BUGS
      For bug reports, use the issue tracker at
      https://github.com/util-linux/util-linux/issues.

AVAILABILITY
      The findmnt command is part of the util-linux package which can
      be downloaded from Linux Kernel Archive
      <https://www.kernel.org/pub/linux/utils/util-linux/>.

util-linux 2.39.3             2023-12-01                    FINDMNT(8)
The following incantation shows the mount points for the data partitions.
$ findmnt -lo source,target | grep data
/dev/sdb5                      /media/mslinn/data
/dev/sdc5                      /media/mslinn/data1
The options used in the above incantation are briefly summarized in the following table.
For more information, please see the complete findmnt help message above.
| Option | Explanation |
|---|---|
-l
| Use the list output format. |
-o
|
Define output columns.
The source and target columns were specified.
|
We now know that for my Ubuntu instance,
the files and directories mounted at /media/mslinn/data1/
need to be copied to /media/mslinn/data/.
Cut and Paste
One way to copy all the files would be to just copy and paste.
This is likely to require superuser privilege to copy some files or directories.
Unfortunately, Ubuntu 20.04 removed the ability for a file manager such as nautilus or thunar
to run with elevated permissions.
Thus, you are likely to find that some or even most files copy fine, but the process will terminate with an error.
If you tried to use cut and paste, then encountered an error, follow the rsync procedure, described next.
You should avoid attempting to use cut and paste to copy all files between two partitions.
I recommend you use rsync instead.
However, if you got lucky and were able to perform the copy without incident,
skip to the All Done section.
Rsync
Rsync can resume a large copy that failed earlier,
without recopying files that were successfully copied.
You can rerun rsync as many times as you like without fear of duplicating information.
Following is the general form of the rsync command that you should use.
Instead of source_directory and destination_directory,
specify the mount points for the two data directories.
Be sure to append a trailing slash to both directories when using rsync.
$ rsync -axHAXS --numeric-ids --info=progress2 \
  source_directory/ destination_directory/
The rsync options used above are:
| Option | Explanation |
|---|---|
-a
| Copy all files, with permissions, etc. |
-x
| Stay on one file system |
-H
| Preserve hard links |
-A
| Preserve ACLs/permissions |
-X
| Preserve extended attributes |
-S
| Handle sparse files |
--numeric-ids
| Transfer numeric group and user IDs, rather than using user and group names and mapping them at both ends |
--info=progress2
| shows statistics based on the whole transfer, rather than individual files |
We can now write the proper incantation to run rsync to copy
from /media/ to /media/.
Note that sudo is used to ensure that all files and directories are copied,
without permissions issues.
$ sudo rsync -axHAXS --numeric-ids --info=progress2 \
  /media/mslinn/data1/ /media/mslinn/data/
The copy took about 80 minutes on my system.
Do not worry if you see a message like rsync: [sender] opendir "lost+found" failed: Permission denied (13).
Lost+found is a special directory that is specific to the drive being copied.
It should not be replicated.
If you would like to use rsync to mirror a source file system to another file system,
and remove files on the target that are not present on the source, use the --delete option:
$ sudo rsync -axHAXS --delete --numeric-ids --info=progress2 \
  /source/ /destination/
All Done
Unmount both data partitions, unplug the Sabrent enclosures,
and remove the NVMe drives.
Store the original NVMe drive somewhere safe, and install the clone into the computer that it belongs to;
in my case, this was the P3S.

I turned on the P3S containing the new 4 TB drive, and used
SSH to connect to it.
The df
command showed me that the data partition of the larger drive was mostly empty.
ableton@push:~$ df --block-size=1M
Filesystem     1M-blocks  Used Available Use% Mounted on
/dev/root           9528  3156      5845  36% /
devtmpfs            3789    69      3721   2% /dev
tmpfs               3793     1      3792   1% /run
tmpfs               3793     1      3793   1% /var/volatile
/dev/nvme0n1p1        36    20        16  56% /boot
/dev/nvme0n1p5   3726187 80362   3456473   3% /data
We succeeded in what we set out to do: resized the partition and its file system.
Mini-Series
This article can be read standalone; however, is part of a mini-series that discusses how to increase the storage capacity and performance of the Ableton Push 3 Standalone (P3S). If you own a P3S, or are thinking of purchasing one, you might want to first read my review.
The articles in this mini-series are:


