Published 2024-06-20.
Last modified 2025-08-24.
Time to read: 15 minutes.
av_studio collection.
This article is part of a mini-series that discusses how to increase the storage capacity and performance of the Ableton Push 3 Standalone (P3S). If you own a P3S, or are thinking of purchasing one, you might want to first read my review.
The articles in this mini-series are:
Motivation
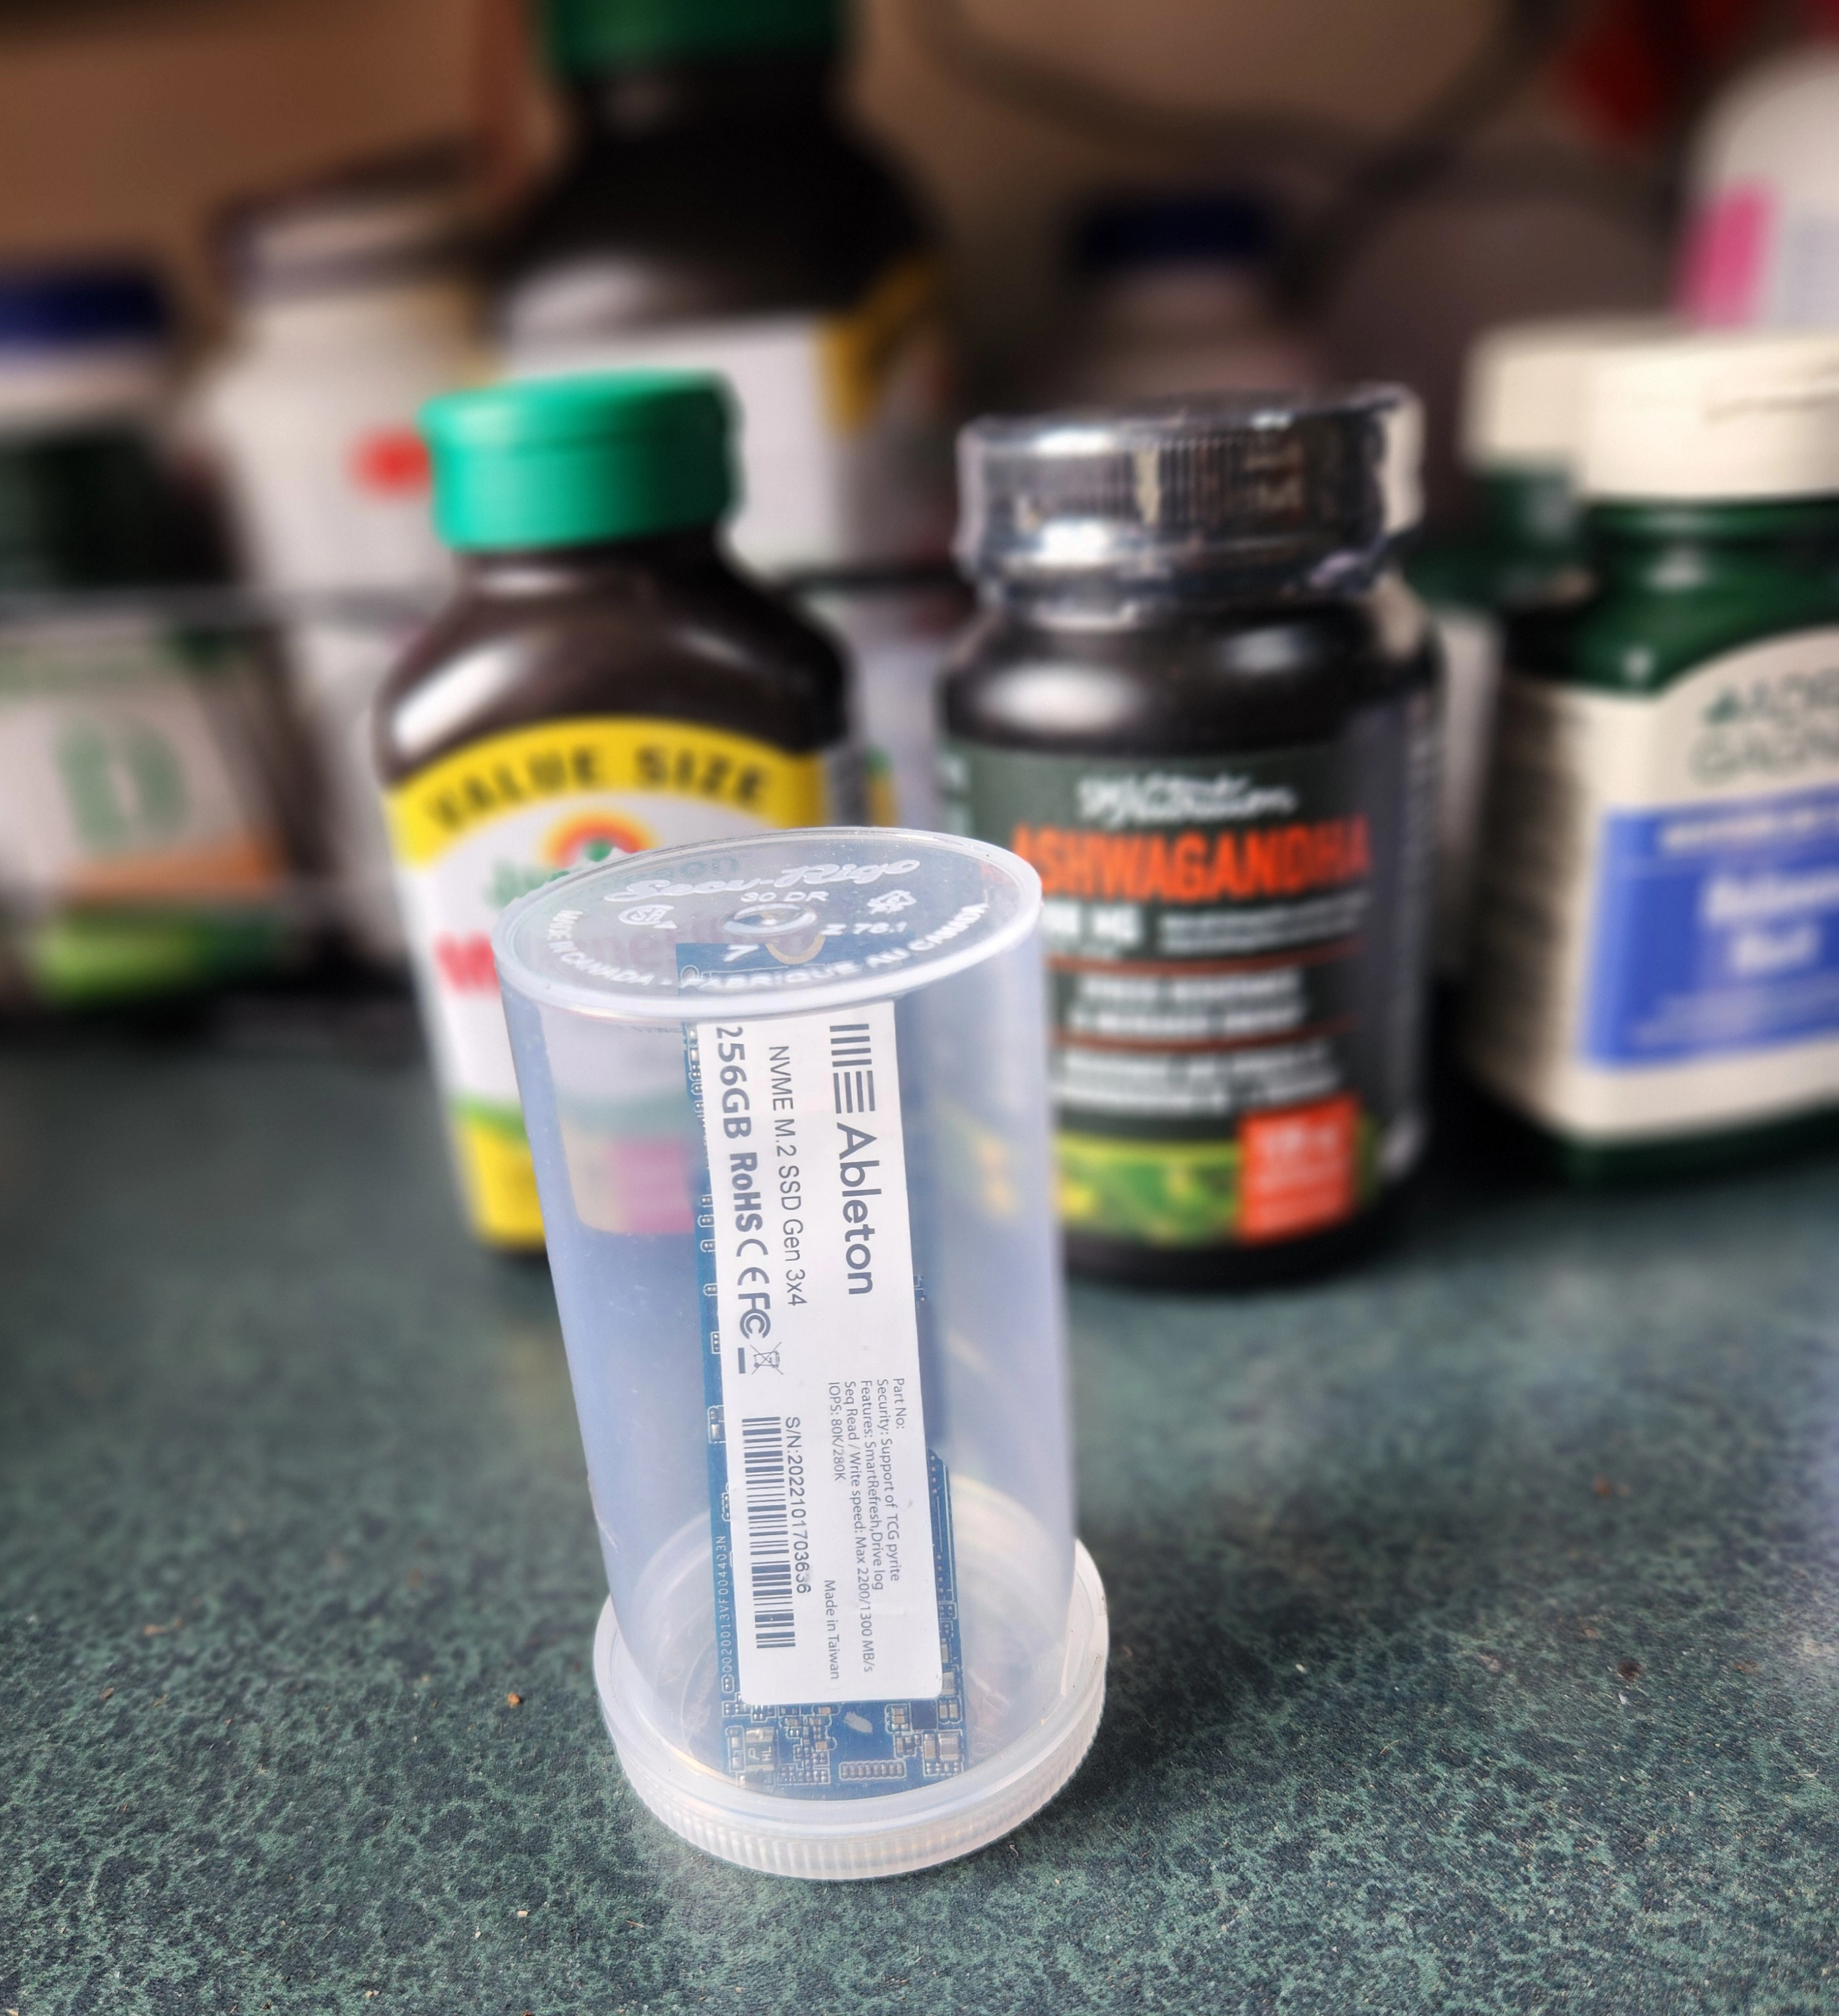
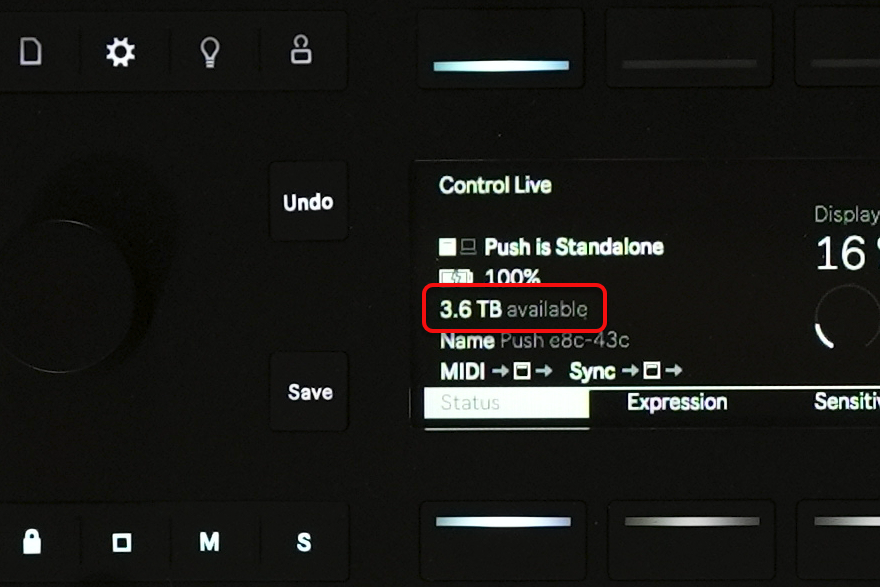
The P3S comes with an internal 256 GB NVMe drive. I found that downloading 3 large Ableton Live packs was enough to fill the drive.
I felt that such a small drive was unacceptable and decided to replace it with a larger NVMe drive. This article describes how I did that and the issues that arose during the process. Although I used a Windows machine to clone the drive, all the software I used is also available for Macintosh and Linux. You should be able to follow along with your desktop computer, regardless of its operating system.
Opening The P3S
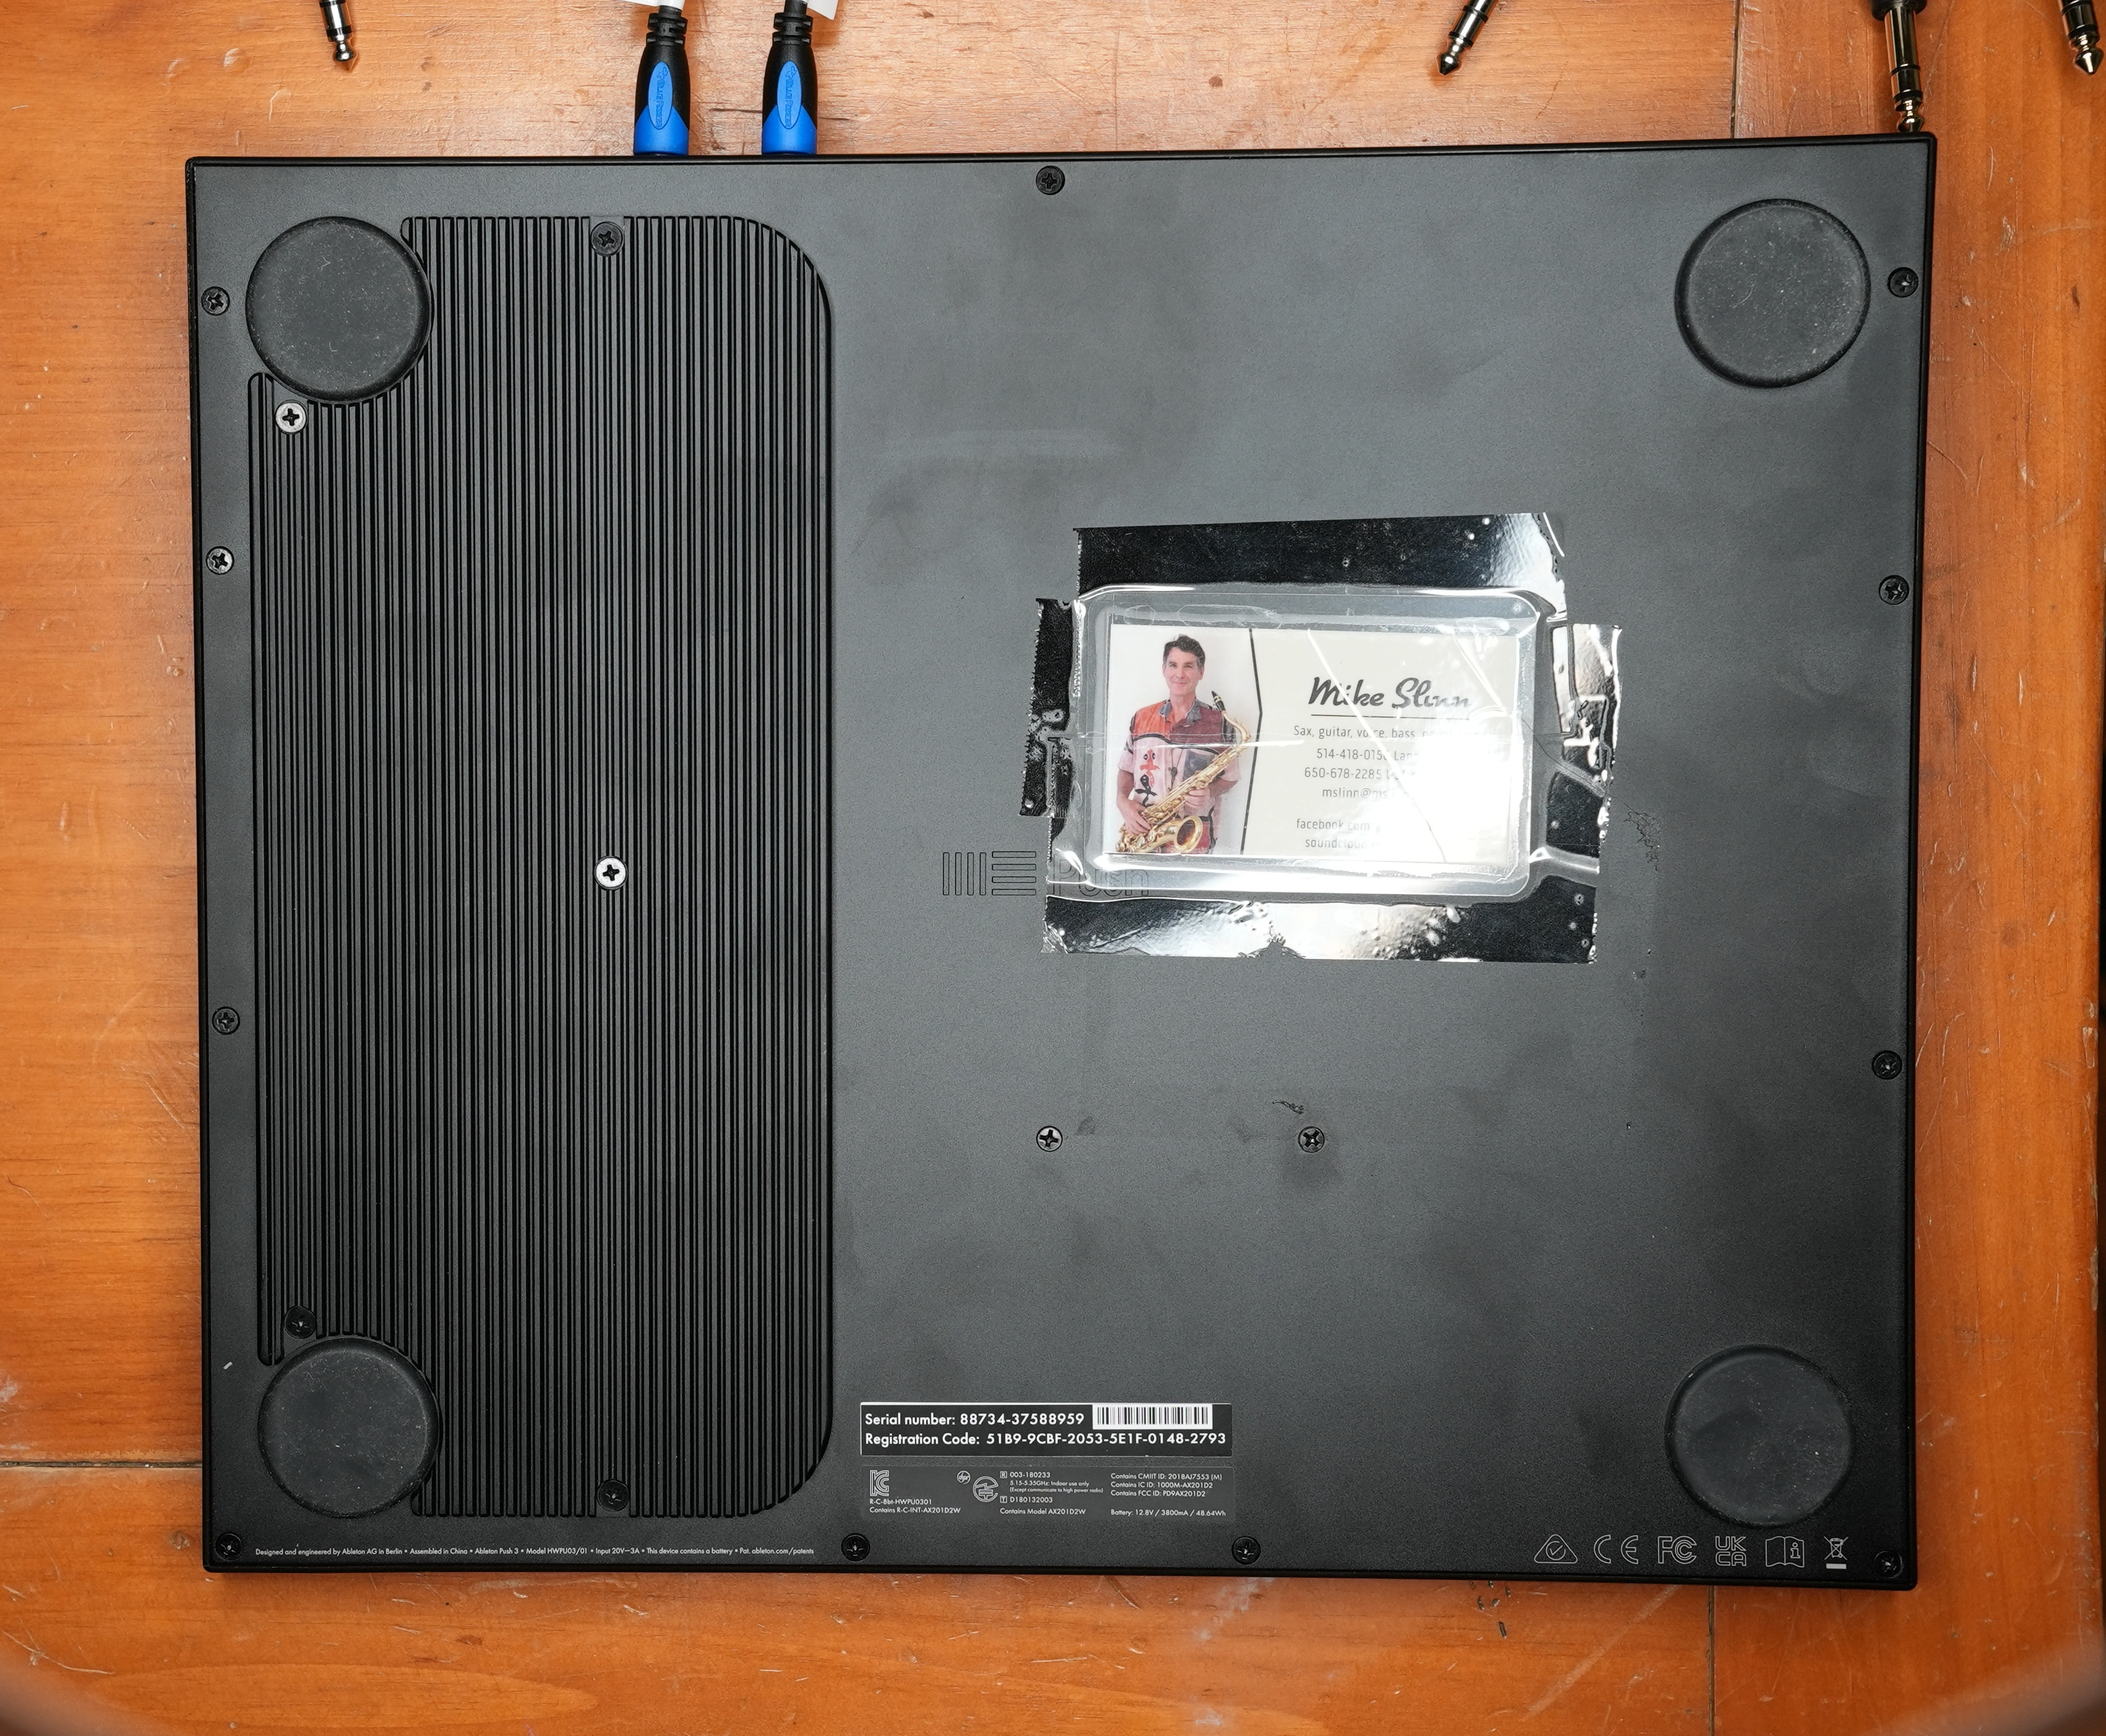
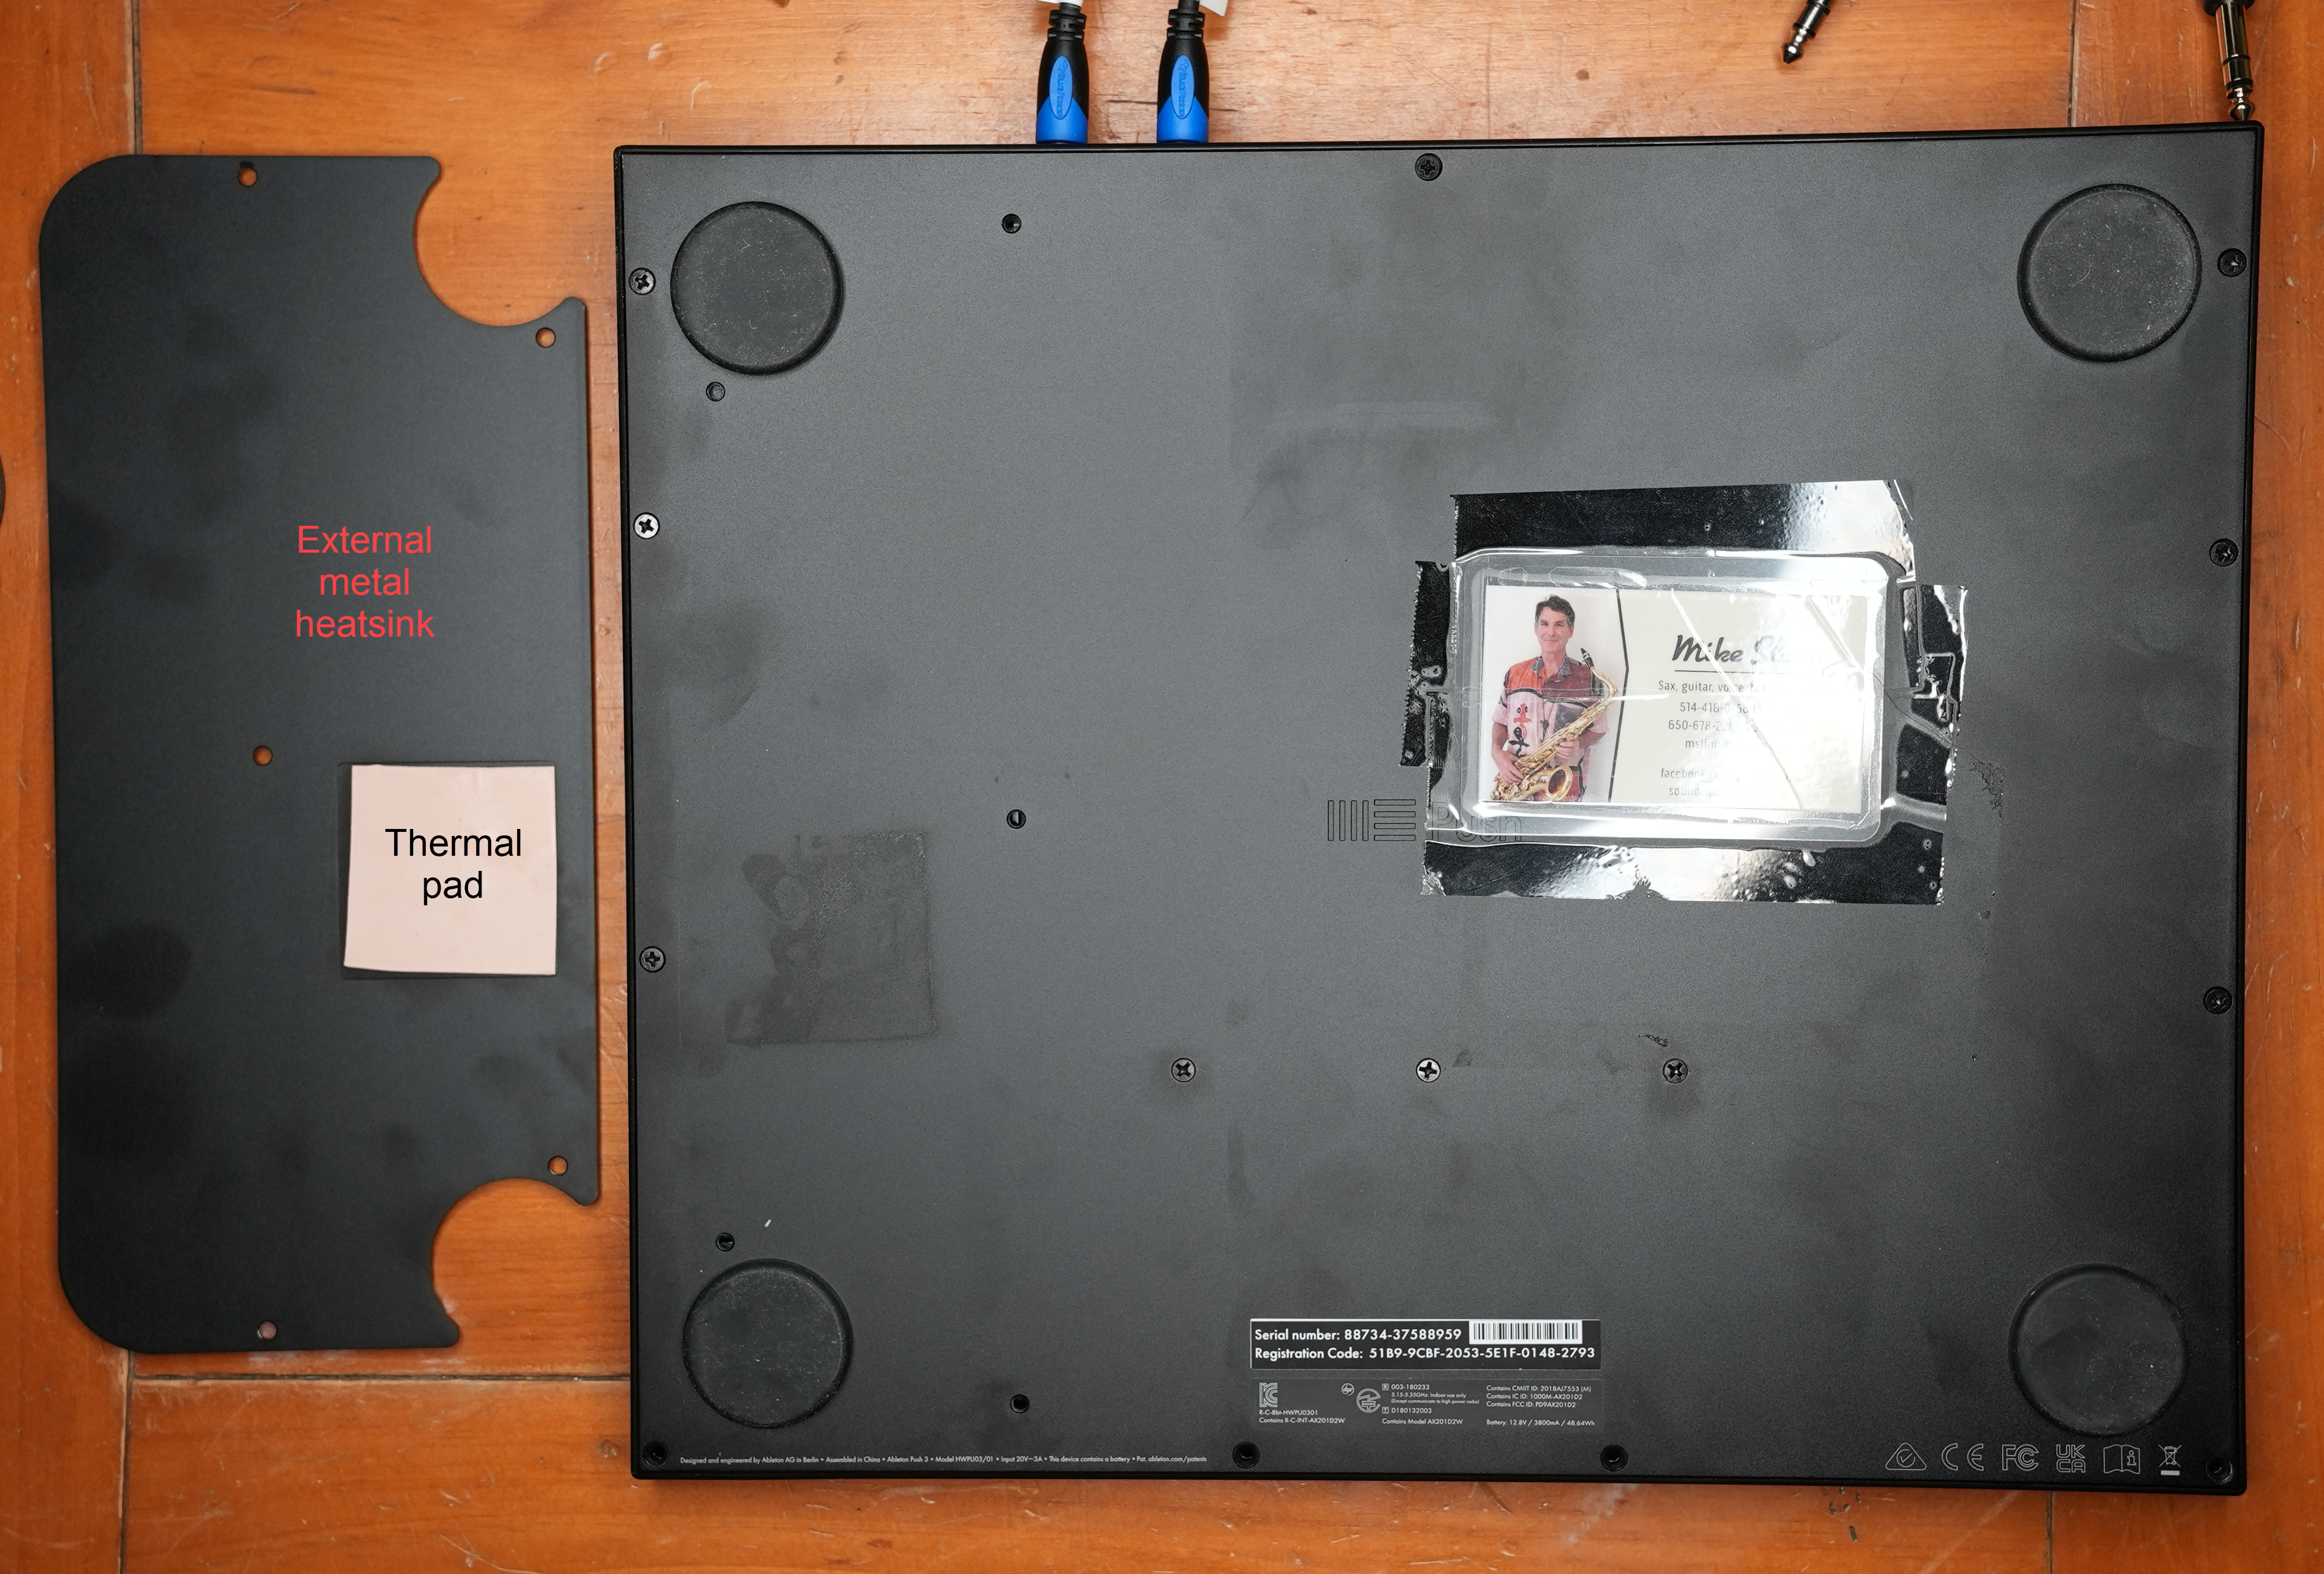
I unplugged the power and turned the P3S upside down. You can leave the other cables attached if you like. This is what the bottom of the P3S looked like:
I removed all the screws, including the screws that attached the external metal heat sink. Notice the pink thermal pad on the top side of the heat sink. The CPU module is right under the heat pad; the purpose of this thermal pad is to conduct heat from the CPU after it has diffused through the bottom plate to the external heat sink.
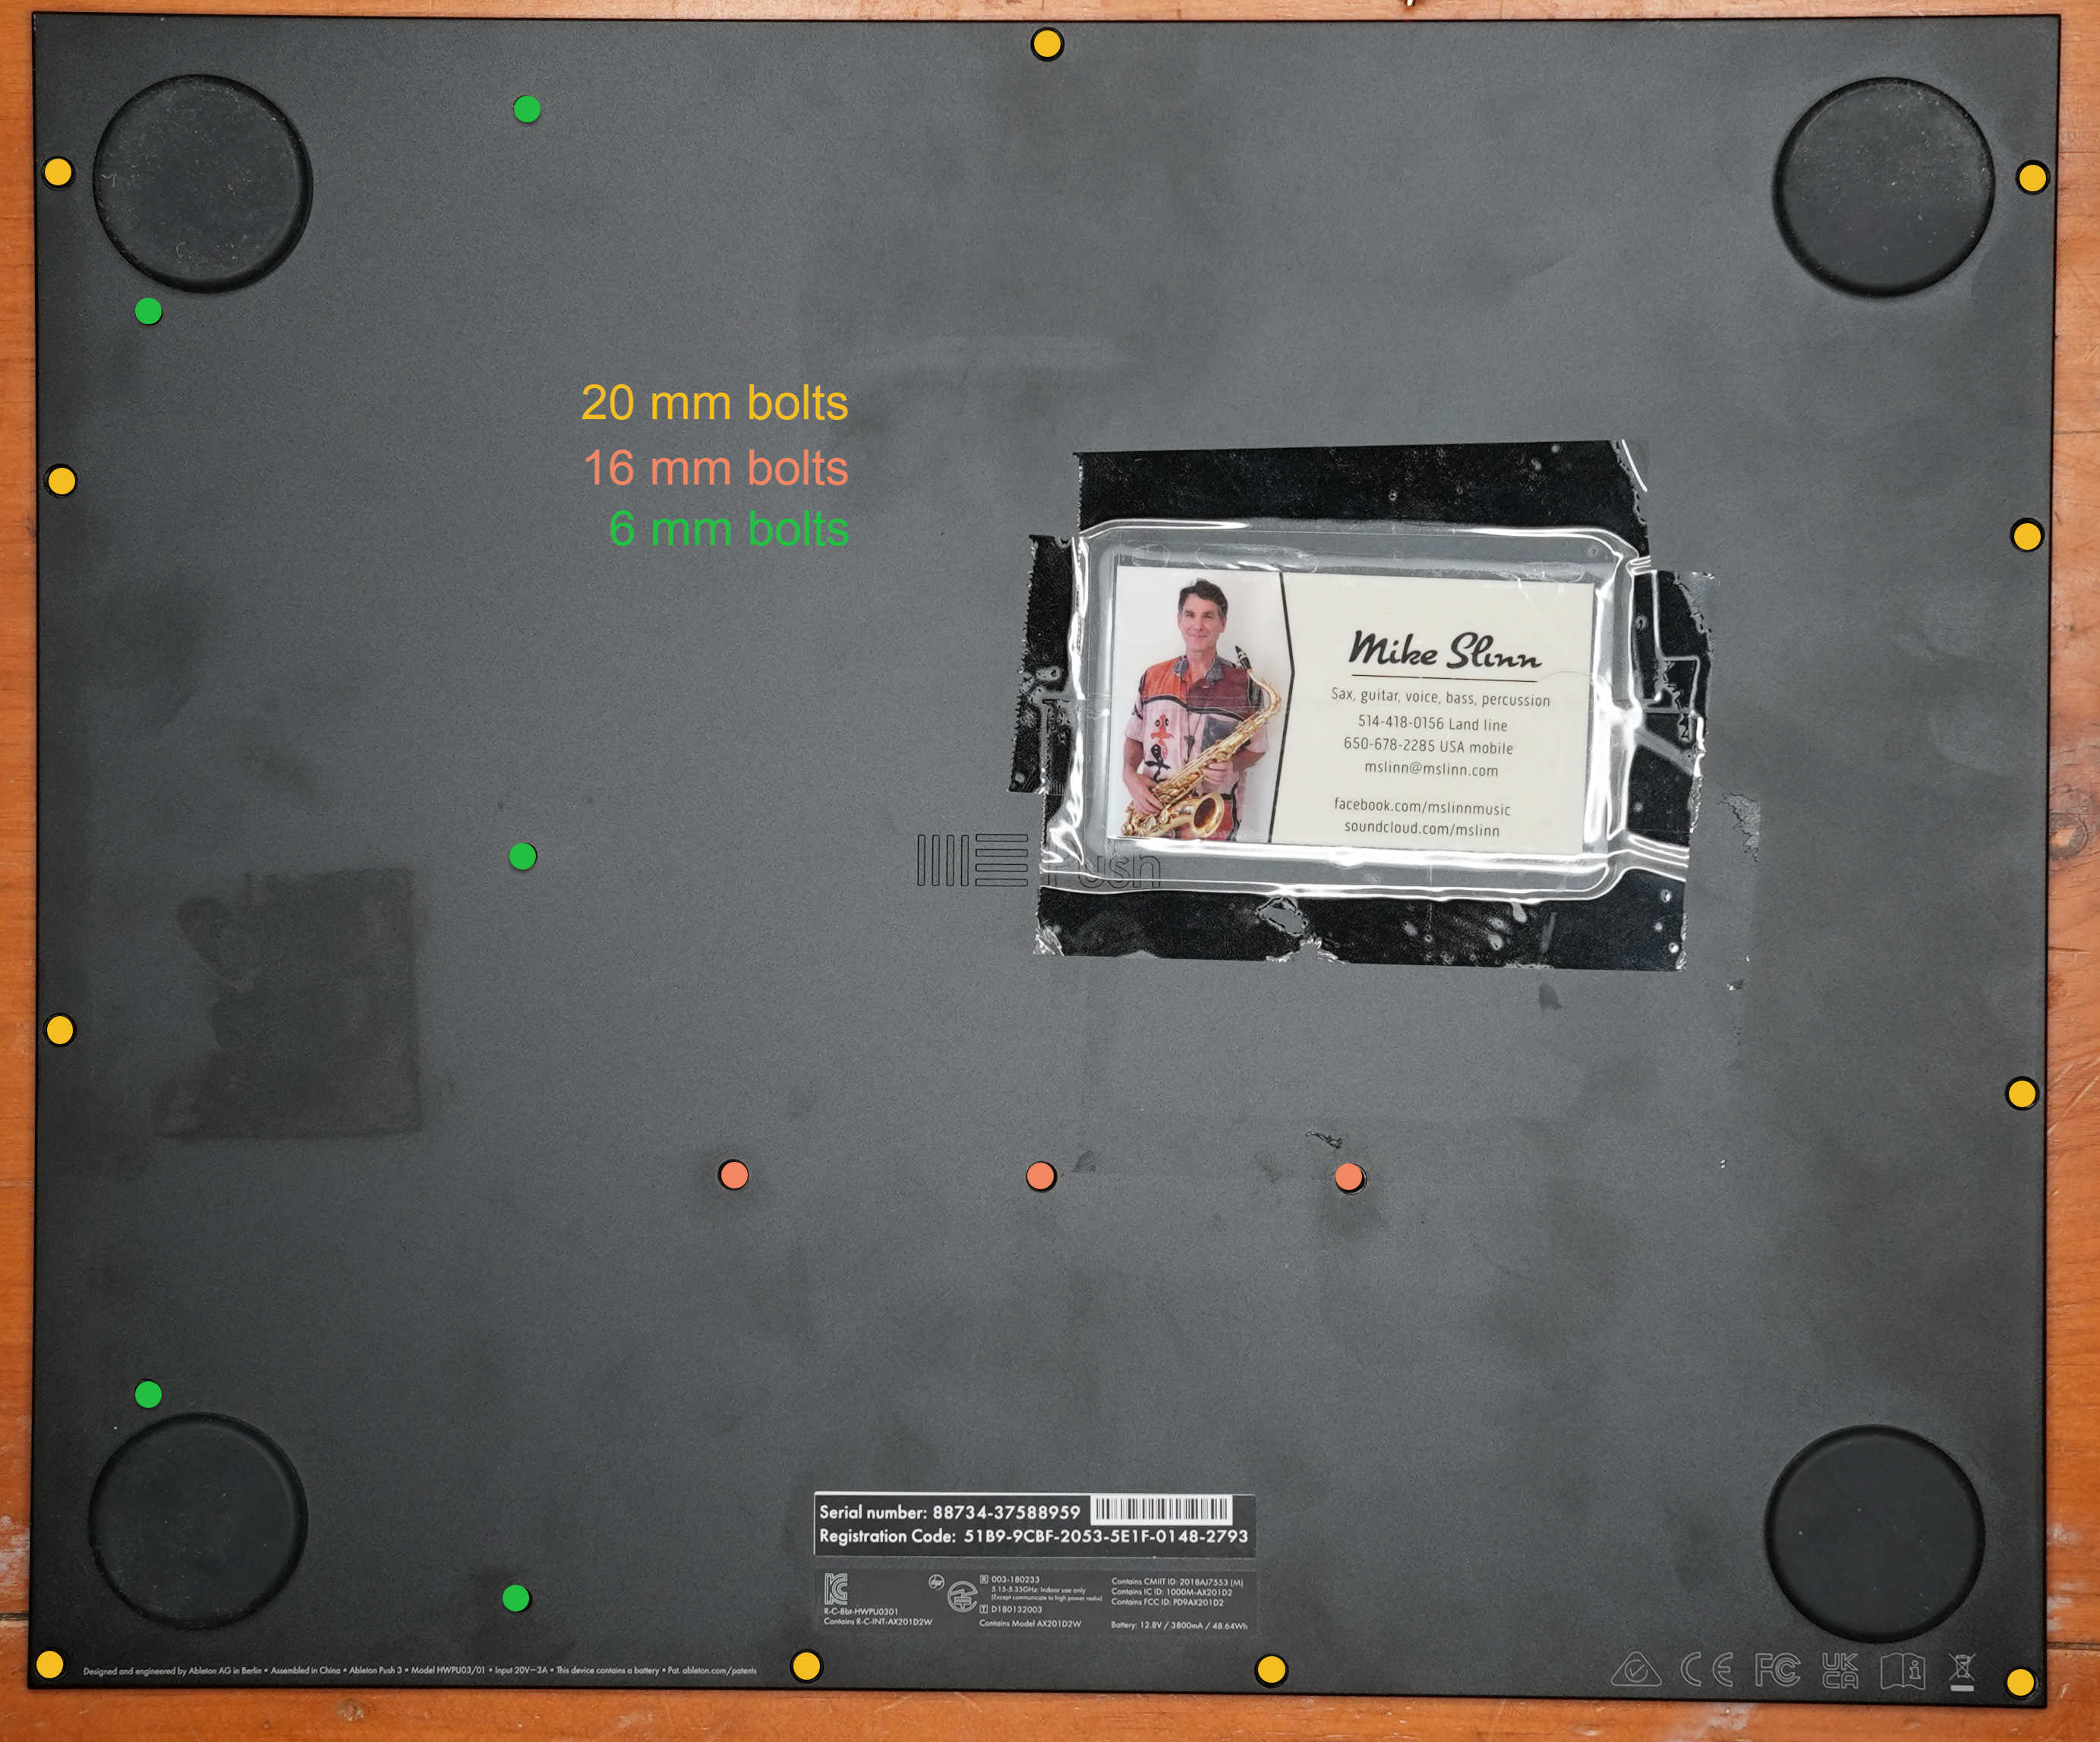
This image shows the metal P3S backplate and all its boltholes. The 3 lengths of bolts are color-coded.
When you are removing the backplate, you could segregate the bolts into 3 groups according to their lengths. Just a suggestion.
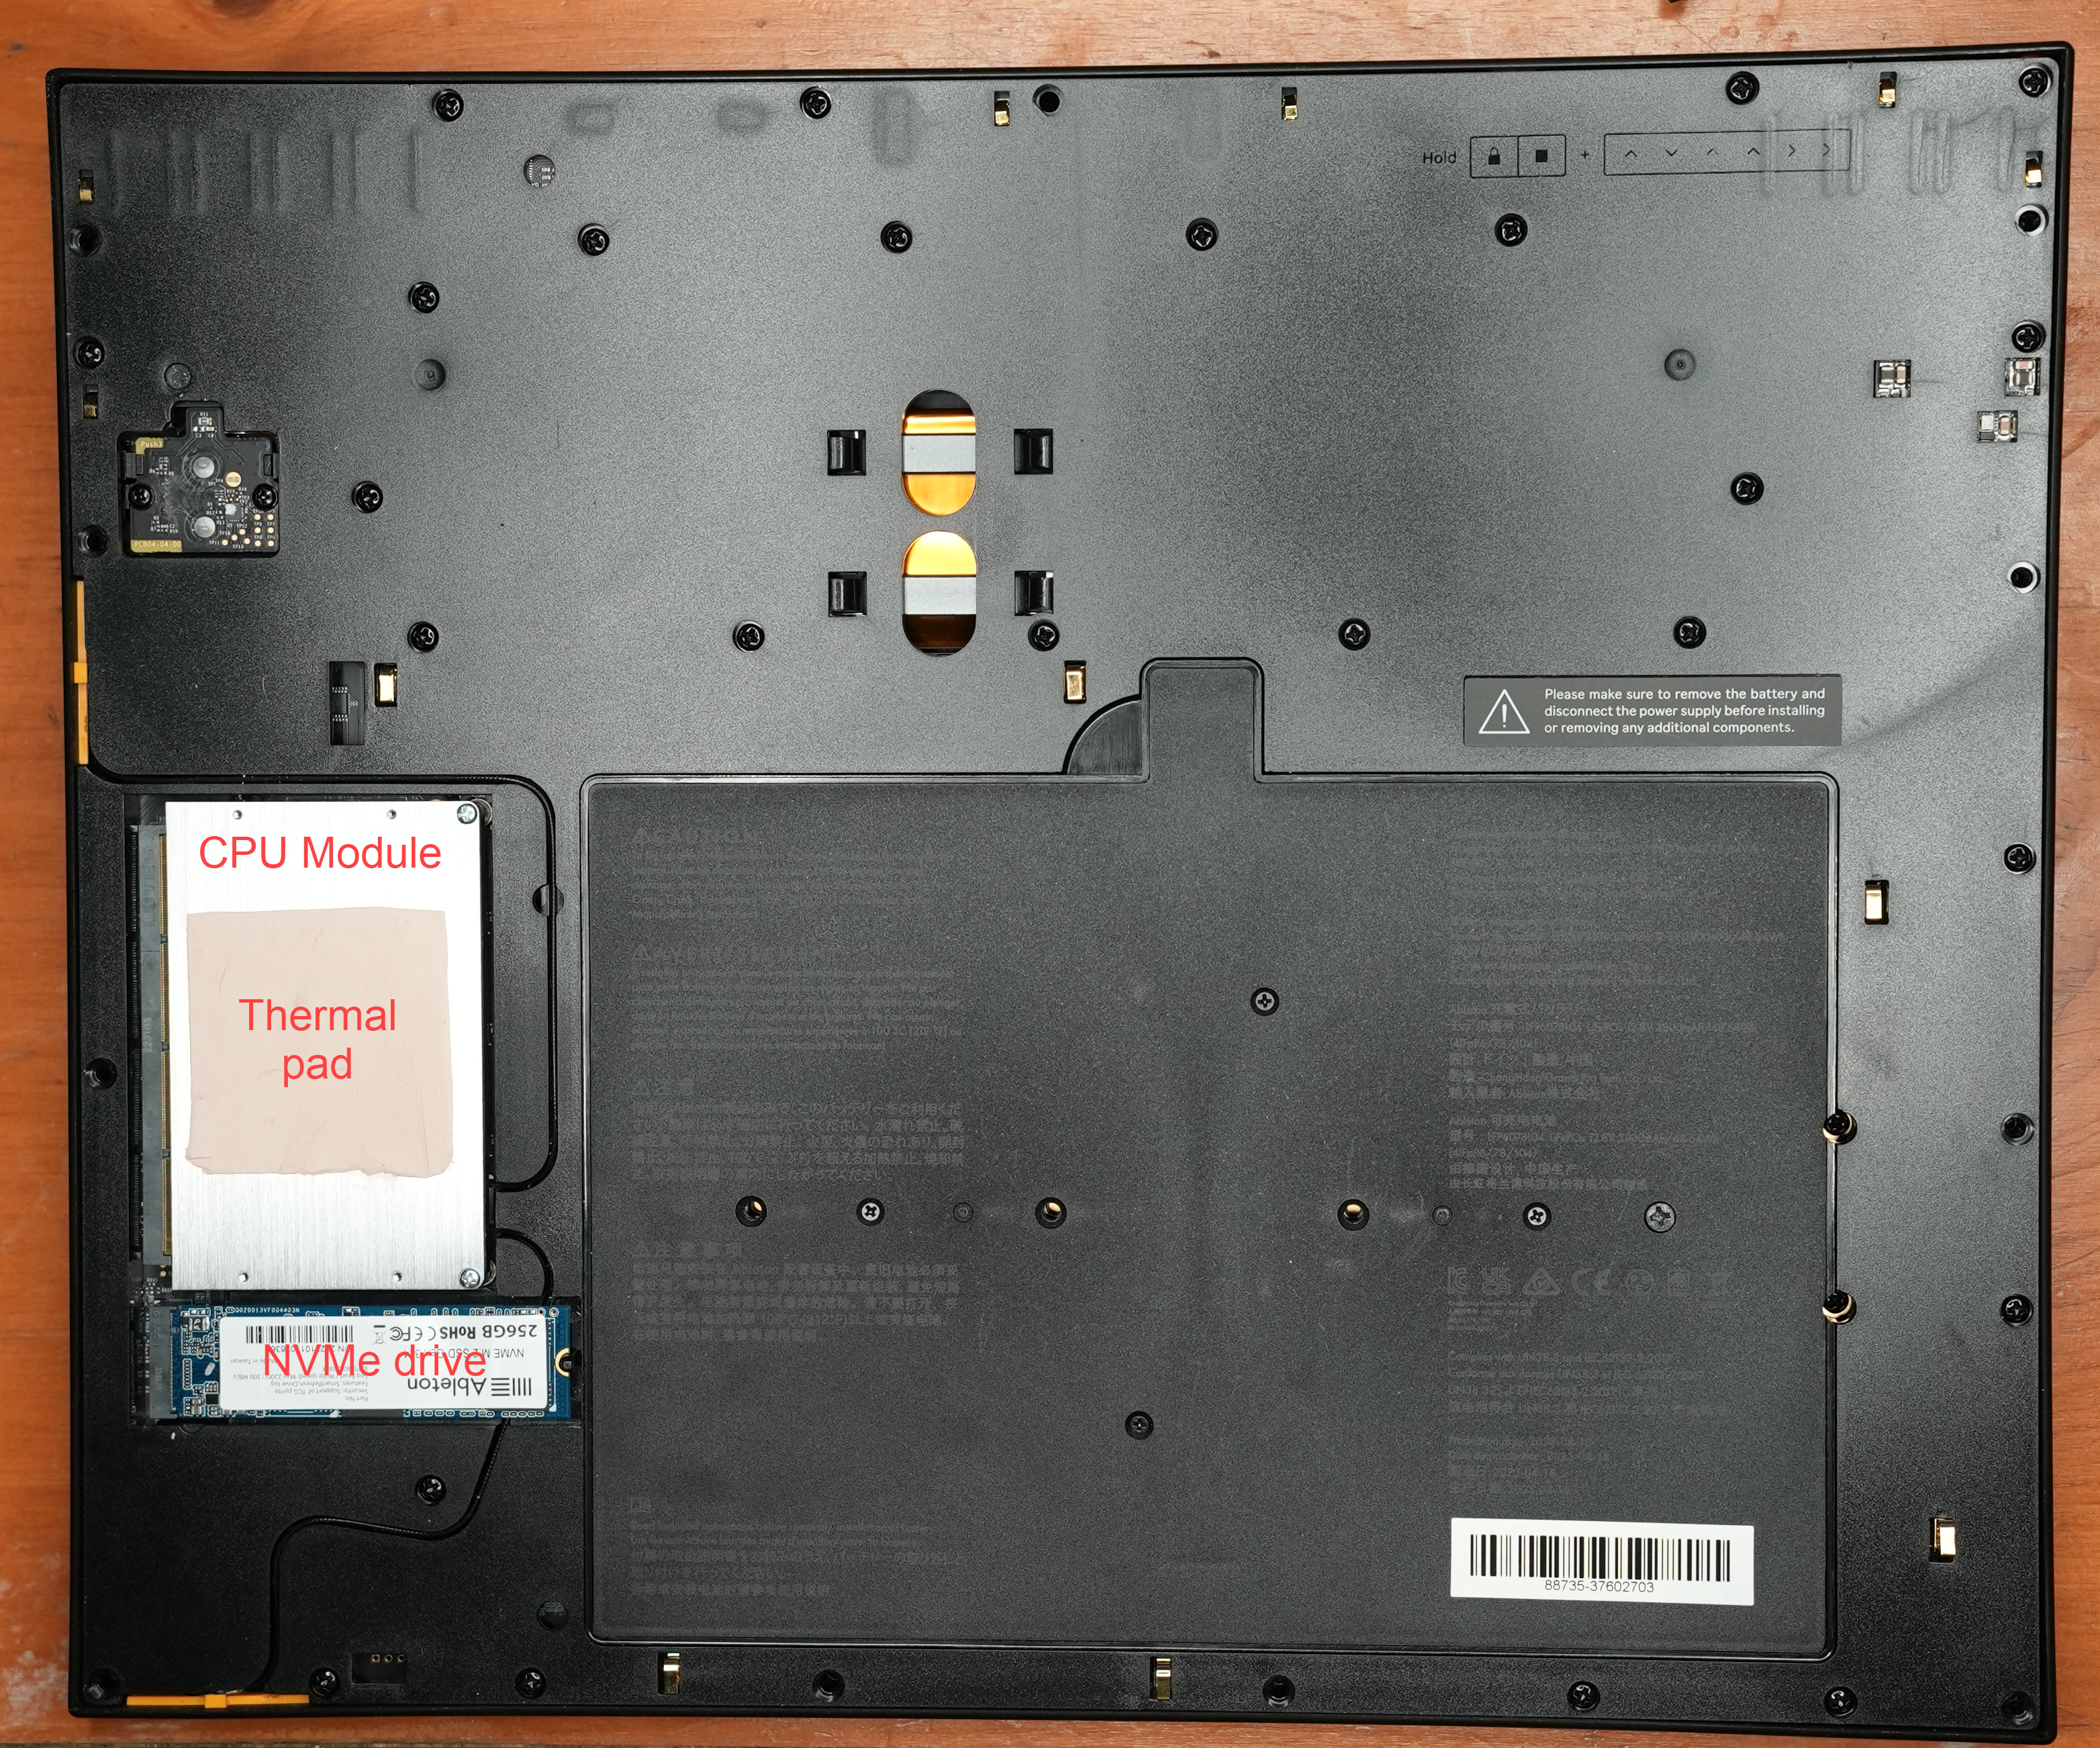
Now that the P3S bottom plate has been removed, we can see the NVMe drive and the CPU module. Notice that the CPU module has another pink thermal pad on top. This thermal pad diffuses heat from the CPU module through the P3S bottom plate. When the P3S is assembled and turned over, so the controls are on top, this thermal pad is directly above the thermal pad that we saw earlier.
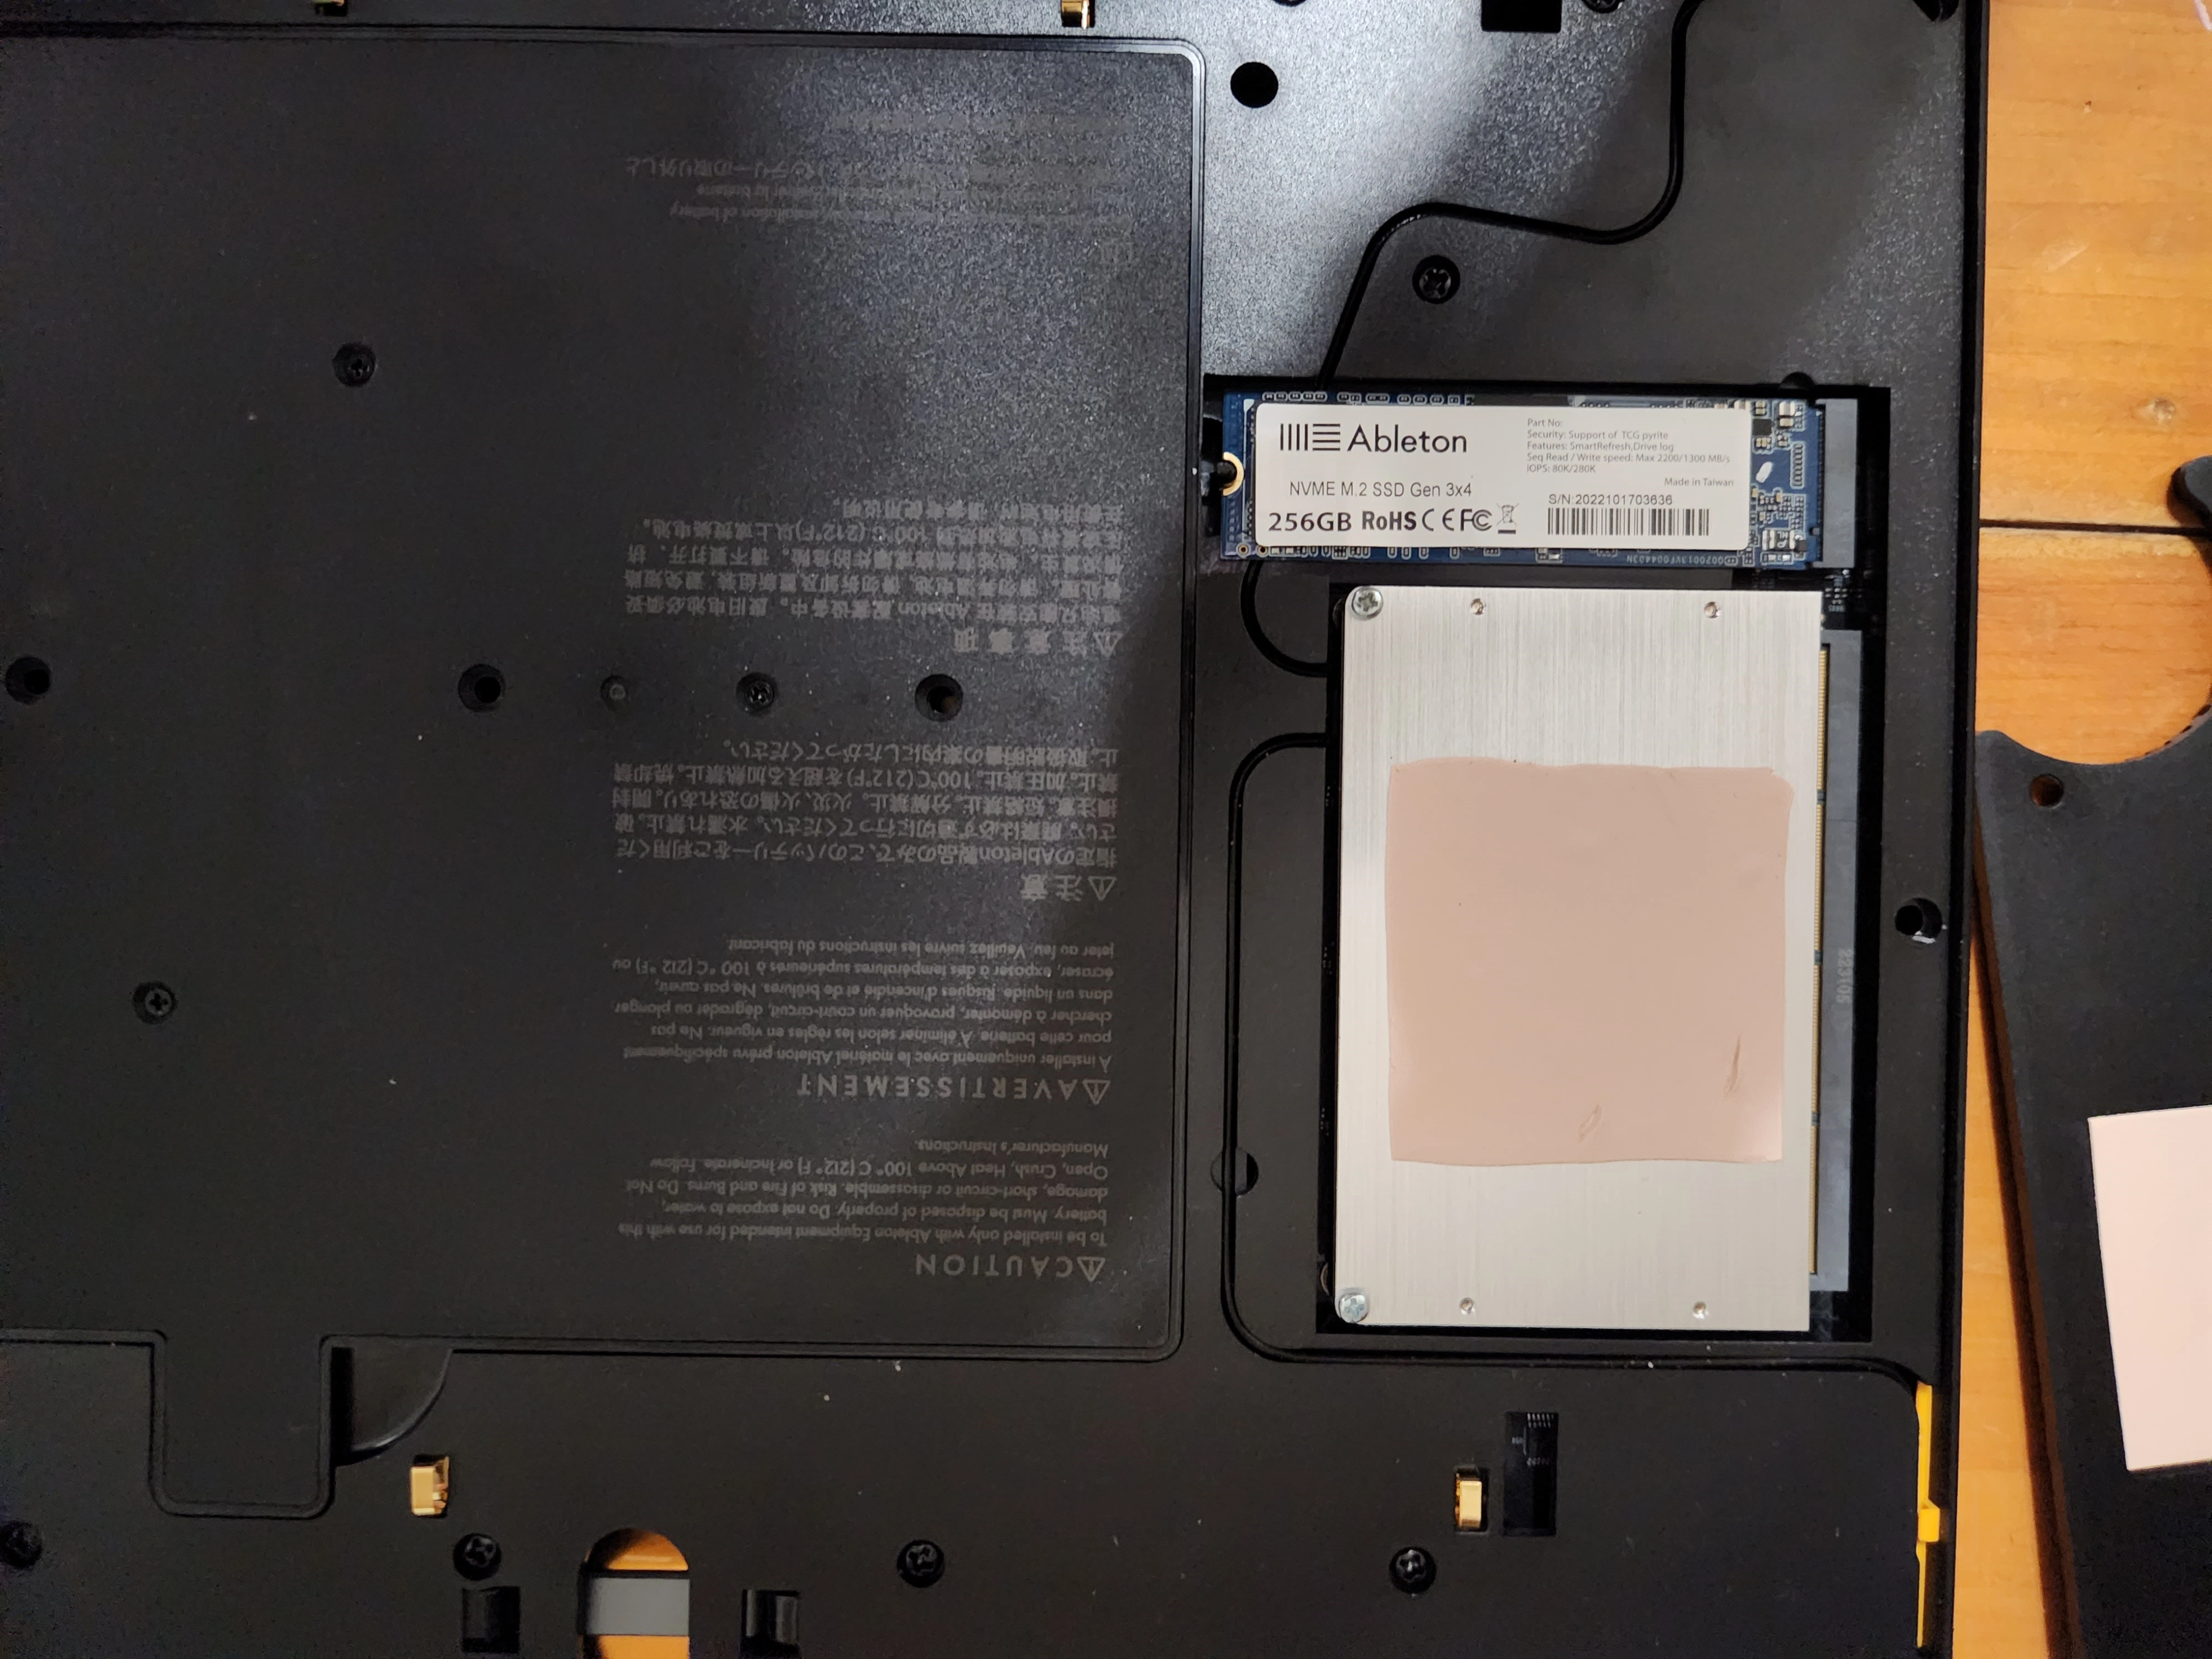
Viewing from the other end, so the writing on the NVMe is easily read, here is a closeup view of the NVMe drive and the CPU module:
NVMe Nomenclature
The Ableton P3S NVMe drive label says, in part, “NVME M.2 SSD Gen 3x4”. Let’s break down what each part of the label text signifies:
-
The Peripheral Component Interconnect Express (PCIe)
is a high-speed serial computer expansion bus standard.
It connects the internal hardware components of a computer, for example, graphics cards, network cards,
and storage devices.
PCIe connectors may provide 1, 4, 8 or 16 lanes.
The PCIe bus specification has evolved over the years; each version has greater bandwidth than previous versions. As of June 2024, PCIe 4 is found in most new computers, and only a few computers and devices support PCIe 5. However, the PCIe 6 and 7 standards have been defined, although almost no products are available today that use them.
PCIe is backward and forward compatible. This means that older, slower components will work with newer, faster components, but only at the maximum speed possible for the older, slower components. This is called “compatibility mode”. -
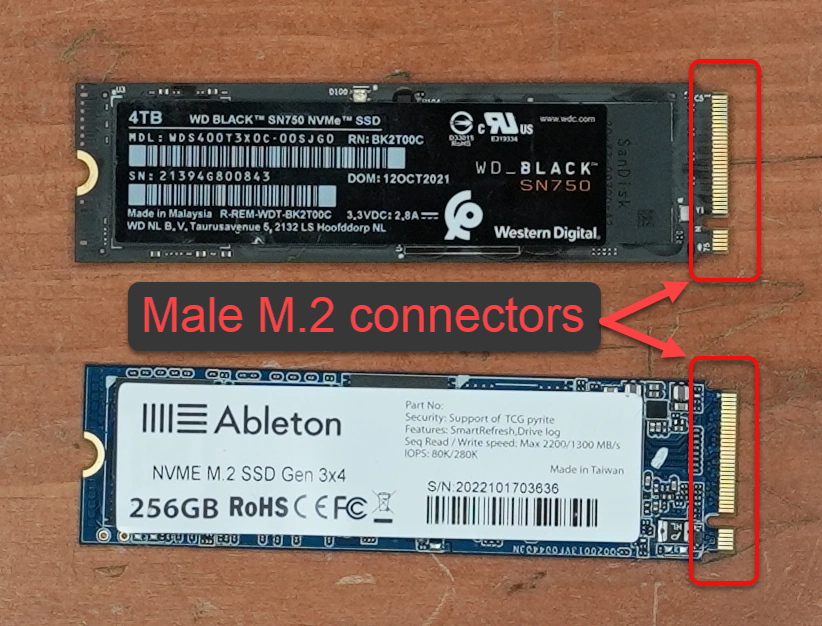
NVMe drives have a male M.2 connector on one end.
The PCI Express M.2 specification defines how internally mounted computer expansion cards interface with internal buses. The M.2 standard is electrically compatible with PCIe, SATA 3.0, and USB 3.0 buses. M.2 connectors pass along the characteristics of the bus that they are connected to.
The female M.2 connector in the P3S is used to provide 4 lanes (the maximum possible for a storage device) from the PCIe bus to an NVMe drive. -
An SSD is a solid-state storage device
with no moving parts, unlike
HDDs,
which contain rotating metal disks.
SSDs can use traditional HDD interfaces and form factors such as SATA,
or newer interfaces and form factors such as NVMe
that exploit specific advantages of the flash memory in SSDs.
In other words, “SSD” is a generic term, while “NVMe” defines a specific type of SSD. - Gen 3: This refers to the third generation of the PCIe standard. PCIe Gen 3 offers higher data transfer rates compared to its predecessors, allowing for faster communication between the SSD and the rest of the system. An M.2 connector attached to a PCIe Gen 3 bus would provide the characteristics of that bus to devices that plug into it. Thus, an NVMe drive plugged into an M.2 connector in a system with a PCIe Gen 3 bus would be exposed to the PCIe Gen 3 signals.
-
Gen 4
drives are faster than Gen 3 drives,
but only when placed in a system that can take advantage of their greater bandwidth.
Gen 4 devices installed in a system with a PCIe Gen 3 bus will operate in Gen 3 compatibility mode.
In general, each successive version of the PCIe specification runs faster, but NVMe drives that run faster tend to consume more power. This means that older, slower drives generally use less power than newer, faster NVMe drives when working hard.
The P3S uses Gen 4 drives in Gen 3 compatibility mode. This is one of the major limiting factors to the maximum P3S system throughput. - The “x4” in “Gen 3x4” indicates the number of PCIe lanes that the NVMe device uses for data transfer. In this case, “x4” means that the NVMe device is using four PCIe lanes for communication, which allows for higher data transfer speeds compared to configurations with fewer lanes.
In summary, “NVME M.2 SSD Gen 3x4” signifies that the NVMe drive is using the PCIe Gen 3 interface with four lanes for data transfer via the M.2 connector that it is plugged into.
Removing the NVMe
The red arrow in the following image points to the post that must be pushed hard to the left to pop out the NVMe drive.
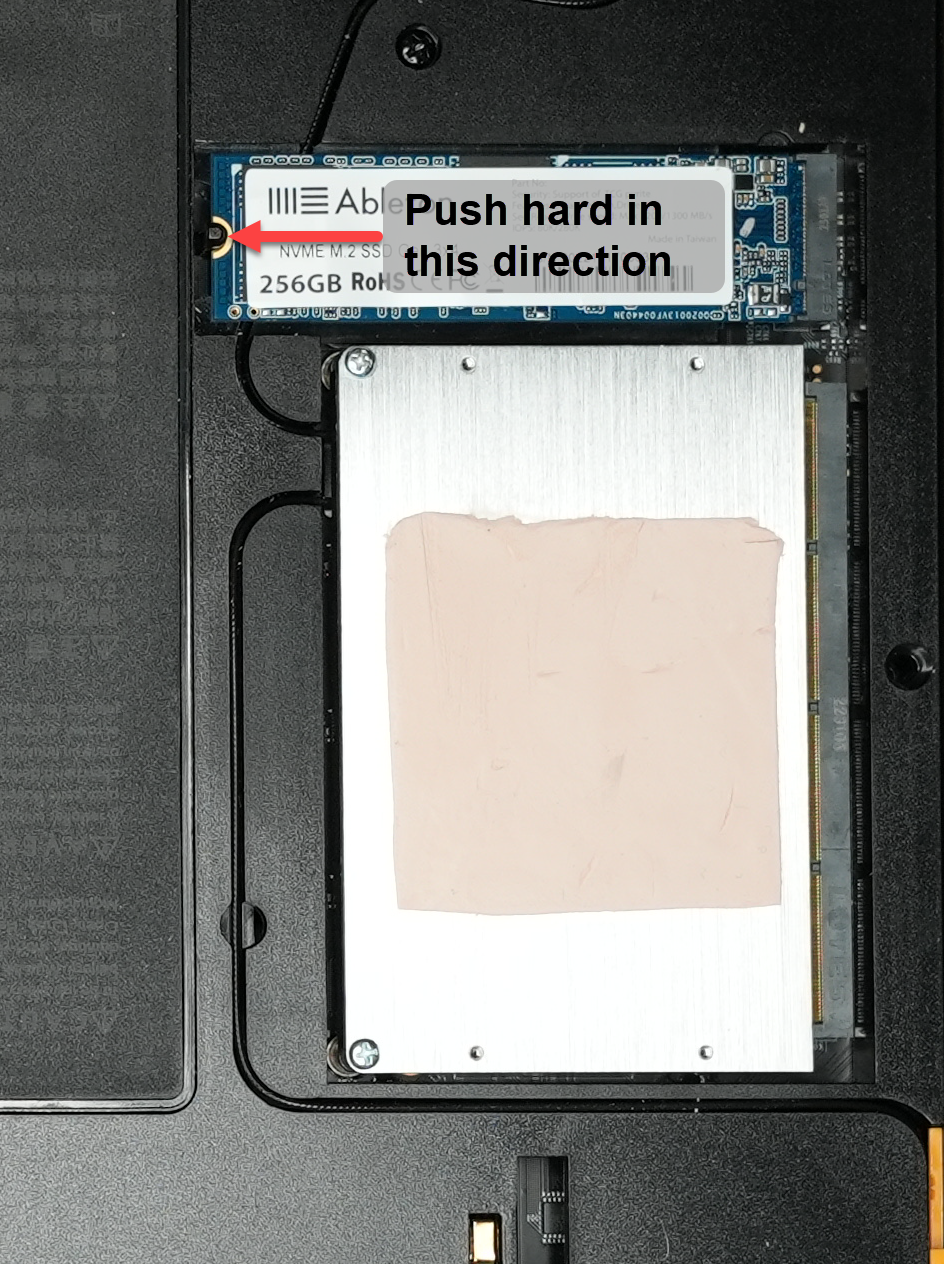
I pushed the plastic retaining pin hard to the left and gently lifted the NVMe out of the tray that it sits in by using a letter opener.
NVMe Tray & Pad
PCIe gen 4 NVMe drives tend to generate more heat than PCIe gen 3 drives when working hard. High-capacity NVMe gen 3 drives and all NVMe gen 4 drives should be installed with a cooling mechanism.
When NVMes get hot, they reduce their operating speeds, so they consume less power, and thereby generate less heat. This is called throttling. As their temperature increases, throughput decreases. At a high enough temperature, NVMe drives stop working. High temperatures also reduce the lifespan of most electronic chips, including NVMes.
Since the CPU module is right next to the NVMe drive, when the CPU heats up, the NVMe drive will be affected.
The tray that the NVMe sits in is made of plastic, which is a heat insulator as well as being electrically non-conductive. This is unfortunate because the only way that an NVMe might be cooled when placed in such a tray is through thermal conduction, drawing heat from the top-side of the NVMe drive and dispersing it to the heavy P3S bottom plate. The CPU module is cooled in this manner. However, Ableton does not provide a means of cooling the NVMe drive; fortunately, this is easily remedied by placing a thermal pad of the appropriate thickness on the NVMe drive.
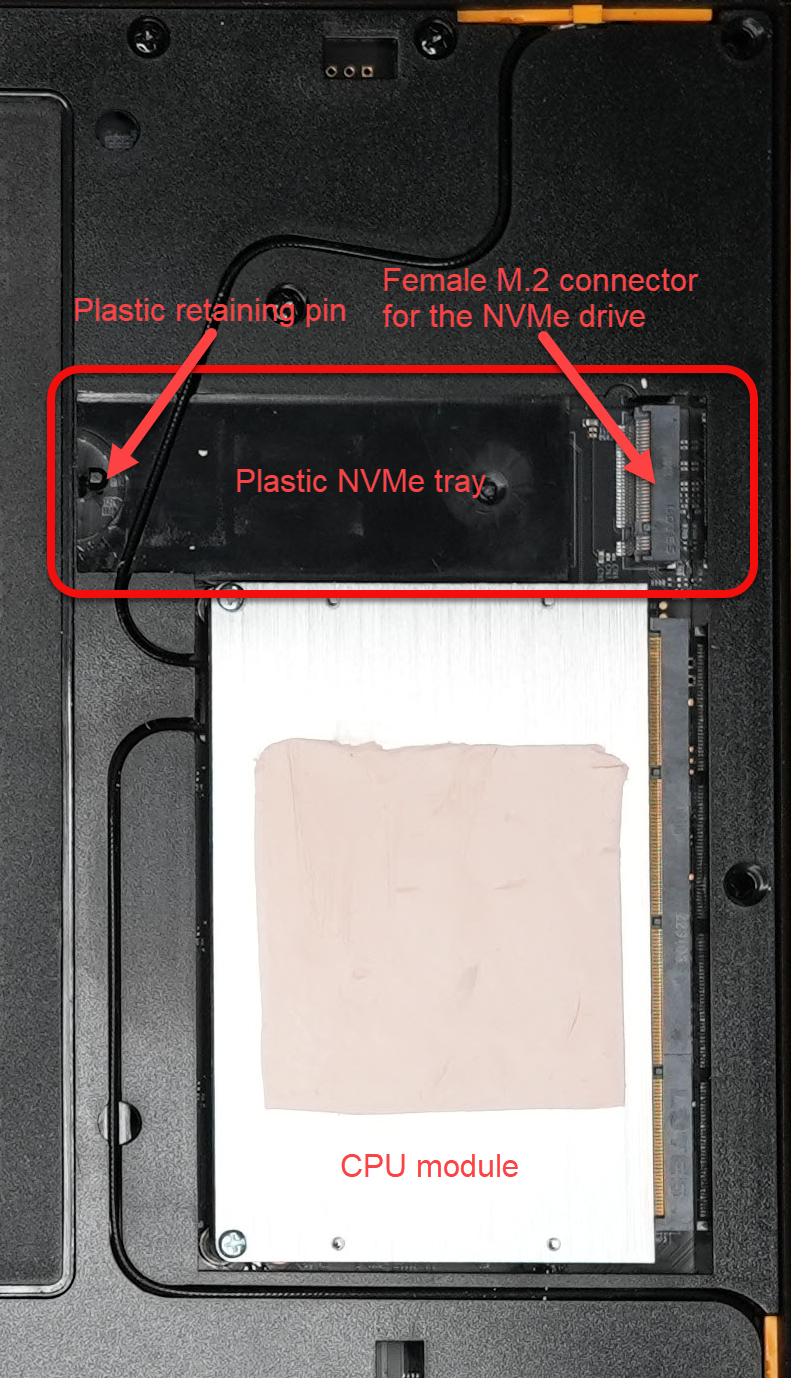
P3S NVMe Cooling
The P3S does not come with a heat-conductive silicon thermal pad for the top of the NVMe . That means a P3S, as manufactured and sold by Ableton, has no provision for effectively cooling its NVMe drive. That might be fine for low-performance, low-capacity NVMes whose speed is unimportant. However, larger and faster NVMes generate more heat, so they are more likely to throttle back when they get hot.
Without a thermal pad of the proper thickness to make good contact with a heat sink, it is more likely that installing a high-capacity NVMe into a P3S will cause the NVMe to throttle back its throughput to such a degree that the overall system performance is dramatically reduced. On the other hand, with the right thickness of thermal pad, the heat generated by an NVMe drive should be conducted to the P3S metal backplate, which acts as a large heat sink.
on a soft, non-conductive surface
I decided to add a blue thermal pad on top of the NVMe drive, just like the pink thermal pad that comes already placed on the CPU module.
I wrote an article called Thermal Control, which is a deep dive about thermal pads and cooling in general for the P3S.
Replacement NVMe
This article discusses how I replaced the stock 256 GB NVMe with a faster, higher-capacity NVMe like the 4 TB WD Black SN750, a Gen 3 PCIe device with a rated maximum transfer rate of 3,400 MB/s. The SN750 has sixteen times more storage than the NVMe drive provided with the P3S.
Although NVMe drives with heat sinks are available, they will not fit into a P3S. Heat sinks require airflow, which is unavailable inside a P3S, so even if an NVMe drive with a heat sink could be somehow made to fit inside a P3S, the heat sink would not do anything.
The next two images show the original NVMe from Ableton next to the replacement NVMe. You can see the gold-colored metal contacts of the male M.2 connectors on both NVMes. This is the top view:
This is the bottom view. Notice how the larger-capacity SN750 has chips on the bottom.
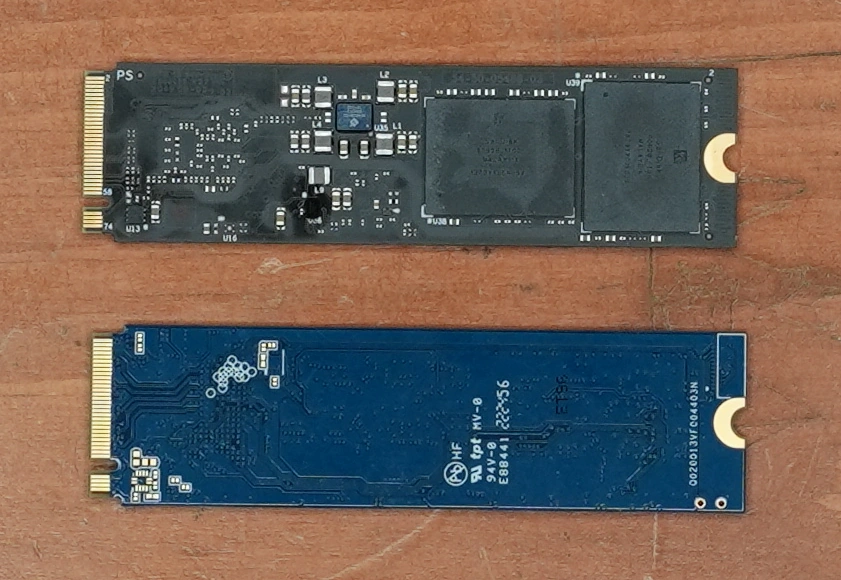
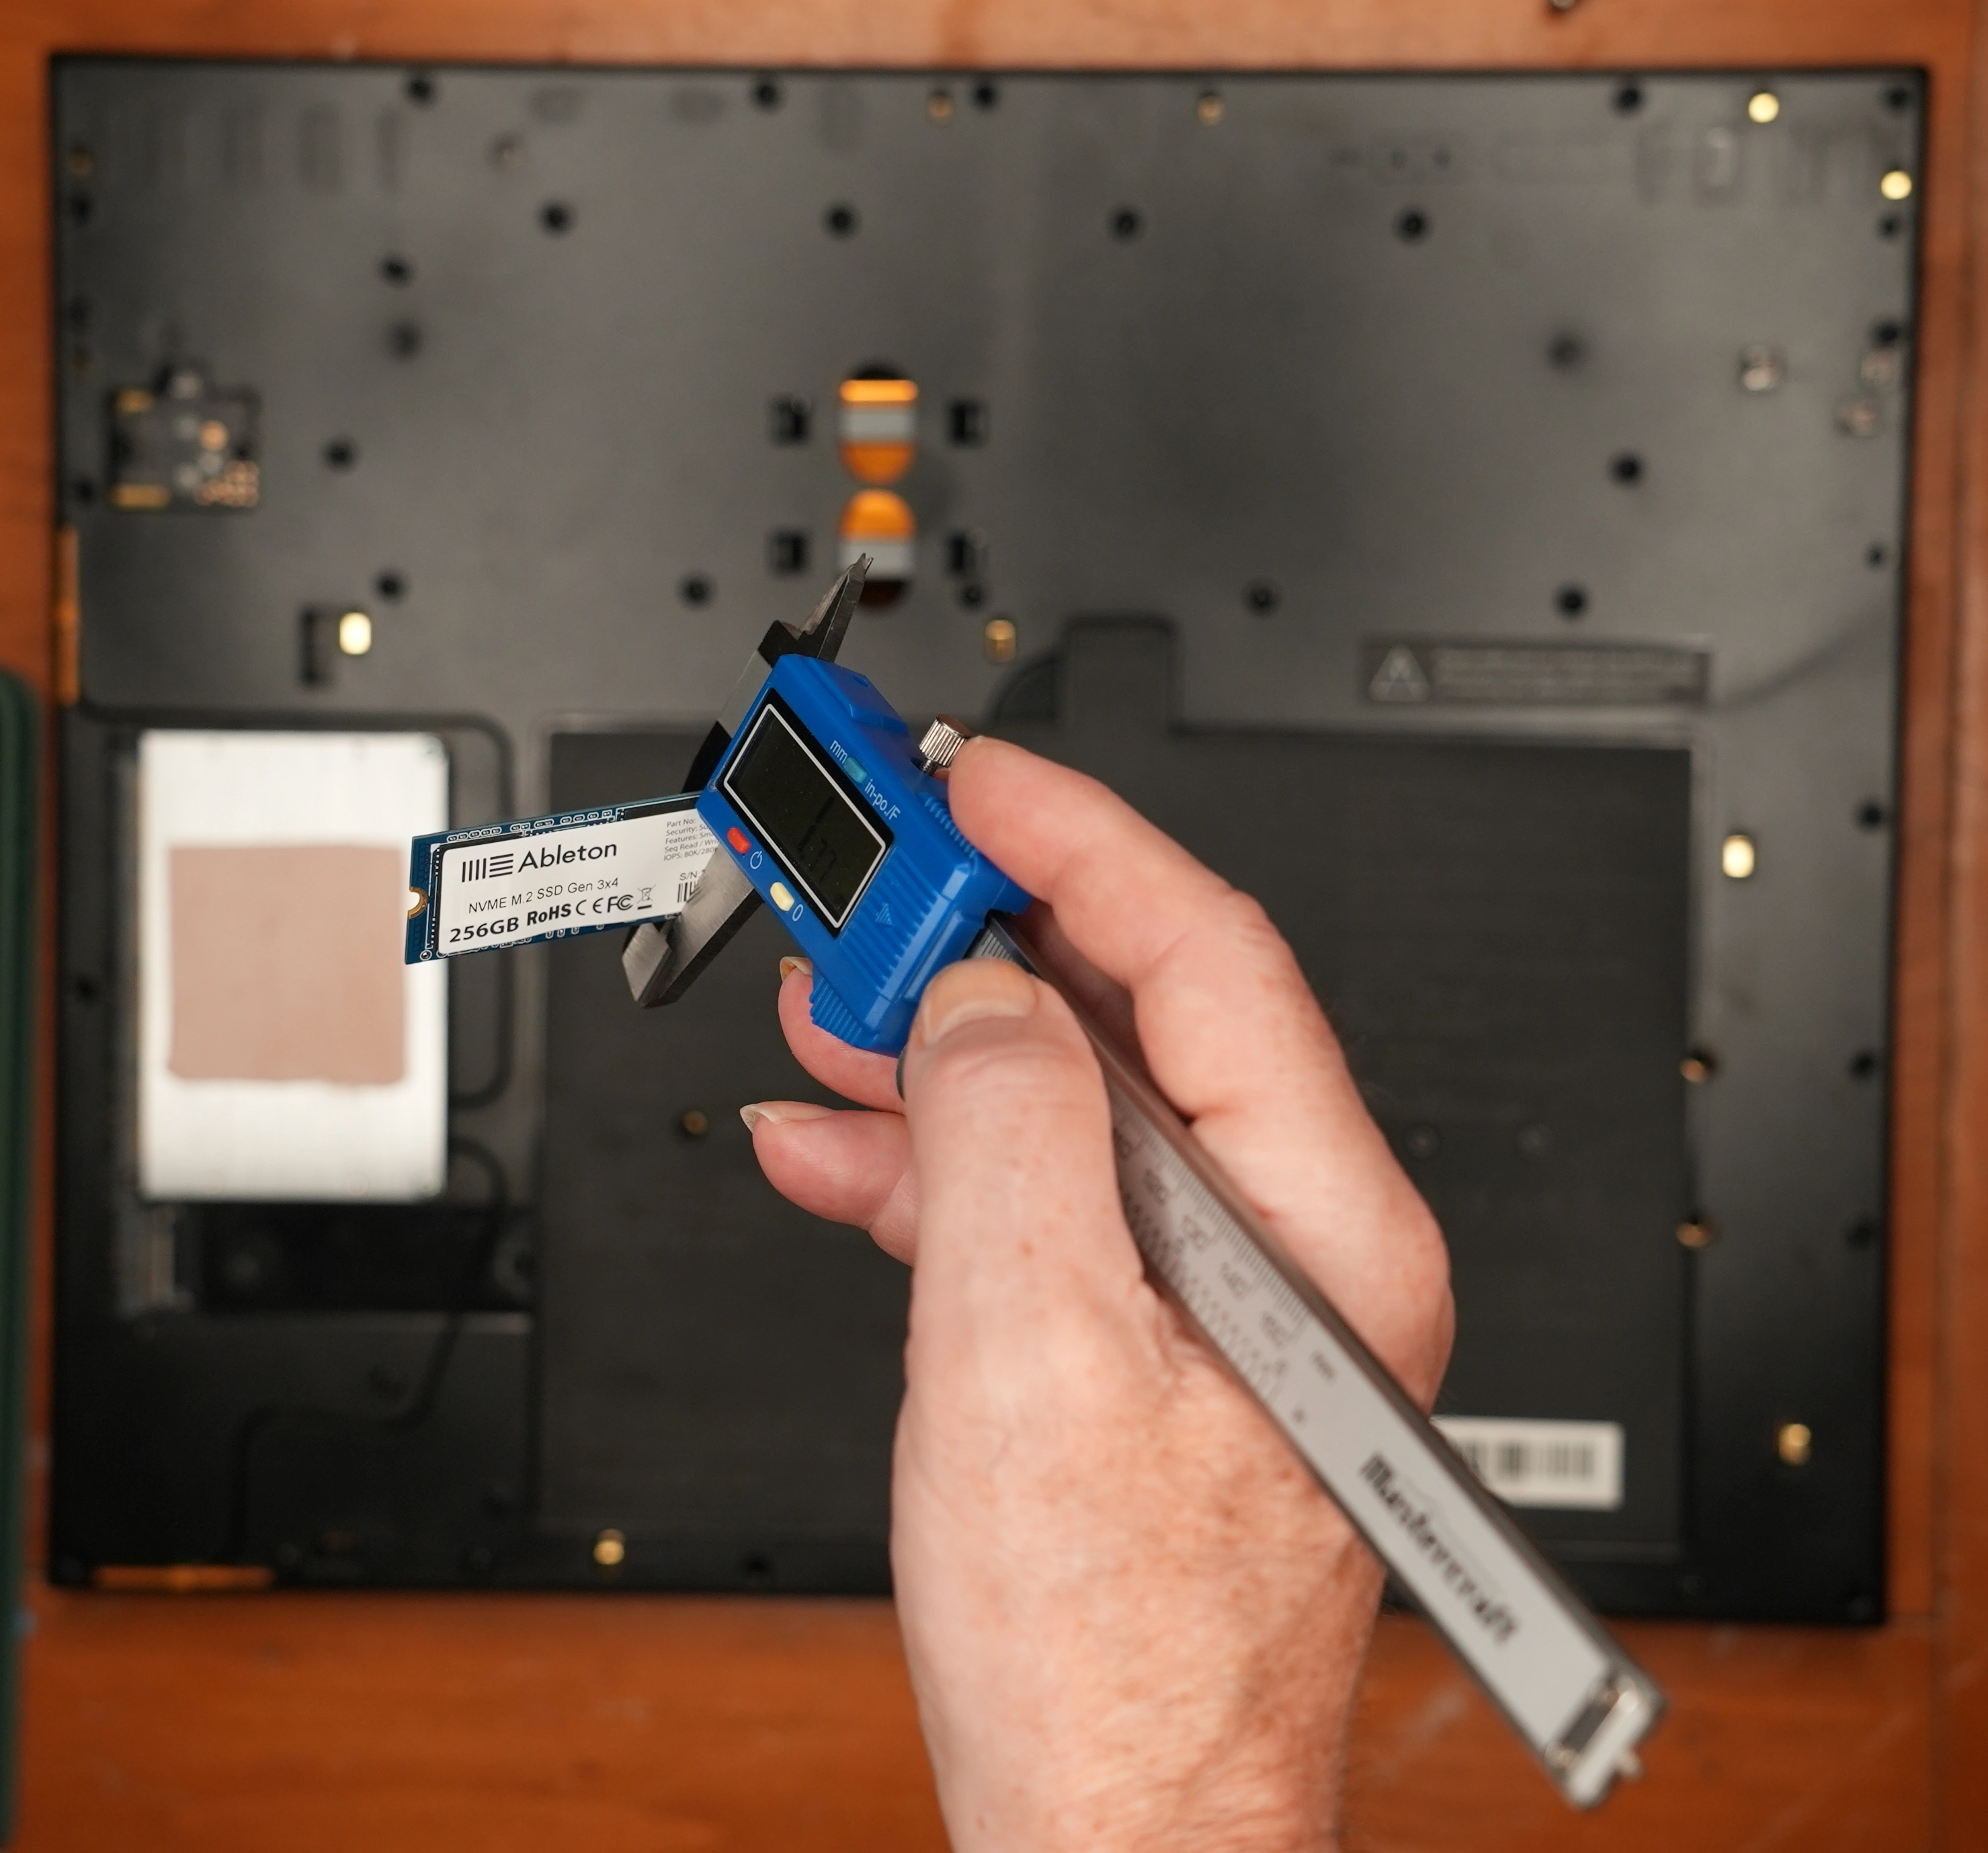
Higher-capacity NVMe drives like the SN750 have hardware on their bottom side, which means they are effectively thicker. I measured the thickness of the original P3S NVMe drive as 1.15 mm and the thickness of the SN750 as 3.46 mm. The depth of the drive bay is 3.87 mm.
Retaining Mechanism
Let’s look ahead, for a moment, to the time when the replacement NVMe drive will be ready to be installed in the P3S. We want the replacement NVMe drive to sit securely in its bay and to be cooled using conduction, since there is no airflow for convective cooling.
The NVMe retaining pin on a P3S does not attach to the thicker WD Black SN750 NVMe. Only NVMe modules with low-relief backsides can attach to the retaining pin. This was an unfortunate design decision. Other retaining mechanisms are available, such as latches, and many accommodate varying NVMe thicknesses.
Abrading the mating surface of the retaining pin by 2 mm would allow the thicker NVMe drive to click into place, but that would not leave much material left at the top of the retaining pin, and it would probably break easily.
The retaining pin is not essential because the electrical connection happens at the other end of the NVMe drive. So long as the NVMe drive does not wiggle around, it should be fine.
Workaround
I found a bamboo skewer that could be jammed into the space between the end of the NVMe drive and the plastic bay it sits in. Its sharp end has a 10-degree angle, perfect for being wedged between the end of the NVMe and the bay end wall.
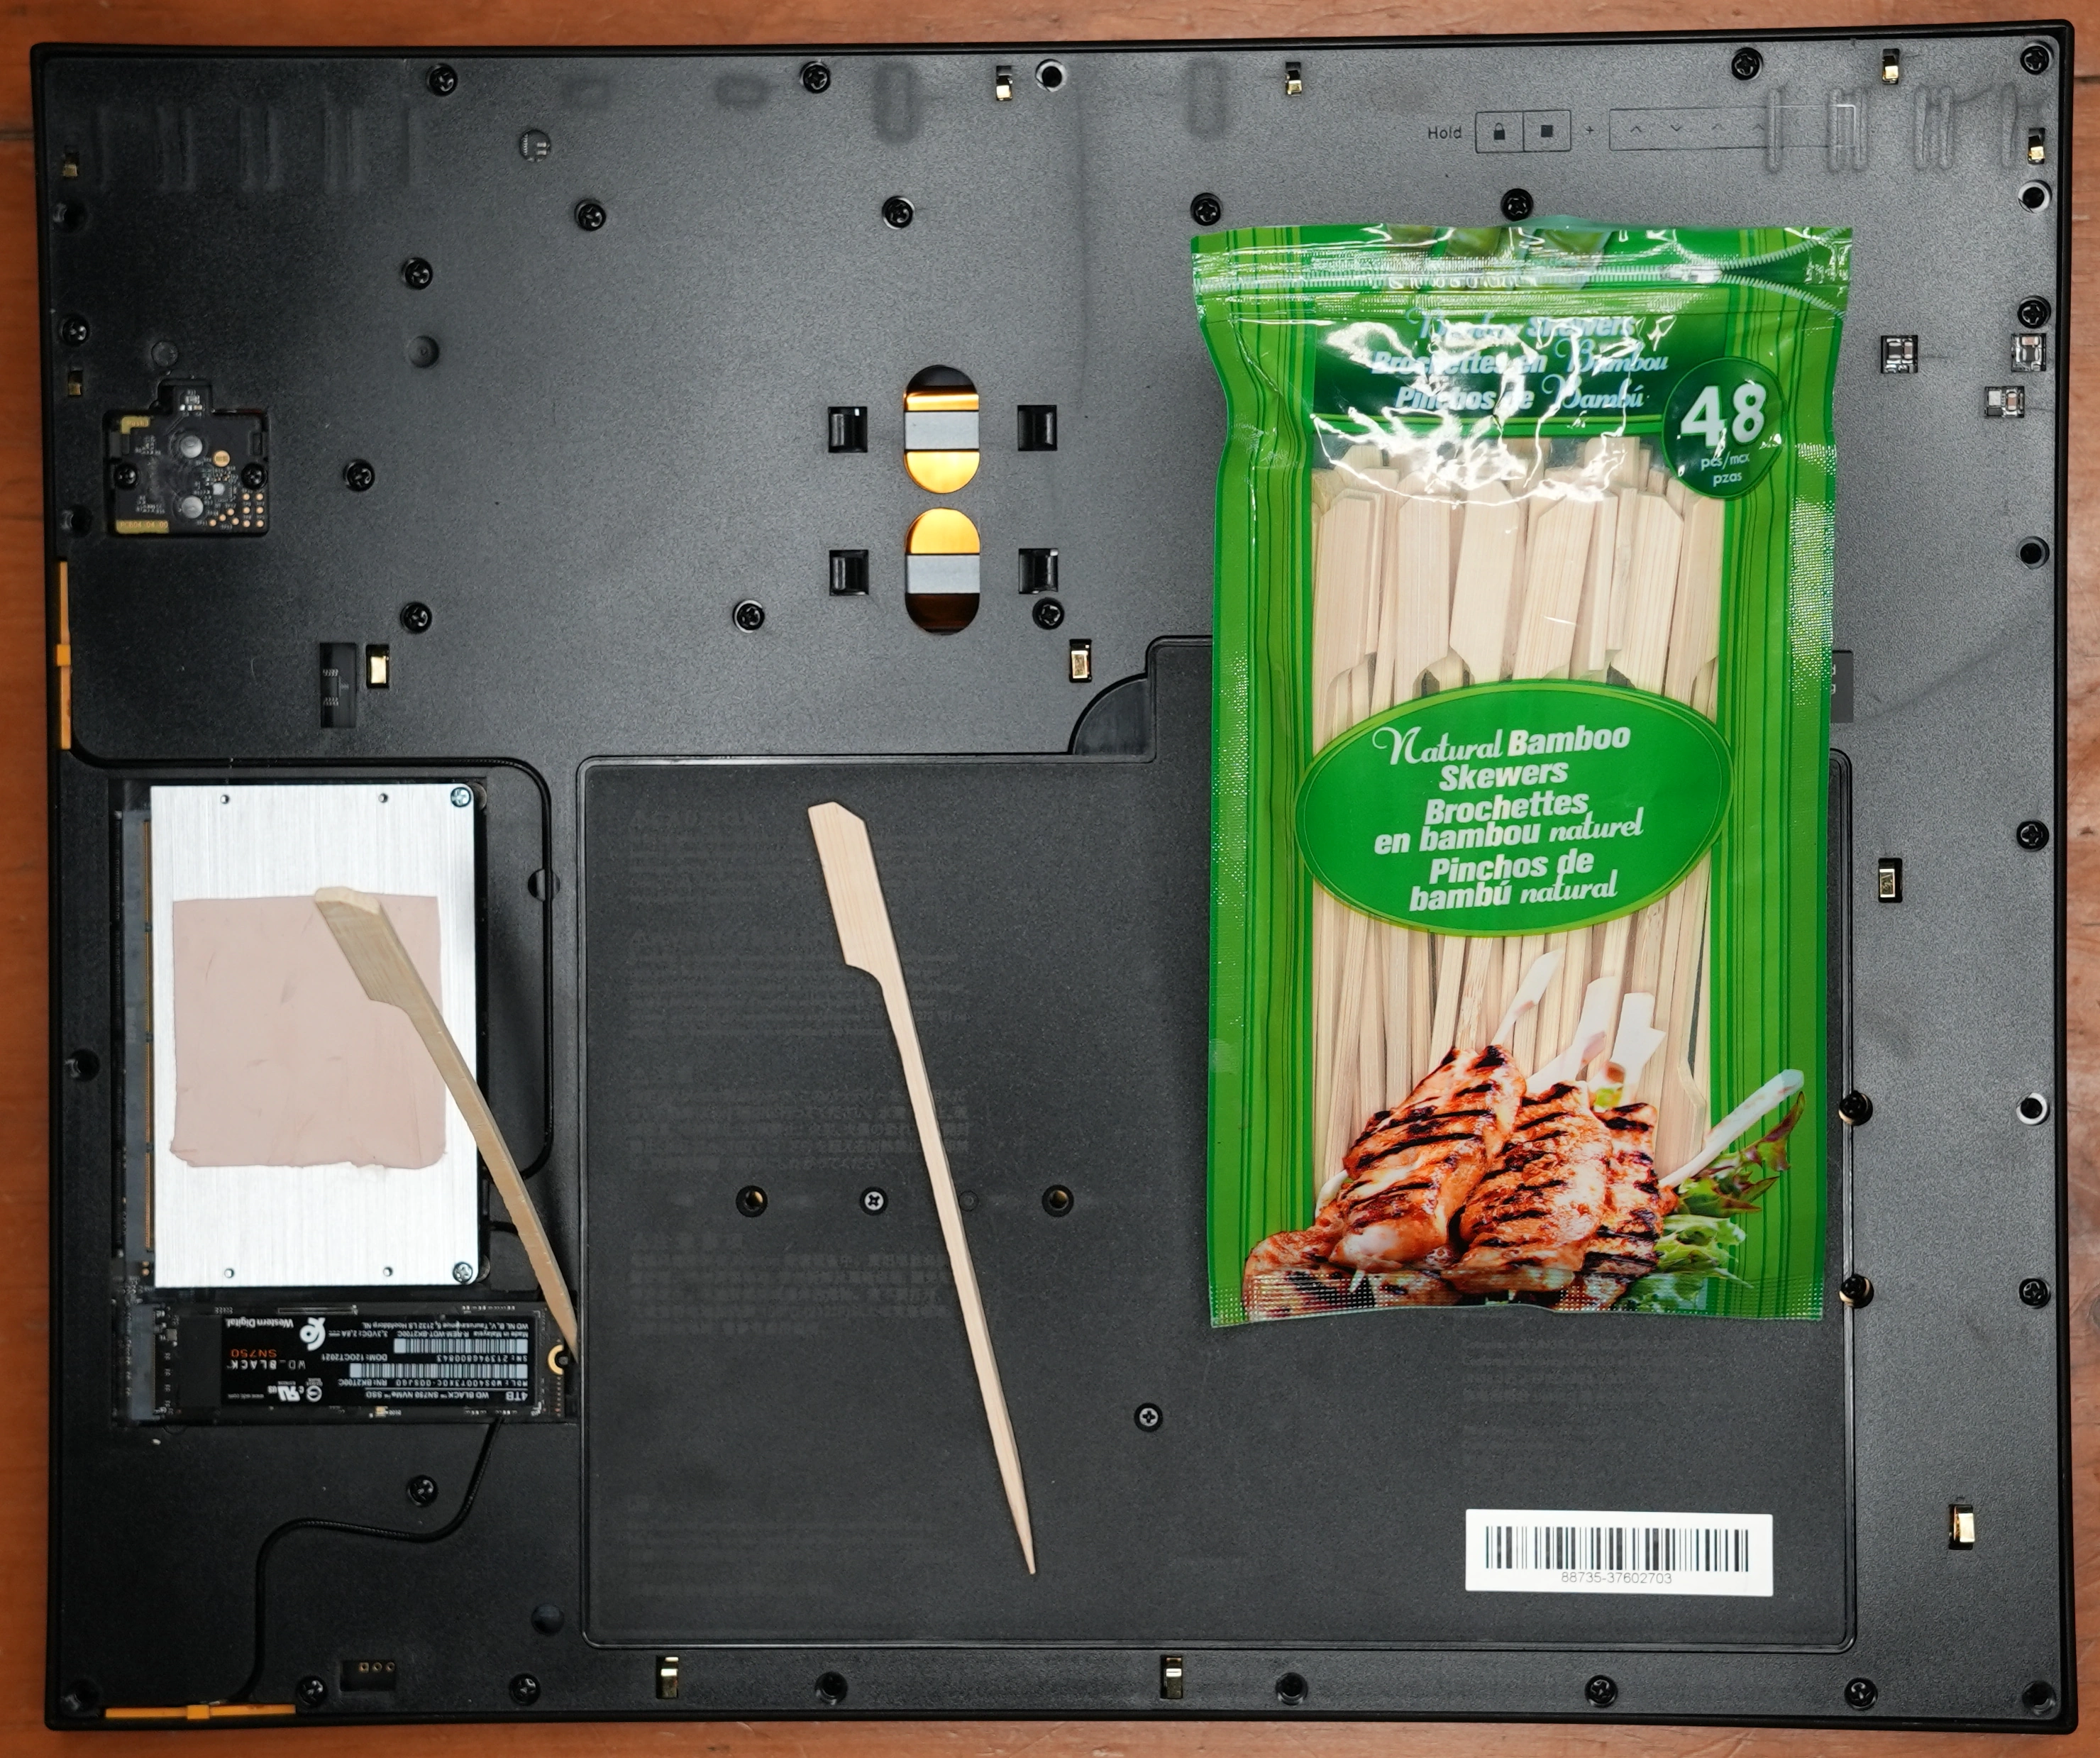
I trimmed the bamboo skewer flush with edge-cutting pliers, and the replacement NVMe drive was held in place nicely.
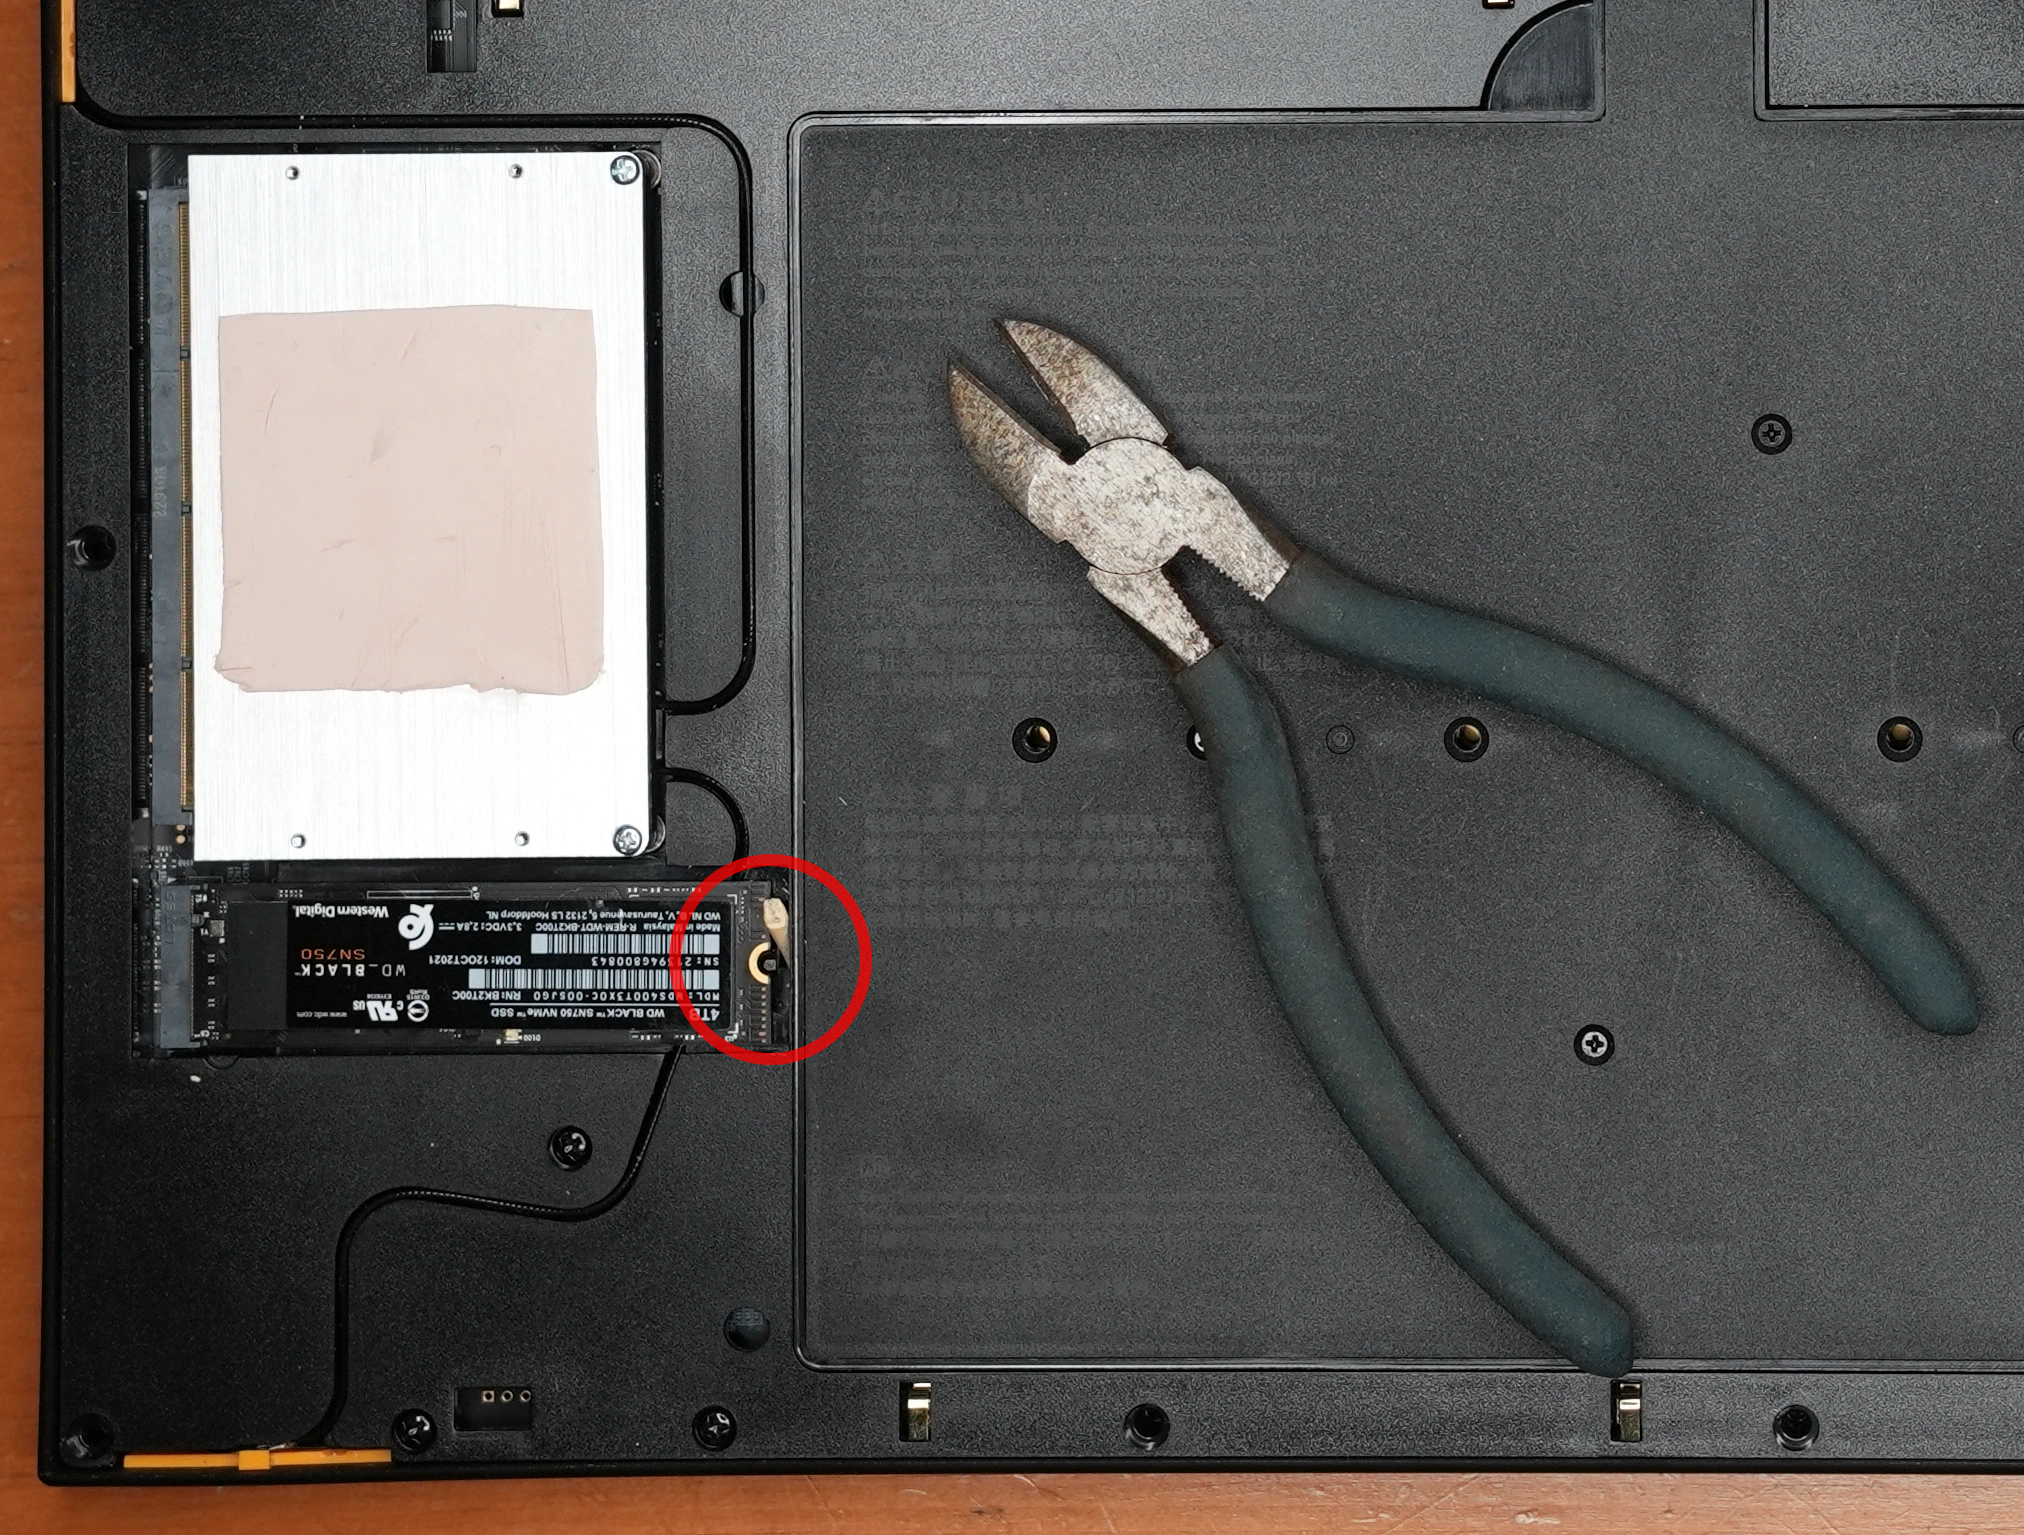
The P3S bottom plate was clearly intended to function as a heat sink; there is no other way for the electronic components to maintain a normal operating temperature. I decided to place a silicon thermal pad on top of the NVMe drive to hold it in place against the P3S metal bottom plate.
Ordering Thermal Pads
I ordered several thicknesses of thermal pads, so I could use one or more pads to get the necessary thickness to hold the NVMe drive in place without subjecting it to excessive pressure.
The top of the replacement NVMe drive nearly matches the height of the top of the CPU module. Adding a thermal pad on top of the NVMe drive that matches the thickness found on the thermal pad on the CPU module should provide good cooling for the NVMe drive. I found that applying a 1.5 mm silicone pad to the top of the replacement NVMe drive brought the top surface of the pad to the same height as the pink pad on the CPU module.
I did not apply the thermal pad yet to the NVMe drive because it needed to be connected to the computer again.
The original NVMe drive needed to be cloned to the replacement NVMe drive, and the
data partition on the cloned drive and its file system needed to be enlarged
to utilize the larger storage capacity of the replacement drive.
Clone Preparation
I wanted the original P3S 256 GB P3S NVMe drive to be cloned to the replacement 4 TB NVMe drive.
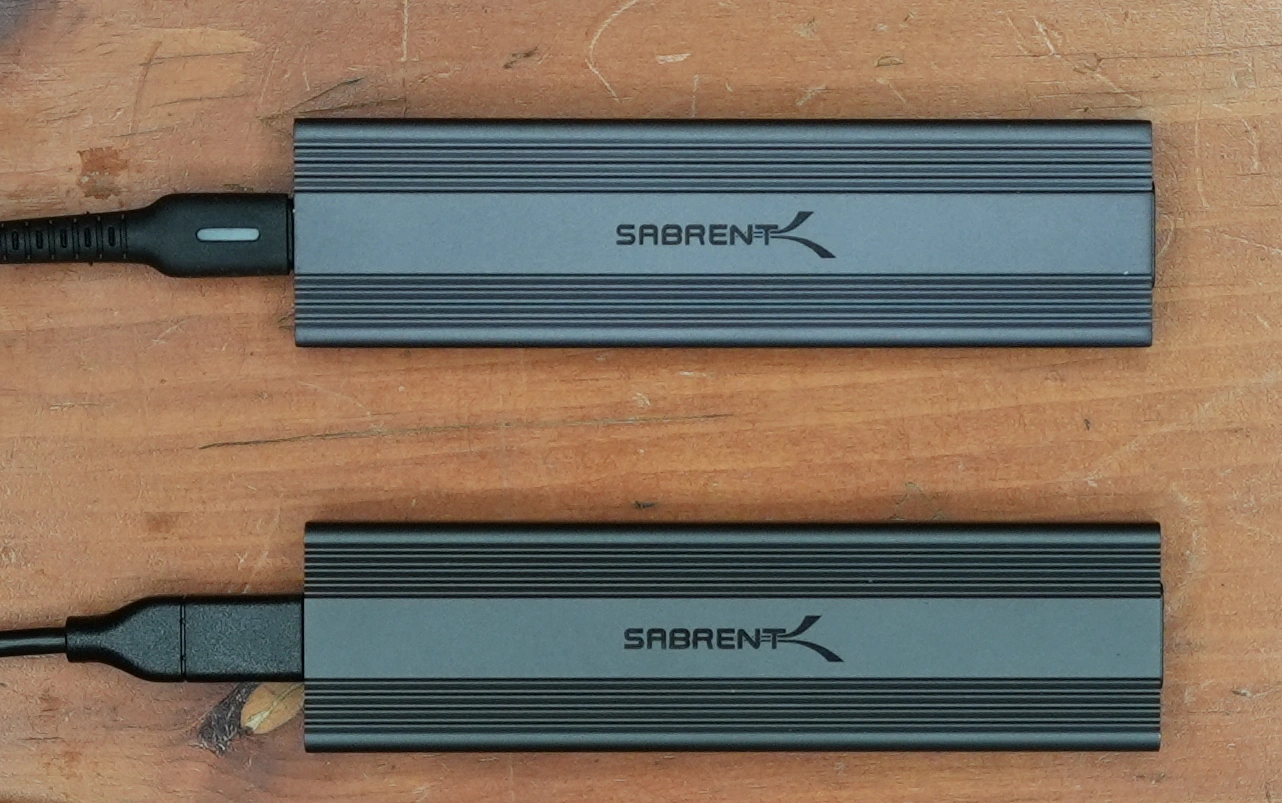
I placed the original 256 GB NVMe from the P3S in a Sabrent Rocket RGB NVMe / USB-C enclosure (EC-RGBG). I put the replacement 4 TB NVMe into a second Sabrent NVMe / USB-C enclosure.
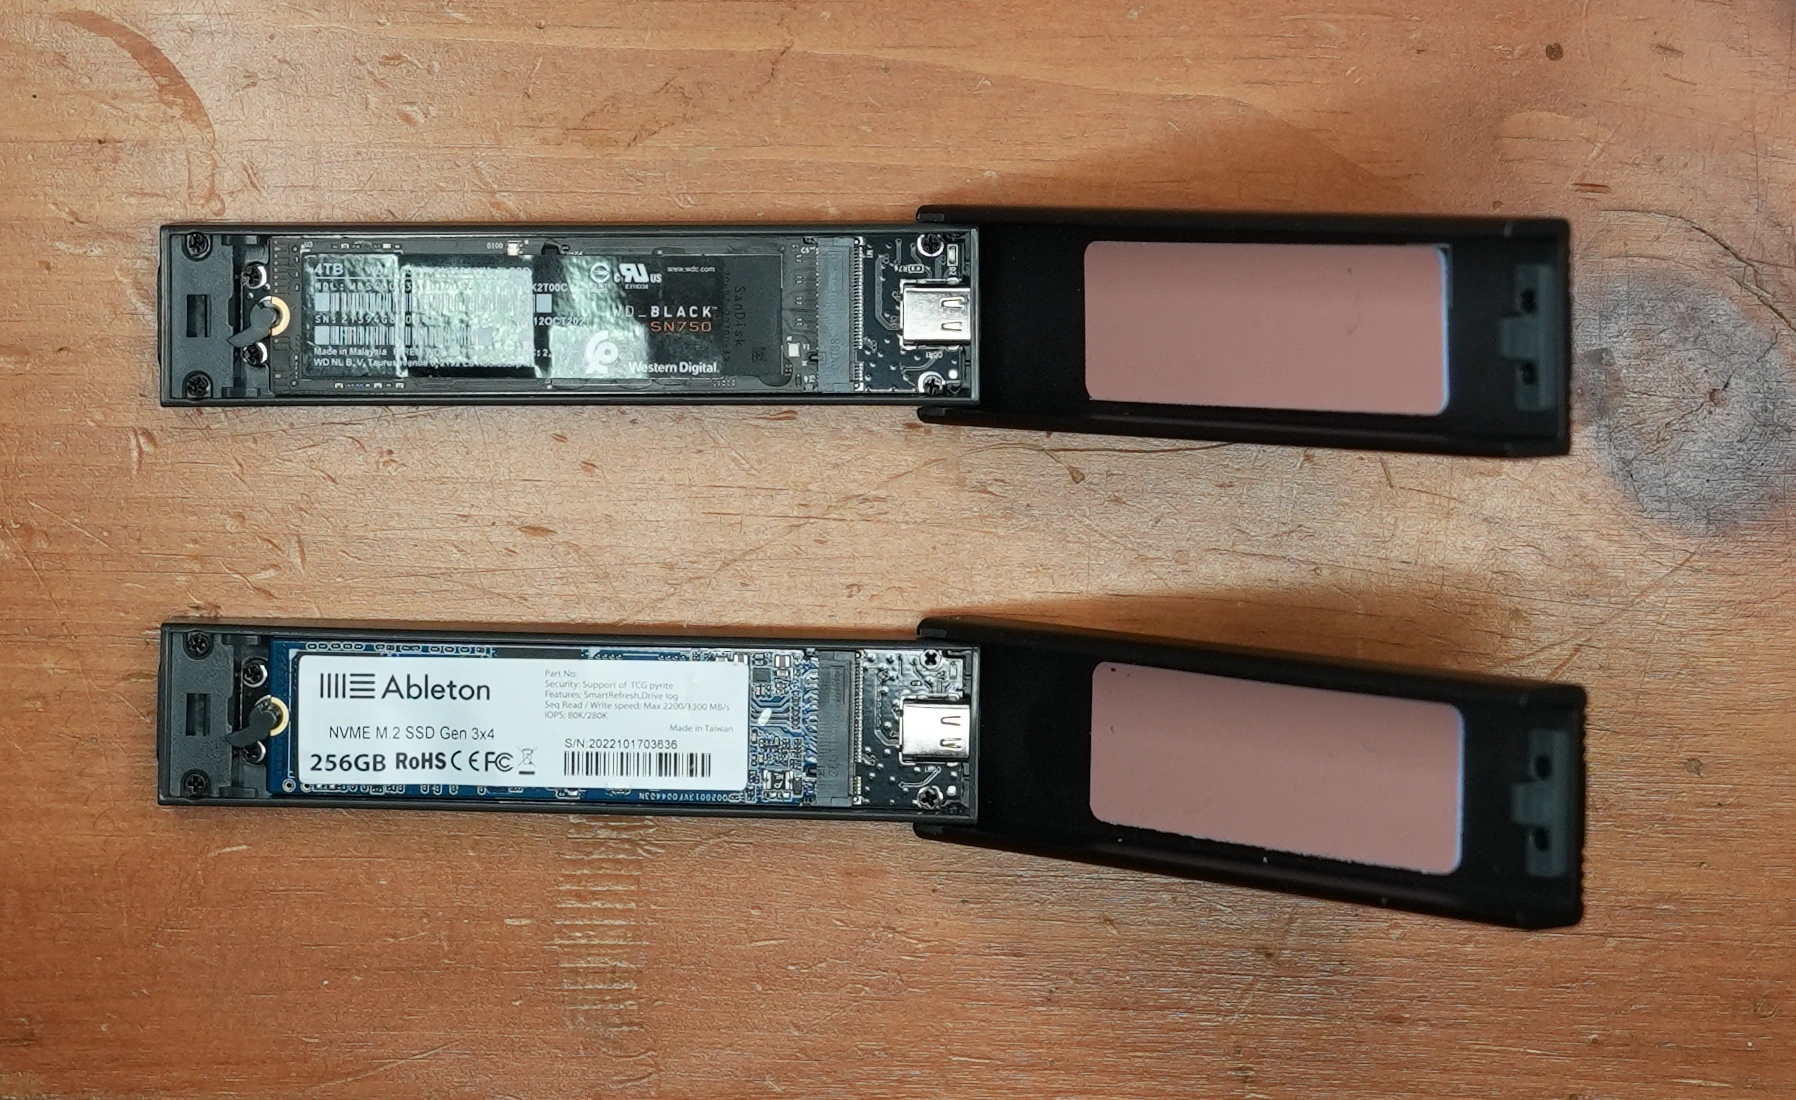
I closed the lids on the two Sabrent NVMe / USB enclosures and plugged them into a Windows computer using USB-C to USB3 adaptors.
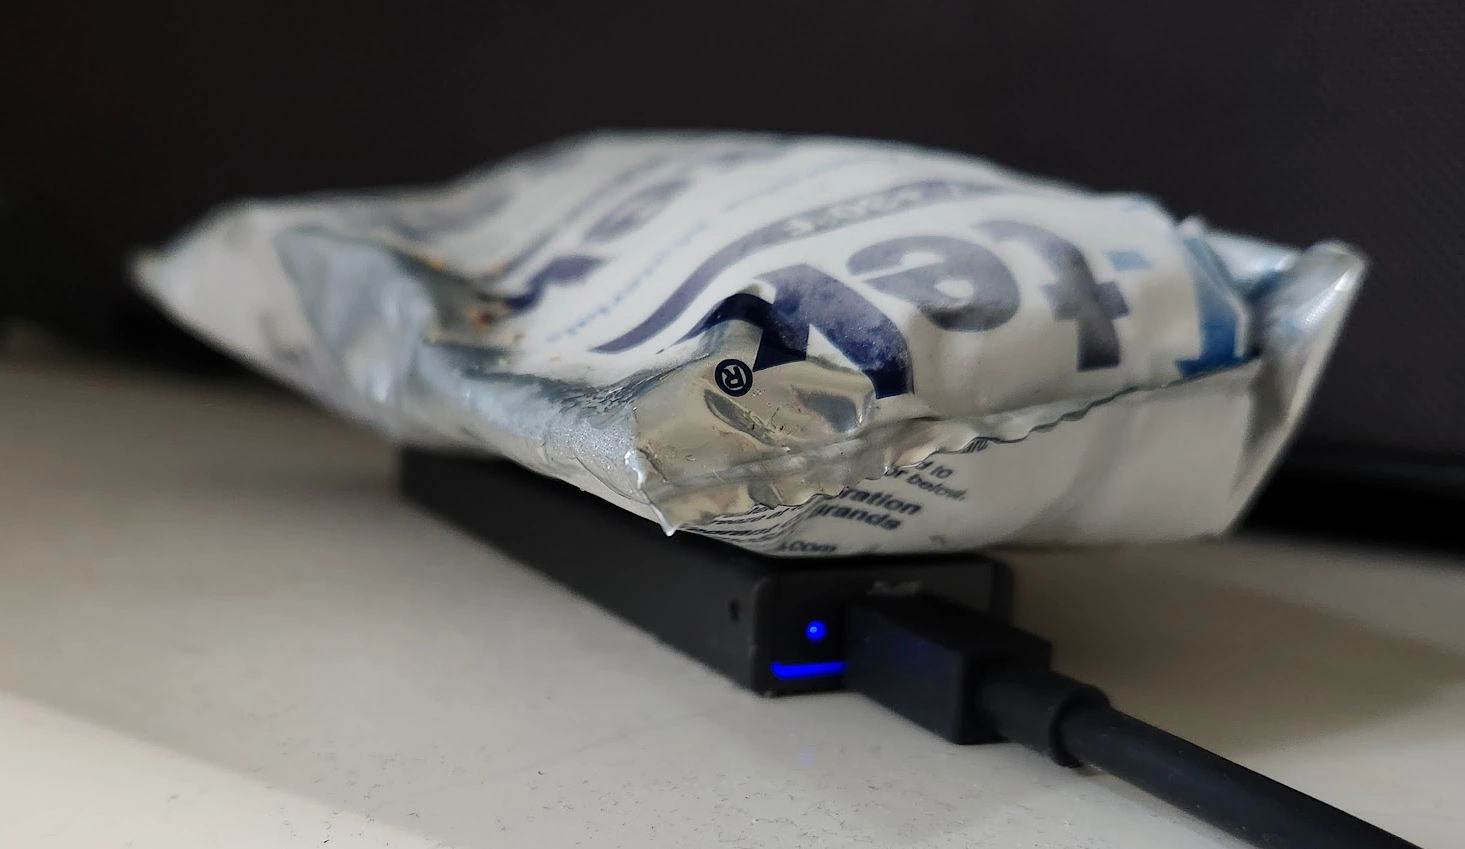
The Sabrent enclosures do not provide very good cooling. Recently, when backing up an internal NVMe drive to an external NVMe drive in a Sabrent enclosure, the operation would constantly abort when 3% complete. Placing an ice pack on the enclosure solved that problem.
Terminology
I would like to define the following terms for the purpose of this article:
- Drive
- A physical mechanism for storing block data, for example, directories and files. The same term is used to refer to the collection of logical partitions on the physical drive.
- Partition
- A portion of the available storage provided by a physical drive. Drives often have several partitions. Various types of partitions differ in how their contents are administered.
- Device
-
Each physical partition appears to a computer’s operating system as a device.
Linux uses names like
/dev/sda1and/dev/sdb5for storage devices. - File system
- The directories and files stored in a partition are managed by the partition's file system.
- Mounting and unmounting
- File systems can connect to each other; when we connect them together, we say they are being mounted. When file systems are being disconnected, we say they are being unmounted.
Although it is more accurate to say:
“unmounting the file system in a partition”,
that phrase does not roll off the tongue as easily as the little white lie:
“unmounting a partition”.
Almost everyone uses the latter phrase;
however, they probably do not realize these words blur the actual mechanics just a little.
VirtualBox
I wrote an article about setting up VirtualBox. This article discusses how VirtualBox might be used twice:
- To clone the original NVMe drive to a larger NVMe drive.
- To expand the
datapartition on the larger NVMe drive to utilize all the storage capacity of the new drive.
If you want to type along with this article, you might want to consider setting up VirtualBox as well.
Unmounting A File System
Unless your file system has provision for snapshotting, file systems should be unmounted for all partitions that you want to clone. Furthermore, file systems should be unmounted before modifying them, for example, if the file system needs to grow or shrink.
By default, Ubuntu automounts every file system it encounters; this can be annoying or helpful.
There are two common ways of unmounting a partition when using Ubuntu Desktop:
- Use Nautilus, the default Ubuntu file manager
- Use the
umountcommand.
Unmounting Via Nautilus
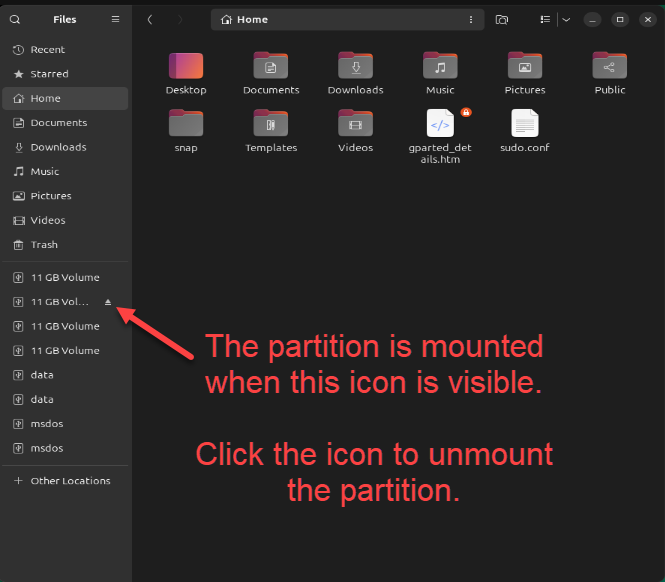
In Nautilus, click the icon next to each of the mounted file systems to dismount them.
UnMount Incantation
The following incantation unmounts /dev/sdb1 through /dev/sdb5:
$ for X in {1..5}; do sudo umount /dev/sdb$X; done
Clonezilla
Clonezilla can clone just about any type of hard drive. I wrote an article about how to use Clonezilla to clone NVMe drives, using the P3S NVMe drive as the example.
To test the cloned drive was as functional as the original NVMe drive, I just plugged in the P3S power cord and turned on the P3S while it was still lying on its front. I then turned it to the side and watched the unit power up without incident. Then I turned off the P3S and set it down again.
The cloned drive is an exact clone of the original.
To take advantage of the larger capacity drive, the data drive partition must be made larger,
and the file system within the partition also must be made larger.
The Clonezilla article told you how to run Clonezilla several ways:
- Booting a CD, DVD or SSD drive containing a stripped-down Linux and Clonezilla.
- Booting a VirtualBox VM containing the above ISO image.
- Booting Ubuntu Desktop, and installing Clonezilla on it. This is the setup I used to write these articles.
Enlarging the Data Partition and Its File System
For those readers who are typing along, so far,
I have explained how to clone the Ableton P3S NVMe drive using Clonezilla.
Now, the data partition on the newly cloned NVMe drive must be enlarged to fully utilize the larger
capacity of the replacement NVMe drive.
I removed the newly cloned NVMe drive from the P3S and put it back in one of the Sabrent NVMe / USB housings. I then reattached the USB drive to the desktop computer.
If you want to type along, you should either use a machine with Ubuntu Desktop installed or run an Ubuntu Desktop instance in a VirtualBox VM. If this is the first time that your VirtualBox VM has been used with a Sabrent enclosure, you need to associate the USB device for the NVMe in the Sabrent enclosure, so click on the small rocket icon at the bottom of the VirtualBox window and enable Sabrent [2001].
Ubuntu automounts all the partitions on the NVMe drive clone at this point.
We still need to resize the data partition.
This partition maps to the /dev/sdb5 device on the Ubuntu Desktop VM.
Once again, I unmounted /dev/sdb5 so it could be worked on.
I show how to enlarge the P3S’s data partition and its file system in
Supersizing a Partition and Its File System.
Closing Up
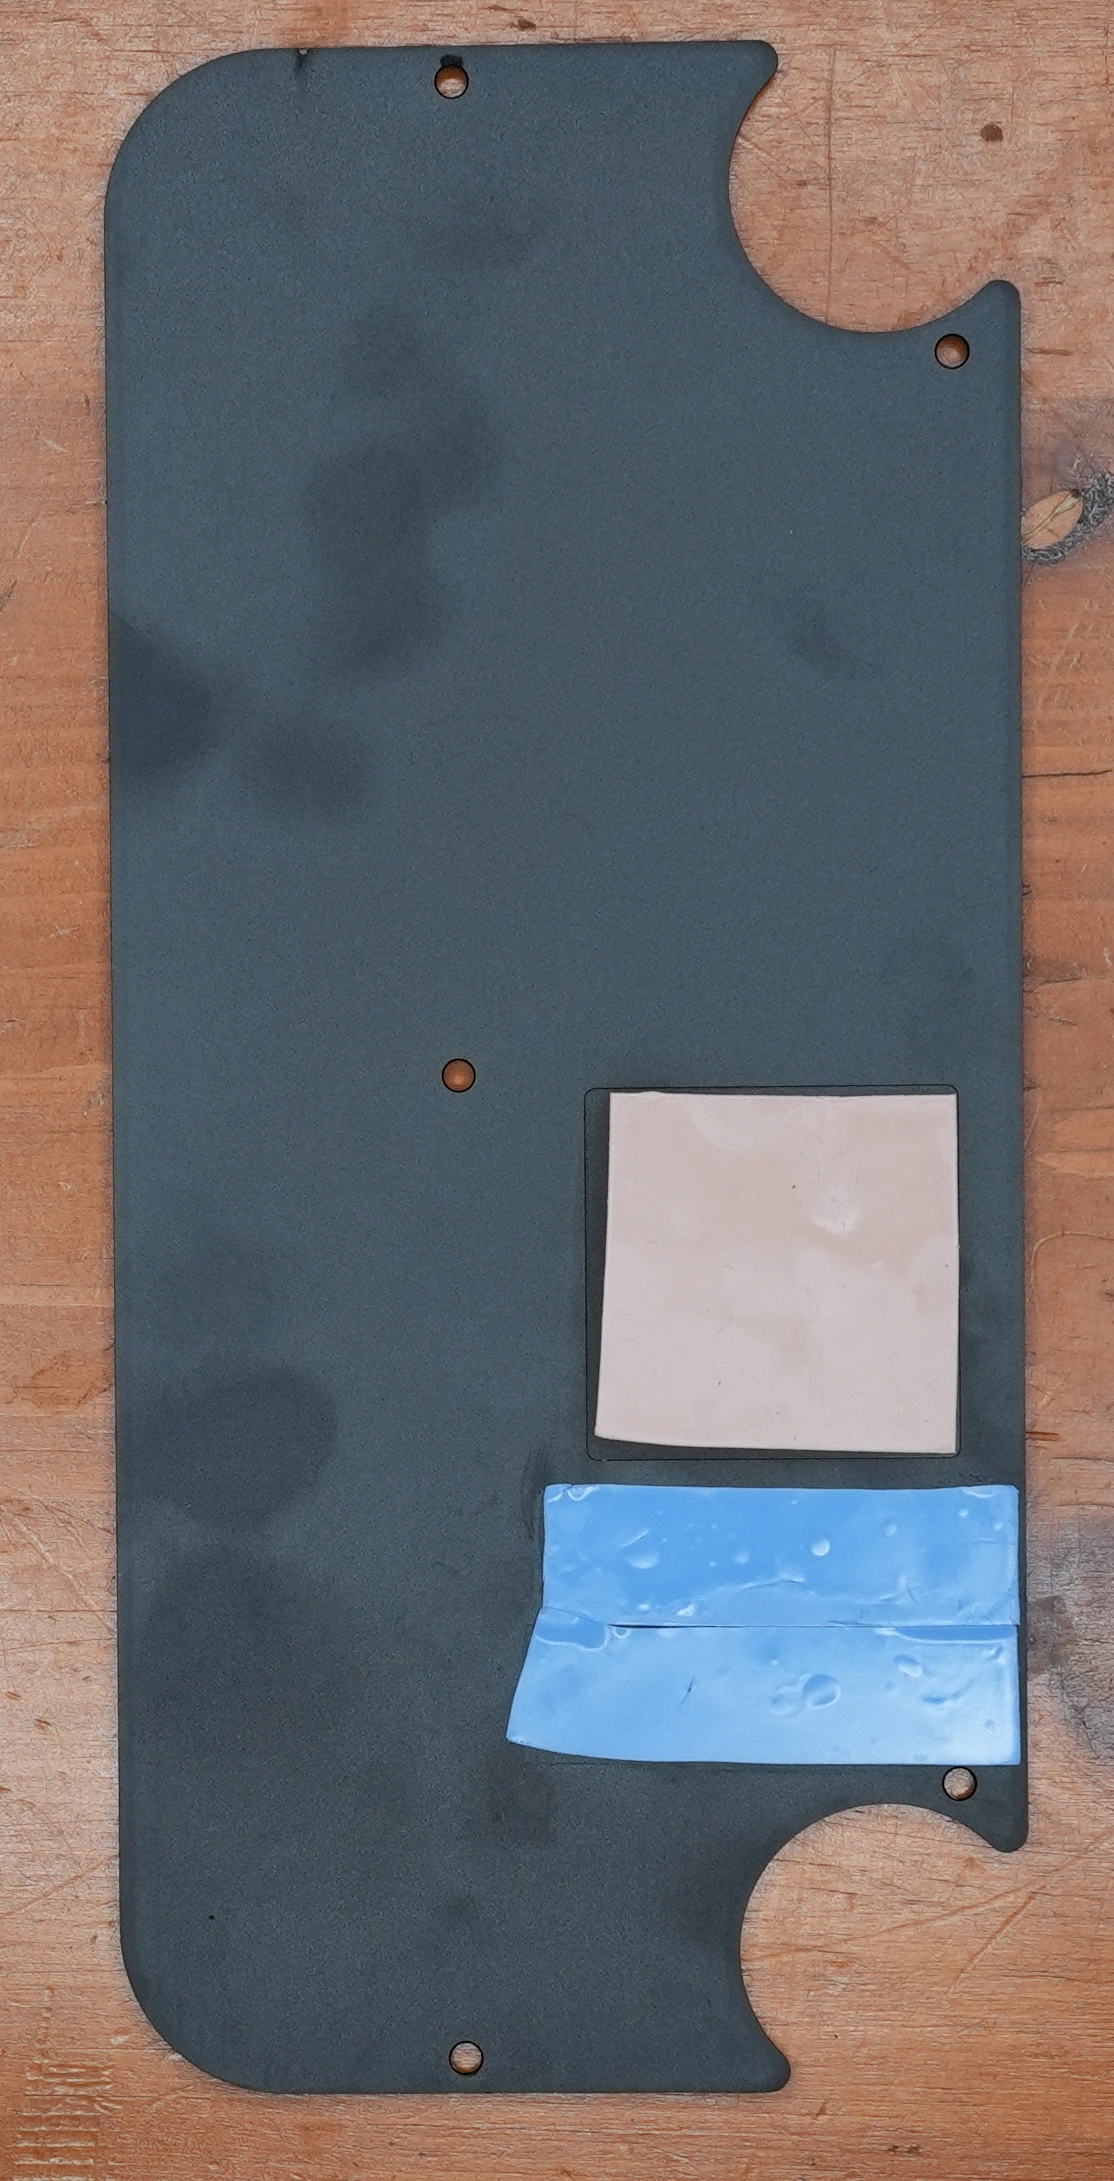
I replaced the backing plate, putting the bolts in the proper holes.
The CPU module has a thermal pad between it and the bottom plate, and there is another pad on the other side of the bottom plate, at the matching location of the external heat sink.
I felt that the new, larger and hotter NVMe drive would also benefit from a thermal pad on the other side of the bottom panel. This would help conduct the extra heat from the new NVMe drive to the external heat sink. You can see the two blue, 0.5 mm thick thermal pads that I added; I felt that more was better.
All Done
😁We did what we set out to do: replace the P3S internal drive with a larger drive. … And we learned a few things along the way!
Q & A
Someone on the Ableton Push Forum asked me a few questions about this article.
hi, i want to upgrade my ssd as well but some questions before, is there an ssd that has the same height? i do not need 4tb so in this case i can use a 1 or 2 tb for this that fits exactly like the stock one? also wanted to make sure i can use ur tutorial for a virtualbox running on a mac m1?
SSDs can have a USB interface, a SATA interface or an NVMe interface. The storage component within all of these SSDs is essentially the same. The P3S has an internal SSD with an NVMe interface; this is usually called an NVMe drive.
By “height”, I believe you actually mean “thickness”. The advantage of using a slender single-sided NVMe drive in a P3S is that the P3S retaining pin would be able to hold the NVMe in place. Not mentioned in the articles is the length and width of NVMe drives: the P3S is designed to use “2280” NVMe drives. “2280” denotes a module that is 22 mm wide and 80 mm long. So you might search for: 1 tb nvme single-sided 2280. When I did that, I found a Samsung 1TB PM961, which looks like a perfect match for a P3S.
The Patriot P400 Lite M.2 PCIe Gen 4 seems just as good, and costs the same, but has twice the storage capacity (2 TB). (Amazon USA, Amazon Canada). Note that the Patriot P400 V4 is much faster than the Lite version (6200 MB/s read, 5200 MB/s write), and does not cost much more.
The best price/performance NVMe I have seen so far is the Lexar EQ790. This single-sided 4TB NVMe has faster write speeds than the Lexar NQ790, at only a 20% premium, which still makes it cheaper per TB than competitors.
Another important detail that I did not mention in the articles is the requirement of controlling static electricity. If you accidentally zap an NVMe drive with a spark from your finger, its contents might get wiped out, or its electronics might be destroyed.
The article I wrote on VirtualBox says it runs the same on all supported host OSes. Clonezilla runs the same because it always runs on Linux. However, if you have never used Linux before, then I do not recommend you leap in and attempt to perform open-heart surgery on your P3S. Instead, install VirtualBox, then Ubuntu as described in the VirtualBox article. Play with Ubuntu Linux for many hours, running various programs and becoming familiar with how Ubuntu Linux works. Read about Linux and Ubuntu. Then start experimenting with cloning various drives. Once you have mastered all that, you might consider opening up your P3S and performing open-heart surgery.
Another option you have, once you have installed Ubuntu Linux in VirtualBox,
is to share your screen with someone who has worked extensively with Linux and has cloned Linux ext4 drives before.
Let them do the surgery while you watch.
Yet another option is to give your P3S to someone who is used to doing this sort of work. Let them open it without zapping anything with static electricity, and perform the open-heart surgery.
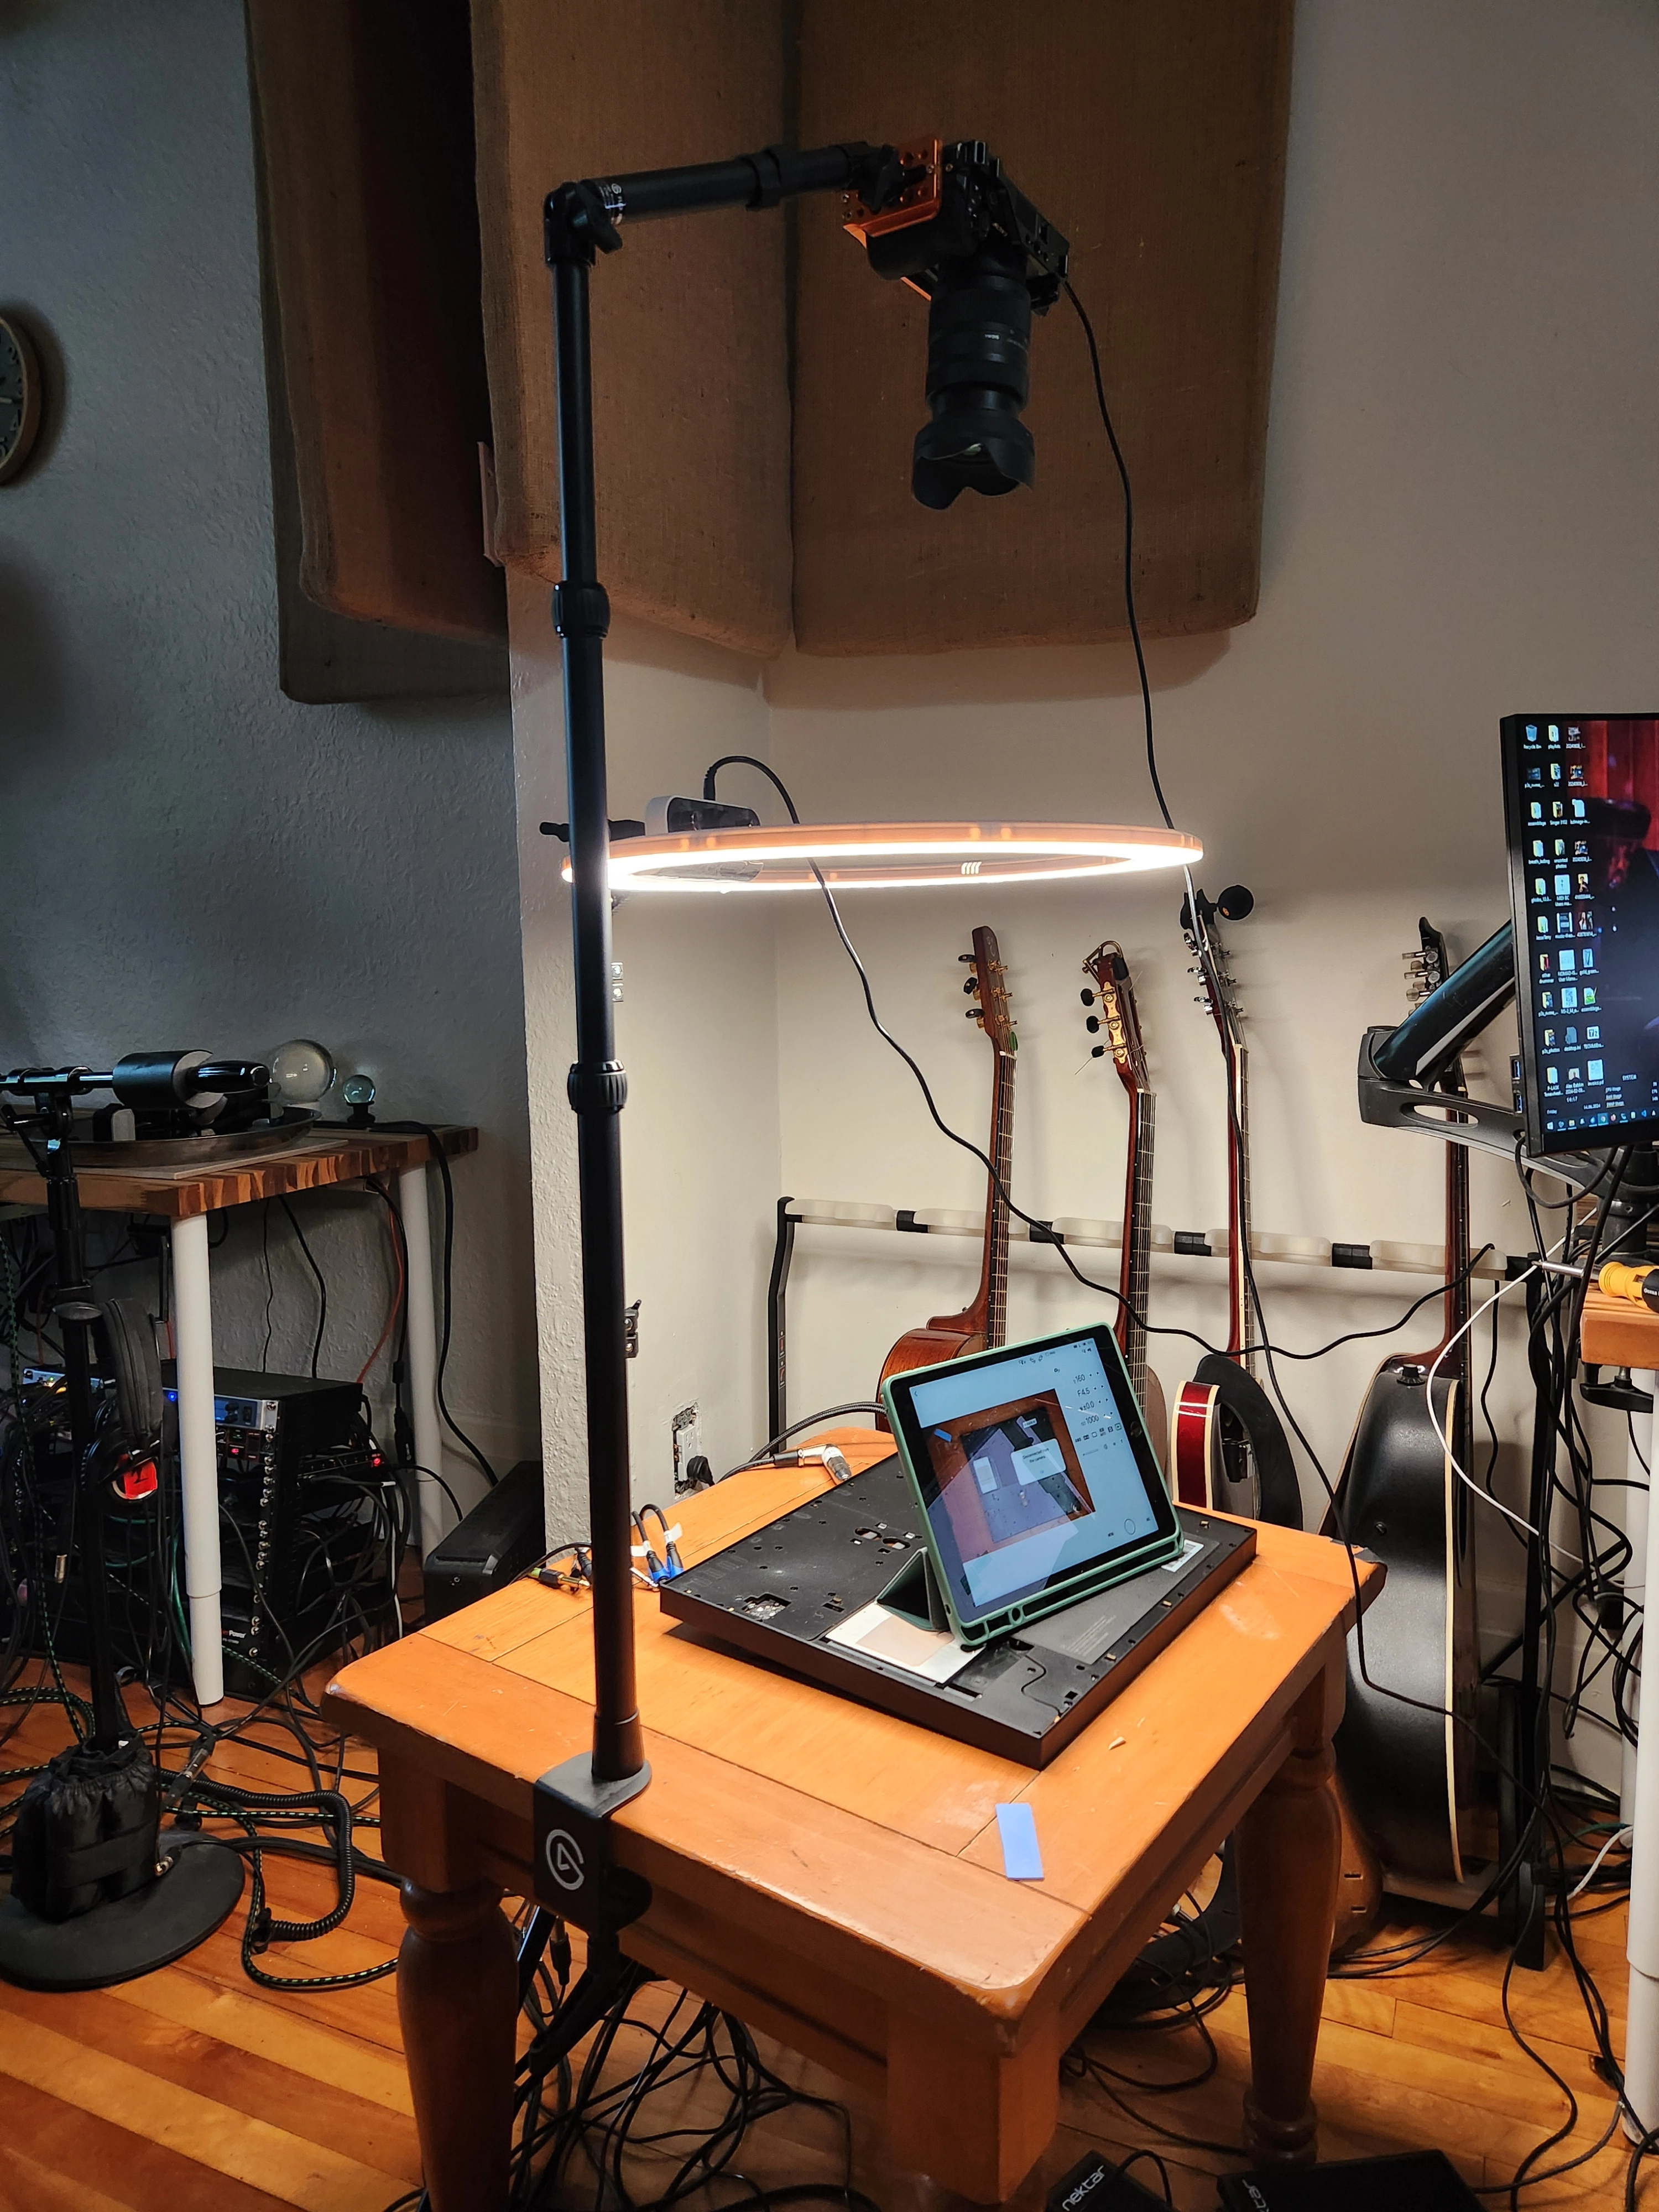
Photo Setup
This is the setup I used to photograph the P3S.
This article is part of a mini-series that discusses how to increase the storage capacity and performance of the Ableton Push 3 Standalone (P3S). If you own a P3S, or are thinking of purchasing one, you might want to first read my review.
The articles in this mini-series are:
