Published 2020-12-28.
Last modified 2023-11-21.
Time to read: 5 minutes.
jekyll collection.
Debugging Jekyll plugins can be a challenge, but a configurable logging facility can be a big help.
Writing puts statements to generate insightful output is a quick-and-dirty solution.
However, puts statements are tedious to control and maintain
because you must comment and uncomment lines that generate output as you work through issues.
Inevitably, you forget to comment some, and the code is released with messy output.
when used correctly
Loggers are cheap and easy to set up. Use a dedicated logger for each plugin that you write.
Loggers can output to STDOUT, STDERR, or a file.
The output for each logger should be individually controlled by
adjusting their log levels through configuration settings.
Topics
This article discusses the following topics:
- A quick introduction to Ruby logging.
- Detailed discussion of default Jekyll logging: what it is and how to work with it. Then a revelation: that logging facility is most useful for the people who maintain the Jekyll project, and it can be painful for others to use.
-
Describes
jekyll_plugin_logger, a Ruby gem that allows you to quickly make custom loggers for your plugins. This plugin was originally calledlogger_factory, but it was renamed for version 2 because it was completely rewritten and became completely incompatible with previous versions. -
Standard operating procedure is to set the log level for all loggers
to
warnorerrorwhen you are not debugging the code associated with them. Place expressions to be evaluated within blocks, so site generation goes full speed.
Colored Console Output
It can be difficult to find what you are looking for as you watch miles and miles of log output spew onto your console,
hour after hour, while you work on a problem.
Colored output can be a big help.
Jekyll relies on the colorizer gem,
colorizer allows you to inject colors into any terminal output written by puts
or sent to a log that writes to STDERR or STDOUT.
It is easy to do this. Just append a suffix to a string that indicates the color you want. For example:
puts "Green text and ham!".green
log.warn "Red text at night, sailor's delight".red
The above produces:
Green text and ham!
Red text at night, sailor's delight.
The colors supported by the colorizer gem are as follows,
with yellow and white shown on a dark background, so they can be seen:
redblackgreenyellowmagentawhitebluecyanbold
First, the Obvious But Wrong Way
You can cause Jekyll.logger to generate log messages by writing code like this:
Jekyll.logger.debug "Hello, world"
Jekyll.logger.info  "Hello, world"
Jekyll.logger.warn  "Hello, world"
Jekyll.logger.error "Hello, world"
The default Jekyll.logger.log_level is :info.
This is a global setting that affects all of Jekyll because only one Logger is used throughout Jekyll.
It outputs to $stderr.
If you want to control the output by adjusting log levels,
you will quickly realize that attempting to adjust
log_level for Jekyll’s logger singleton is problematic.
When you need to see verbose output from your plugin,
verbose output from the rest of Jekyll will also spew all over your terminal.
Adjusting Jekyll.logger.log_level
Jekyll.logger is under-documented.
This section is just provided to round out your understanding of how logging works in Jekyll.
Please do not attempt to use Jekyll’s logger in your plugins;
instead, use the jekyll_plugin_logger, described below,
which is packaged as a Ruby gem for convenience.
To set Jekyll.logger.log_level for the entire webapp, specify the
--verbose / -V or --quiet / -q options when starting Jekyll:
$ bundle exec jekyll build --verbose  # Sets log_level to :debug

$ bundle exec jekyll build --quiet  # Sets log_level to :error

$ JEKYLL_ENV=development bundle exec jekyll serve --verbose

$ JEKYLL_ENV=development bundle exec jekyll serve --quiet
You can also reset the Jekyll log level from within a Jekyll plugin like this:
Jekyll.logger.adjust_verbosity(:verbose => true)
I found that _config.yml has no effect on Jekyll.logger.log_level;
the following entry does nothing:
quiet: true
Jekyll_plugin_logger To the Rescue!

Jekyll_plugin_logger provides 2 classes:
PluginMetaLogger–PluginLoggerfactory and top-level logger.PluginLogger– Logger dedicated to a specific Jekyll plugin.
PluginMetaLogger is designed to provide each Jekyll plugin with its own PluginLogger instance.
This allows each plugin’s log level to be individually controlled.
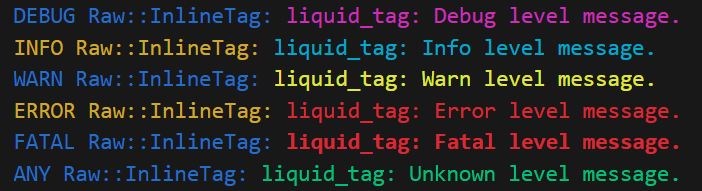
The log levels look like the following on a terminal:
The current version does not allow the colors for each log level to be customized on the terminal. Please create an issue if that feature would be useful to you.
Log messages can also be displayed on a web page.
Colors are defined in
demo/,
and you can, of course, implement any stylesheet you desire in your webapp.
The HTML output shown below indicates the numeric log level (0..5)
and the corresponding log level name (debug .. unknown).
debuglevel output is colored magenta.infolevel output is colored cyan.warnlevel output is colored yellow.errorlevel output is colored red.fatallevel output is colored bold red on the terminal; however, the HTML stylesheet providedjekyll_plugin_loggeruses white on red.unknown(ANY) level output is colored green; however, the HTML stylesheet providedjekyll_plugin_loggeruses green on light yellow.
Installation
See the jekyll_plugin_logger documention.
Background
When jekyll_plugin_logger starts up, it inspects _config.yml
for a section labeled plugin_loggers.
When a Jekyll plugin asks Jekyll_plugin_logger to create a logger,
jekyll_plugin_logger searches the section for a key named after the plugin’s fully qualified class name.
For example, if the Jekyll plugin’s fully qualified class is called MyPlugin1,
then an entry called plugin_loggers.MyPlugin1
would be read from the site configuration, if present.
If no such entry is found,
then the log_level for that logger is set to info.
Here are a few example entries:
If the Jekyll plugin is part of a Ruby module, the fully qualified name of the plugin class begins with the module name, followed by two colons.
plugin_loggers:
  PluginMetaLogger: info
  MyPlugin1: warn
  Module2::MyPlugin2: error
  Module3::MyPlugin3: debug
As you can see above, the log level for each Jekyll plugin is written after the fully qualified class name of the Jekyll plugin entry point.
This type of configuration only works for jekyll_plugin_logger, not for the default Jekyll logger.
Implementation Details for Geeks
When the plugin is loaded, jekyll_plugin_logger invokes a
Jekyll site hook
that instantiates the PluginMetaLogger singleton.
PluginMetaLogger constructs a PluginLogger info-level instance for each entry,
with the log level as specified in _config.yml.
PluginMetaLogger. holds the site. section
that was read from _config.yml.
Examples
The two following examples perform very similar tasks.
Notice how the second plugin, built from jekyll_plugin_support,
is shorter and simpler than the first plugin,
built using the Liquid API that Jekyll exposes.
Example: Liquid Plugin
Below is a simple but complete example of how to create a plugin that extends Liquid::Tag
and has a dedicated jekyll_plugin_logger.
require 'jekyll'
require 'jekyll_plugin_logger'

class InlineTag < Liquid::Tag
  NAME = 'liquid_tag'.freeze
  VERSION = '0.1.0'.freeze

  def initialize(tag_name, text, tokens)
    super
    @logger = PluginMetaLogger.instance.new_logger(self, PluginMetaLogger.instance.config)
    @text = text
  end

  def render(_context)
    @logger.debug { "Debug level message." }
  end

  Liquid::Template.register_tag(NAME, Raw::InlineTag)
  PluginMetaLogger.instance.info { "Loaded #{NAME} #{VERSION} plugin." }
end
The above might cause the following output to appear on the console.
INFO PluginMetaLogger: Loaded liquid_tag v0.1.0 plugin.
DEBUG Raw::InlineTag:  Debug level message
Note that the debug level output would only be displayed if _config.yml had an entry like:
plugin_loggers:
  Raw::InlineTag: debug
Take a look at
https:/
for the complete working example.
Example: JekyllSupport Plugin
Below is a simple but complete example of how to create a plugin that extends JekyllSupport::JekyllTag
and has a dedicated jekyll_plugin_logger.
require 'jekyll_plugin_support'

module Support
  class InlineTag < JekyllSupport::JekyllTag
    NAME = 'support_tag'.freeze
    VERSION = '0.1.0'.freeze

    def render_impl
      @logger.debug { "Debug level message." }
    end

    JekyllPluginHelper.register(self, NAME)
    PluginMetaLogger.instance.info { "Loaded #{NAME} #{VERSION} plugin." }
  end
end
The above might cause the following output to appear on the console.
INFO PluginMetaLogger: Loaded support_tag v0.1.0 plugin.
DEBUG Raw::InlineTag:  Debug level message
Note that the debug level output would only be displayed if _config.yml had an entry like:
plugin_loggers:
  Support::InlineTag: debug
Take a look at
github.com/
for the complete working example.
Do Not Use Simple Strings
These log messages are always computed, needed or not:
@logger.info "Information message"
@logger.warn("Warning message")
@logger.error "Error message"
Use Blocks Instead
The following blocks are not evaluated unless the current log_level requires them to be.
This means your Jekyll site will generate quickly when log_level is set high enough to suppress most output.
@logger.info { "Information message" }
@logger.warn { "Warning message" }
@logger.error { "Error message" }
You can also use “fat braces” (do ... end) instead of {regular braces}.
The following example also uses
string interpolation within a
squiggly here document:
@logger.debug do
  <<~END_DEBUG
    @link=#{@link}
    @site.posts.docs[0].url  = #{@site.posts.docs[0].url}
    @site.posts.docs[0].path = #{@site.posts.docs[0].path}
  END_DEBUG
end
Proof That Blocks Are Lazily Evaluated
Below is a simple example that demonstrates how Ruby blocks are lazily evaluated.
Output from the block passed to the test method results each time the block is evaluated.
As you can see, it is never evaluated.
This is because blocks in Ruby are only evaluated when invoked,
they are somewhat similar to call by reference,
and are definitely not call by value.
$ irb
irb(main):001:0> def test; yield if false; end
=> :test

irb(main):002:0> test { puts "hi" }
=> nil
Acknowledgements
Thanks to Ashwin Maroli (@ashmaroli) for his kind assistance.


