
Published 2022-02-13.
Last modified 2022-03-22.
Time to read: 10 minutes.
ruby collection.
This article is the second in a three-part series.
The previous article
described how to install and use the jekyll_bootstrap5_tabs plugin.
This article describes how the Jekyll plugin was constructed.
The plugin is built and published as an open-source Ruby gem.
The third article
demonstrates how to set breakpoints in the Jekyll plugin using Visual Studio Code and examine data structures.
The Ruby gem / Jekyll plugin provides a convenient way of creating tabbed sections in websites generated by Jekyll 4, which uses Bootstrap 5 for the user interface.
As a reminder, this video shows what we are building and publishing in this article:
We will discuss how to ensure that the Ruby source code in the Jekyll plugin uses currently accepted coding conventions and the simple, quick and easy publishing process that allows the world to use the open-source plugin. There is no charge for publication. Be fruitful and multiply!
If you just want to make a gem for yourself or modify someone else's gem, feel free to publish a new one. Each gem contains a reference to a license, and you can provide your own. Whether you were just thinking of yourself, a select group of people, or no one in particular, go ahead and publish.
Acknowledgement
Before writing this article,
I found an open-source project that provided Bootstrap 4 tabs for Jekyll
(github.com/Applifort/jekyll-simple-tab),
and I updated it to Bootstrap 5.
After working over virtually every line in the original program for a few hours,
I decided it would be easier and faster to just recreate the project scaffolding
using current versions and standards.
The essence of the two core files survived a heavy edit. Complements to the original author, Artur Gabitov: those two surprisingly short files are exquisite! I would have used many more characters to program something similar using more traditional approaches. This was the first time I had encountered the Slim domain-specific language (DSL). If I squint, it reads like the Slinn language.
I felt that the Slim Language was worth a closer look. Check out my Slim Language Explorer.
Beyond the necessary changes to support Bootstrap 5 instead of Bootstrap 4,
I also removed two lines from the Jekyll handler,
which had caused the contents of each tab to be enclosed within
<pre><code></code></pre> tags.
About This Article
The transcript of the process I followed is detailed below.
I originally used an older version of bundle to write this article.
On 2022-03-11, I revised this article to reflect the usage of a more recent version of
bundle because the newer version had significant changes.
$ bundle --version
Bundler version 2.3.7
Not discussed in this article is the work I did to modify the two original source files, so they were compatible with Bootstrap 5. The project README describes the HTML5 code generated for Bootstrap 5, however.
Also, not discussed in detail, is the simple process of replacing the contents of my fork of the original project with the new gem files.
Renaming the GitHub Project and Gem
I forked the jekyll-simple-tab GitHub project and renamed it to
jekyll_
by using GitHub.com’s Settings menu.
I also globally replaced the old name with the new name in every project file
and renamed directories and files accordingly.
The directory structure was further modified to match current programming standards; more on that later.
About Gems

Gems are built from a collection of files. Because I had decided to work from a clean slate and redefine the gem that Artur had published, I made a temporary work directory. My plan was to replace the old gem files with the new ones once the new gem worked. The plan worked, but I am getting ahead of myself.
The best way to generate the files that will make up your new gem is to use the
bundle gem command.
Following are comments that explain the customizations I made to the generated files.
- I use Visual Studio Code and WSL2 for working with Jekyll.
- The Visual Studio Code Rubocop plugin is great for working with Rubocop from Visual Studio Code. There was no reason to include Rubocop as a runtime project dependency. Software bloat is best avoided. Instead, development tools such as Rubocop were set up as development dependencies.
- Here are two sets of instructions for writing unit tests for Jekyll:
Rubocop and Programming Standards
Rubocop is a software linter. It is picky, like how you feel when picking lint off your sweater. Rubocop, like all software language linters, critiques the writing style of a program; unsurprisingly, it only operates on Ruby programs.
Rubocop issues warnings and provides advice. Many Ruby programming standards exist because needs vary according to circumstances. Rubocop’s default standards are well-considered, however, and in general represent very well-thought-out advice on how to write Ruby code.
You must define your programming standards in a Rubocop configuration file. Configuration files can occur in a multiplicity of locations. I prefer to establish Rubocop’s default standards as the standards I wish to use on all projects. This is easily accomplished by the following incantation:
$ touch ~/.rubocop
Explaining incantations is so much fun! Here we go...
The file ~/.rubocop is a file that specifies the current OS user’s overrides of the
default Rubocop programming style standards.
The touch
*nix command
updates the last-modified timestamp and creates an empty file if it did not previously exist.
By providing an empty file, you are not specifying any overrides,
so you get the default programming style standards for all your projects.
Writing style overrides are possible in many circumstances.
Gem Naming Conventions
The command to initiate a dialog that creates a new Ruby gem is:
$ bundle gem my_shiny_new_gem
The name you choose for your gem affects the code that is generated by bundle gem,
perhaps in a way that might surprise you.
I slightly paraphrased the official documentation for readability:
Our recommendation on the use of “_” and “-“ in your gem’s name.
- If a class or module has multiple words, use underscores to separate them.
-
If you’re adding functionality to another gem, use a dash.
This usually corresponds to a
/in therequirestatement (and therefore your gem’s directory structure) and a::in the name of your main class or module. -
If your class or module has multiple words, and you’re also adding functionality to another gem, follow both of the rules above.
For example,
net-http-digest_authadds HTTP digest authentication tonet/http. The user willrequire 'net/http/digest_auth'to use the extension (in classNet::HTTP::DigestAuth). - MacOS and Windows have case-insensitive file systems by default. Users may mistakenly require files from a gem using uppercase letters, which will be non-portable if they move it to a non-Windows or macOS system. While this will mostly be a newbie mistake, we don’t want to confuse them.
Many gems do not follow the above naming convention. Those gems can be more difficult to maintain because they do not follow conventions and might be more difficult to understand.
Elaborating further, when you create a gem, the characters you use in the new name are significant to how the gem is structured.
Consider what happens when you give your new gem a name containing underscores, for example my_shiny_new_gem:
$ bundle gem my_shiny_new_gem
A Ruby source file is produced that normally contains the module structure for the gem's processing logic. As you can see, the module structure is flat (it has only one level of hierarchy):
module MyShinyNewGem
  VERSION = "0.0.1"
end
However, if the name of your new gem contains dashes instead of underscores, like this:
$ bundle gem my-shiny-new-gem
Then the above produces a module structure with four levels of hierarchy for
lib/my-shiny-new-gem.rb.
Also note the similar but different file name, using dashes instead of underscores:
module My
  module Shiny
    module New
      module Gem
        VERSION = "0.0.1"
      end
    end
  end
end
With the above in mind:
Because my new gem will not be modifying another gem, I will name my new gem using underscores instead of dashes.
That means I will name the new gem jekyll_bootstrap5_tabs instead of jekyll-bootstrap5-tabs.
Creating A New Gem
Older versions of bundle engaged the user in a dialog.
This is no longer the case; a standard .gemspec is now generated instead.
$ bundle gem jekyll_bootstrap5_tabs
Creating gem 'jekyll_bootstrap5_tabs'...
MIT License enabled in config
Initializing git repo in /mnt/f/work/jekyll/temp/jekyll_bootstrap5_tabs
      create  jekyll_bootstrap5_tabs/Gemfile
      create  jekyll_bootstrap5_tabs/lib/jekyll_bootstrap5_tabs.rb
      create  jekyll_bootstrap5_tabs/lib/jekyll_bootstrap5_tabs/version.rb
      create  jekyll_bootstrap5_tabs/sig/jekyll_bootstrap5_tabs.rbs
      create  jekyll_bootstrap5_tabs/jekyll_bootstrap5_tabs.gemspec
      create  jekyll_bootstrap5_tabs/Rakefile
      create  jekyll_bootstrap5_tabs/README.md
      create  jekyll_bootstrap5_tabs/bin/console
      create  jekyll_bootstrap5_tabs/bin/setup
      create  jekyll_bootstrap5_tabs/.gitignore
      create  jekyll_bootstrap5_tabs/LICENSE.txt
Gem 'jekyll_bootstrap5_tabs' was successfully created.
For more information on making a RubyGem visit https://bundler.io/guides/creating_gem.html
Now let's look at the files that were generated by bundle gem.
The command creates a new directory with the given name and initializes that directory as a git repository.
I suppressed the listing of the .git directory in the find incantation below:
$ cd jekyll_bootstrap5_tabs

$ find . -path ./.git -prune -o -printf '%P\n' | sort
.gitignore
Gemfile
LICENSE.txt
README.md
Rakefile
bin
bin/console
bin/setup
jekyll_bootstrap5_tabs.gemspec
lib
lib/jekyll_bootstrap5_tabs
lib/jekyll_bootstrap5_tabs.rb
lib/jekyll_bootstrap5_tabs/version.rb
sig
sig/jekyll_bootstrap5_tabs.rbs
jekyll_bootstrap5_tabs.gemspec originally looked like this when generated:
require_relative "lib/jekyll_bootstrap5_tabs/version"

Gem::Specification.new do |spec|
  spec.name = "jekyll_bootstrap5_tabs"
  spec.version = JekyllBootstrap5TabsPlugin::VERSION
  spec.authors = ["Mike Slinn"]
  spec.email = ["mslinn@mslinn.com"]

  spec.summary = "TODO: Write a short summary, because RubyGems requires one."
  spec.description = "TODO: Write a longer description or delete this line."
  spec.homepage = "TODO: Put your gem's website or public repo URL here."
  spec.license = "MIT"
  spec.required_ruby_version = ">= 2.6.0"

  spec.metadata["allowed_push_host"] = "TODO: Set to your gem server 'https://example.com'"

  spec.metadata["homepage_uri"] = spec.homepage
  spec.metadata["source_code_uri"] = "TODO: Put your gem's public repo URL here."
  spec.metadata["changelog_uri"] = "TODO: Put your gem's CHANGELOG.md URL here."

  # Specify which files should be added to the gem when it is released.
  # The `git ls-files -z` loads the files in the RubyGem that have been added into git.
  spec.files = Dir.chdir(File.expand_path(__dir__)) do
    `git ls-files -z`.split("\x0").reject do |f|
      (f == __FILE__) || f.match(%r{\A(?:(?:bin|test|spec|features)/|\.(?:git|travis|circleci)|appveyor)})
    end
  end
  spec.bindir = "exe"
  spec.executables = spec.files.grep(%r{\Aexe/}) { |f| File.basename(f) }
  spec.require_paths = ["lib"]

  # Uncomment to register a new dependency of your gem
  # spec.add_dependency "example-gem", "~> 1.0"

  # For more information and examples about making a new gem, check out our
  # guide at: https://bundler.io/guides/creating_gem.html
end
The .gemspec contains six TODO items.
Before you go any further, now is the best time to address them.
At a minimum, you must provide a valid URL for the value of spec.homepage on line 13.
If you do not, the next step will generate the following error:
The gemspec at /mnt/f/work/jekyll_bootstrap5_tabs/jekyll_bootstrap5_tabs.gemspec is not valid.
Please fix this gemspec. (Gem::InvalidSpecificationException)
The validation error was 'metadata['homepage_uri'] has invalid link: "TODO: Put your gem's website or public repo URL here."'
You can delete the comments at the end of the .gemspec.
RubyGems 2.2.0 and newer supports the allowed_push_host metadata value, which restricts gem pushes to a single host.
If you are publishing private gems, you should set this value to prevent accidental pushes to rubygems.org.
Otherwise, you could either delete this line or set it as follows:
s.metadata['allowed_push_host'] = 'https://rubygems.org'
This is also a good time to create a changelog.
Older versions of bundle gem had a provision for this; now it is a manual step.
$ printf "# HEAD\n\n## 0.1.0 / $(date '+%Y-%m-%d')\n  * Project began\n" > CHANGELOG.md

$ cat CHANGELOG.md
# HEAD

## 0.1.0 / 2022-03-11
  * Project began
My .gemspec now looked like this:
require_relative "lib/jekyll_bootstrap5_tabs/version"

Gem::Specification.new do |spec|
  spec.name = "jekyll_bootstrap5_tabs"
  spec.version = JekyllBoostrap5Tabs::VERSION
  spec.authors = ["Mike Slinn"]
  spec.email = ["mslinn@mslinn.com"]

  spec.summary = "Enables Bootstrap 5 tabs in Jekyll content."
  spec.description = "The jekyll_bootstrap5_tabs plugin provides two new Liquid tags: tabs and tab."
  spec.homepage = "https://github.com/mslinn/jekyll_bootstrap5_tabs"
  spec.license = "MIT"
  spec.required_ruby_version = ">= 2.6.0"

  spec.metadata["allowed_push_host"] = "https://rubgems.org"

  spec.metadata["homepage_uri"] = spec.homepage
  spec.metadata["source_code_uri"] = "https://github.com/mslinn/jekyll_bootstrap5_tabs"
  spec.metadata["changelog_uri"] = "https://github.com/mslinn/jekyll_bootstrap5_tabs/CHANGELOG.md"

  # Specify which files should be added to the gem when it is released.
  # The `git ls-files -z` loads the files in the RubyGem that have been added into git.
  spec.files = Dir.chdir(File.expand_path(__dir__)) do
    `git ls-files -z`.split("\x0").reject do |f|
      (f == __FILE__) || f.match(%r{\A(?:(?:bin|test|spec|features)/|\.(?:git|travis|circleci)|appveyor)})
    end
  end
  spec.bindir = "exe"
  spec.executables = spec.files.grep(%r{\Aexe/}) { |f| File.basename(f) }
  spec.require_paths = ["lib"]
end
The template for the gem is:
require_relative "jekyll_bootstrap5_tabs/version"

module JekyllBootstrap5Tabs
  class Error < StandardError; end
  # Your code goes here...
end
The default README.md is:
# JekyllBootstrap5Tabs

Welcome to your new gem! In this directory, you'll find the files you need to be able to package up your Ruby library into a gem. Put your Ruby code in the file `lib/jekyll_flexible_include_plugin`. To experiment with that code, run `bin/console` for an interactive prompt.

TODO: Delete this and the text above, and describe your gem


## Installation

Add this line to your application's Gemfile:

```ruby
gem 'jekyll_flexible_include_plugin'
```

And then execute:

    $ bundle install

Or install it yourself as:

    $ gem install jekyll_flexible_include_plugin


## Usage

TODO: Write usage instructions here


## Development

After checking out the repository, run `bin/setup` to install dependencies. You can also run `bin/console` for an interactive prompt that will allow you to experiment.

To install this gem onto your local machine, run `bundle exec rake install`. To release a new version, update the version number in `version.rb`, and then run `bundle exec rake release`, which will create a git tag for the version, push git commits and the created tag, and push the `.gem` file to [rubygems.org](https://rubygems.org).


## Contributing

Bug reports and pull requests are welcome on GitHub at https://github.com/[USERNAME]/jekyll_flexible_include_plugin.


## License

The gem is available as open source under the terms of the [MIT License](https://opensource.org/licenses/MIT).
Committing To Source Control
Do not check Gemfile.lock into version control when making a gem.
Instead, add it to .gitignore.
$ echo "Gemfile.lock" >> .gitignore
Assuming your Git repository's chief branch is called master, commit your work:
$ git add -A && \
git commit -m "Initial commit" && \
git push origin master
One More Change
The gemspec is still suboptimal, and the worst problem is likely to manifest early on.
$ pwd
/var/work/jekyll/jekyll_bootstrap5_tabs

$ git status  # Commit all changes before proceeding
Beware!
Uncommitted changes in the Jekyll Git project that you are presumably working on can cause the next step to fail. The root cause of the error message that might result can be difficult to detect. Here is an error message you might encounter:
WARNING:  See https://guides.rubygems.org/specification-reference/ for help
      ERROR:  While executing gem ... (Gem::InvalidSpecificationException)
      ["jekyll_bootstrap5_tabs-1.0.0.gem"] are not files
The error message stems from the following excerpt, which computes the value of spec.files.
The computation uses previously committed files and directories to determine what should be stored in the gem.
# Specify which files should be added to the gem when it is released.
# The `git ls-files -z` loads the files in the RubyGem that have been added into git.
spec.files = Dir.chdir(File.expand_path(__dir__)) do
  `git ls-files -z`.split("\x0").reject do |f|
    (f == __FILE__) || f.match(%r{\A(?:(?:bin|test|spec|features)/|\.(?:git|travis|circleci)|appveyor)})
  end
end
The above code looks like a cat walked all over a keyboard. It is difficult to understand what files and directories get selected. This code also causes the person who is developing the Ruby gem to commit their work every time they make any change to the gem. This often means dozens or hundreds of trivial commits when trying to do something new.
Below is a more straightforward computation that does not require the Git repository to be in sync with the current contents of the project directory. It also computes the files for unit tests, which the above did not do.
spec.files = Dir[".rubocop.yml", "LICENSE.*", "Rakefile", "{lib,spec}/**/*", "*.gemspec", "*.md"]
spec.test_files = spec.files.grep(%r!^(test|spec|features)/!)
Other issues remain with the automatically generated gemspec, which I might address in another article one day.
Building the New Gem
$ pwd
/var/work/jekyll/jekyll_bootstrap5_tabs
It is now time to build the new gem using rake.
The rake build task builds the current version of the gem and stores it in the pkg
folder, which it creates if necessary.
Note that this is different from running
gem build,
which stores the newly built gem in the project's top-level directory.
This is a good explanation
of why bundle exec should be used.
$ bundle exec rake build
gem build jekyll_bootstrap5_tabs.gemspec
  WARNING:  open-ended dependency on jekyll (>= 3.0) is not recommended
  if jekyll is semantically versioned, use:
    add_runtime_dependency 'jekyll', '~> 3.0'
WARNING:  See https://guides.rubygems.org/specification-reference/ for help
  Successfully built RubyGem
  Name: jekyll_bootstrap5_tabs
  Version: 1.0.0
  File: jekyll_bootstrap5_tabs-1.0.0.gem
Regarding the above warning: This plugin does, in fact, work on Jekyll 3.5+ and 4.x. I ignored the warning.
Remember: use rake build, not gem build.
Rake is a better build tool than gem.
For example, the above warning, useful for many but not for me,
is not produced by gem build, just rake build.
The next step is to install the new gem using gem install.
If you are using the distribution Ruby instead of a version managed by rbenv or rvm,
you might see the following error message whenever you try to install any gem using gem install:
ERROR:  While executing gem ... (Gem::FilePermissionError)
    You don't have write permissions for the /var/lib/gems/3.1.0 directory.
You can handle this problem in
several ways.
My ~/.bashrc has these lines in it because the system I am writing this article on uses the Ruby distributed with Ubuntu.
(Note that this exactly follows the
Jekyll installation instructions for Ubuntu.)
export GEM_HOME=~/.gems
export PATH="$GEM_HOME:$PATH"
Installing the New Gem
Now let's proudly install the new gem on the local machine:
$ gem install pkg/jekyll_bootstrap5_tabs-1.0.0.gem
Fetching temple-0.8.2.gem
Fetching slim-3.0.9.gem
Successfully installed temple-0.8.2
Successfully installed slim-3.0.9
Successfully installed jekyll_bootstrap5_tabs-1.0.0
Parsing documentation for temple-0.8.2
Installing ri documentation for temple-0.8.2
Parsing documentation for slim-3.0.9
Installing ri documentation for slim-3.0.9
Parsing documentation for jekyll_bootstrap5_tabs-1.0.0
Installing ri documentation for jekyll_bootstrap5_tabs-1.0.0
Done installing documentation for temple, slim, jekyll_bootstrap5_tabs after 0 seconds
3 gems installed
Next, I moved to the Jekyll project that needed the plugin, $cadenzaSiteTempate,
added its name to the Gemfile,
and used bundle update, which figured out the versioning for the updated project dependencies
and updated Gemfile.lock.
$ cd $cadenzaSiteTemplate  # My Jekyll project

$ vi Gemfile  # Add this line: gem 'jekyll_bootstrap5_tabs'
Update the project dependencies to include jekyll_bootstrap5_tabs:
$ bundle update
Fetching gem metadata from https://rubygems.org/..........
Resolving dependencies...
Using rake 13.0.6
Using public_suffix 4.0.6
Using mercenary 0.3.6 (was 0.4.0)
Using safe_yaml 1.0.5
Using temple 0.8.2
Using eventmachine 1.2.7
Using addressable 2.8.0
Using tilt 2.0.10
Using forwardable-extended 2.6.0
Fetching rb-fsevent 0.11.1 (was 0.11.0)
Using rexml 3.2.5
Fetching slim 3.0.9 (was 4.1.0)
Using bundler 2.3.7
Using pathutil 0.16.2
Using colorator 1.1.0
Using concurrent-ruby 1.1.9
Using http_parser.rb 0.8.0
Using i18n 0.9.5 (was 1.9.1)
Using ffi 1.15.5
Using em-websocket 0.5.3
Fetching rouge 3.28.0 (was 3.27.0)
Using liquid 4.0.3
Using rb-inotify 0.10.1
Using kramdown 2.3.1
Installing rb-fsevent 0.11.1 (was 0.11.0)
Installing slim 3.0.9 (was 4.1.0)
Using listen 3.7.1
Using sass-listen 4.0.0
Using jekyll-watch 2.2.1
Using sass 3.7.4
Using jekyll-sass-converter 1.5.2 (was 2.1.0)
Installing rouge 3.28.0 (was 3.27.0)
Fetching jekyll 3.9.1 (was 4.2.1)
Installing jekyll 3.9.1 (was 4.2.1)
Using jekyll_bootstrap5_tabs 1.0.0 from source at `.`
Bundle updated!
Inspecting the Installed Gem
Now that the gem is installed in a project, we can discover where bundle found the gem:
$ bundle info jekyll_bootstrap5_tabs
* jekyll_bootstrap5_tabs (1.0.0)
        Summary: Jekyll plugin for Bootstrap 5 tabs
        Homepage: https://mslinn.com/blog/2022/02/13/jekyll-gem.html
        Source Code: https://github.com/mslinn/jekyll_bootstrap5_tabs
        Path: /home/mslinn/.ruby/gems/jekyll_bootstrap5_tabs-1.0.0
I highlighted the Path returned by bundle info jekyll_bootstrap5_tabs.
Let's see what the new gem looks like:
$ find $GEM_HOME -name jekyll_bootstrap5_tabs
/home/mslinn/.ruby/gems/jekyll_bootstrap5_tabs-1.0.0/lib/jekyll_bootstrap5_tabs

$ find /home/mslinn/.ruby/gems/jekyll_bootstrap5_tabs-1.0.0 \
  -path ./.git -prune -o -printf '%P\n' | sort
Gemfile
Gemfile.lock
LICENSE.txt
README.md
Rakefile
docs
docs/tab-screen.gif
lib
lib/jekyll_bootstrap5_tabs
lib/jekyll_bootstrap5_tabs.rb
lib/jekyll_bootstrap5_tabs/version.rb
lib/template.slim
sig
sig/jekyll_bootstrap5_tabs.rbs
Unimportant Details
The work I did to modify the two original source files so they were compatible with Bootstrap 5 is unimportant, so I do not describe it here. Also, not discussed is the simple process of replacing the contents of my fork of the original project with the new gem files. You can look at the source code if you so desire; it is on GitHub.
Publishing the Gem
The official Ruby Guidelines document how to publish gems. Briefly:
-
Create a free account at
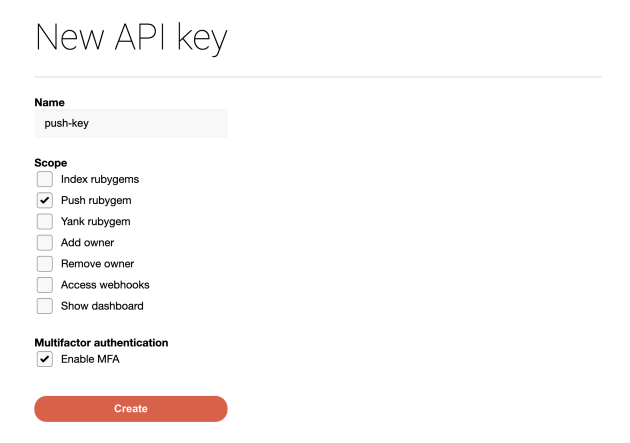
rubygems.org. Let's pretend you obtained the usernameyour_username. -
Create an API key with
Push rubygemprivileges.
- Fetch the key from your account on RubyGems.org into the home directory of the account you are using on your computer:
Shell$ curl -u your_username https://rubygems.org/api/v1/api_key.yaml \ > ~/.gem/credentials;
$ chmod 0600 ~/.gem/credentials -
You could use
gem pushto publish the Ruby gem / Jekyll plugin, so anyone in the world can use it for free:
Shell$ gem push pkg/jekyll_bootstrap5_tabs-1.0.0.gem Enter your RubyGems.org credentials. Don’t have an account yet? Create one at https://rubygems.org/sign_up Email: mslinn@mslinn.com Password: abcEnter Signed in. Pushing gem to RubyGems.org... Successfully registered gem: jekyll_bootstrap5_tabs (1.0.0)
However, it is better to run
bundle exec rake release, which will create a Git tag based on the contents ofversion.rb, push git commits and the new git tag, and then push the.gemfile torubygems.org. Here is an example:Shell$ bundle exec rake release jekyll_bootstrap5_tabs 1.0.0 built to pkg/jekyll_bootstrap5_tabs-1.0.0.gem. Tagged v1.0.0. Pushed git commits and release tag. Pushing gem to https://rubygems.org... Successfully registered gem: jekyll_bootstrap5_tabs (1.0.0) Pushed jekyll_bootstrap5_tabs 1.0.0 to https://rubygems.org
RubyGems.org sent me this email right after I published the Ruby gem:
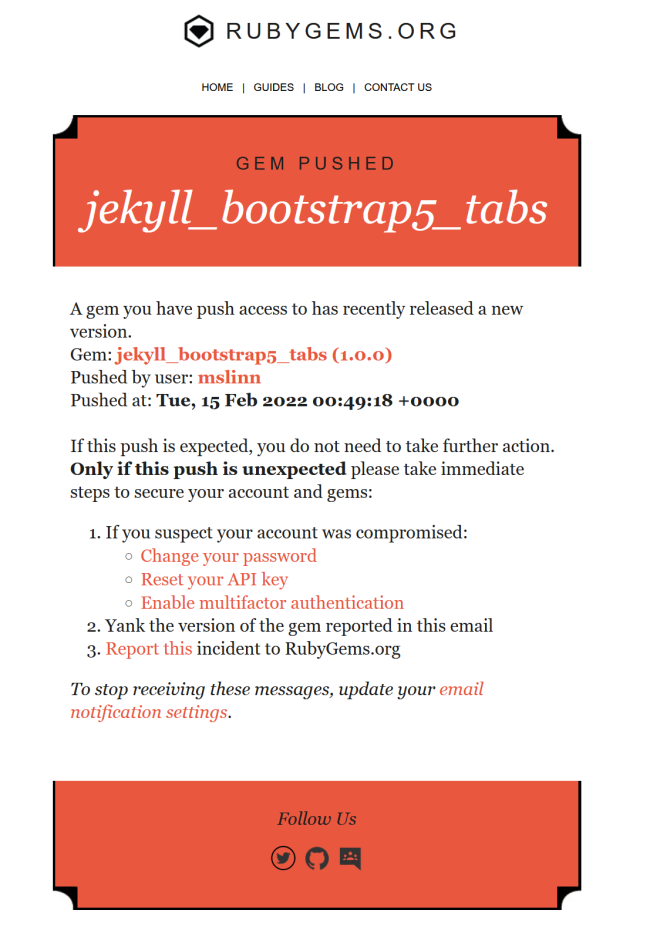
RubyGems.org creates a web page for each Ruby gem that you publish.
Go ahead, use jekyll_bootstrap5_tabs in your next Jekyll 4 / Bootstrap 5 project!
If you discover something embarrassing about your gem (perhaps you accidently published it before you were ready),
you can remove it from RubyGems.org with the gem yank command.
Here is an example:
$ gem yank jekyll_bootstrap5_tabs -v 1.0.0
Once yanked, that version number cannot be used it again.
Increment the contents of version.rb before republishing.
Onward to Part 3
Debugging Jekyll Plugins with an IDE in this series demonstrates a straightforward way of debugging Jekyll plugins.
About the Author

I, Mike Slinn, have been working with Ruby for a long time now. Back in 2005, I was the product marketing manager at CodeGear (the company was formerly known as Borland) for their 3rd Rail IDE. 3rd Rail supported Ruby and Ruby on Rails at launch.
In 2006, I co-chaired the Silicon Valley Ruby Conference on behalf of the SD Forum in Silicon Valley. As you can see, I have the t-shirt. I was the sole chairman of the 2007 Silicon Valley Ruby Conference.
Several court cases have come my way over the years in my capacity as a software expert witness. The court cases featured questions about IP misappropriation for Ruby on Rails programs. You can read about my experience as a software expert if that interests you.
I currently enjoy writing Jekyll plugins in Ruby for this website and others, as well as Ruby utilities.


