Published 2023-09-01.
Last modified 2025-07-01.
Time to read: 17 minutes.
av_studio collection.

I had not yet realized that the top handle was undesirable.
The Sony shotgun microphone had not arrived yet.
I purchased a Sony ZV-E1. I am completely blown away by its video capability.
There is no need for a Cam Link 4K to provide streaming video from the camera; the Sony ZV-E1 does that over USB-C and provides audio as well, which the Cam Link 4K does not. I used a USB-C to USB3 adapter to connect the Sony ZV-E1 to my Windows PC and found that OBS Studio immediately recognized the audio and video streams from the camera.
I normally record video in 4K at 30 or 60 fps with 8-bit depth. The two biggest complaints I have are:
- USB-C cables over 3 meters long reduce the quality of the video stream to 720p.
- Recordings made over Wi-Fi can only be saved to memory cards, so I must remove the memory card and copy its contents to the PC 50 times a day when using this camera.
-
This camera gets hot quickly, especially if it is in a cage.
I found that the camera will overheat and stop recording after about 15 minutes of continuous recording at 4K@60 fps.
The same problem occurs at 30 fps when the camera is in a cage,
which is necessary when using a Frankenpod.
I migitate the heat issue by doing two things:
- Close the display, which reduces the heat generated by the camera. Use Creators App to view the images and control the camers instead of using the display.
-
Attach an ice pack to the camera.
After following the above two steps, my camera could record continuously indefinitely at 4K@60 fps, so long as the ice packs were replaced as soon as they thawed. In a room with ambient temperature of 80 degrees Farenheight (25 Celsius) I found that each ice pack lasted about 30 minutes..")
A waterproof barrier is necessary to protect the camera from condensation from the ice pack (not shown).
This article discusses video codecs, which are explained in So Many Video Codecs, So Much Confusion.
Purchases
ZV-E1 product page.
ILCZVE1-B - body only
ILCZVE1L-B - with a 28-60mm zoom lens
I also purchased:
-
Sony 50 mm F1.4 GM lens.
This is an awesome lens!
It gives wonderful detail and color in low light conditions.
My older Sony A7iii camera, which I keep on a tripod in the studio, has the same E-mount as the Sony ZV-E1. Both cameras can use my older Sigma 28-70 Contemporary f2.8 DG DN zoom lens, as well as the Sony 50 mm F1.4 GM lens. -
Sony ECM-B10 Compact Camera-Mount Digital Shotgun Microphone.
This is a good microphone, however if the camera is handheld by an operator that is moving around,
the audio should be augmented by an audio recorder fixed in a carefully selected location,
either on a tripod or clamped to a non-reflective object;
one of the Zoom handlheld recorders would do the job nicely.
DaVinci Resolve does an excellent job of combining the audio and video sources.
It is also important to monitor the audio for the camera, and to test the audio in the external recorder; this requires noise-canceling headphones for best results.
I would appreciate it if I could connect my Jabra Elite 7 Pro earpieces or my Sony WH-1000XM2 headphones to the camera via Bluetooth – but the Sony ZV-E1 camera does not support Bluetooth headphones. My older Sony WH-1000XM2 headphones can cancel noise when used with a cable while the headphones are powered by the built-in battery. - Sony ACCVC1 vlogger kit includes a Bluetooth camera grip (containing remote controls) built into a mini-tripod. This small handle/tripod is versatile and packs into my camera bag without taking much space. Requires one 2032 battery, included. (Online manual.)
-
SmallRig 4268 NP-FZ100 A7S III Dummy Battery Power Supply Adapter Kit.
Several other manufaturers make equally good dummy batteries.
I purchased this for when I want to use the ZV-E1 in the studio.
Although the older Sony A7iii camera is compatible with this dummy power supply, the older camera runs off USB power just fine so it does not require a dummy power supply. Not so with the newer Sony ZV-E1; this is a design deficiency because USB-C is capable of delivering far more power than this camera could possibly need. -
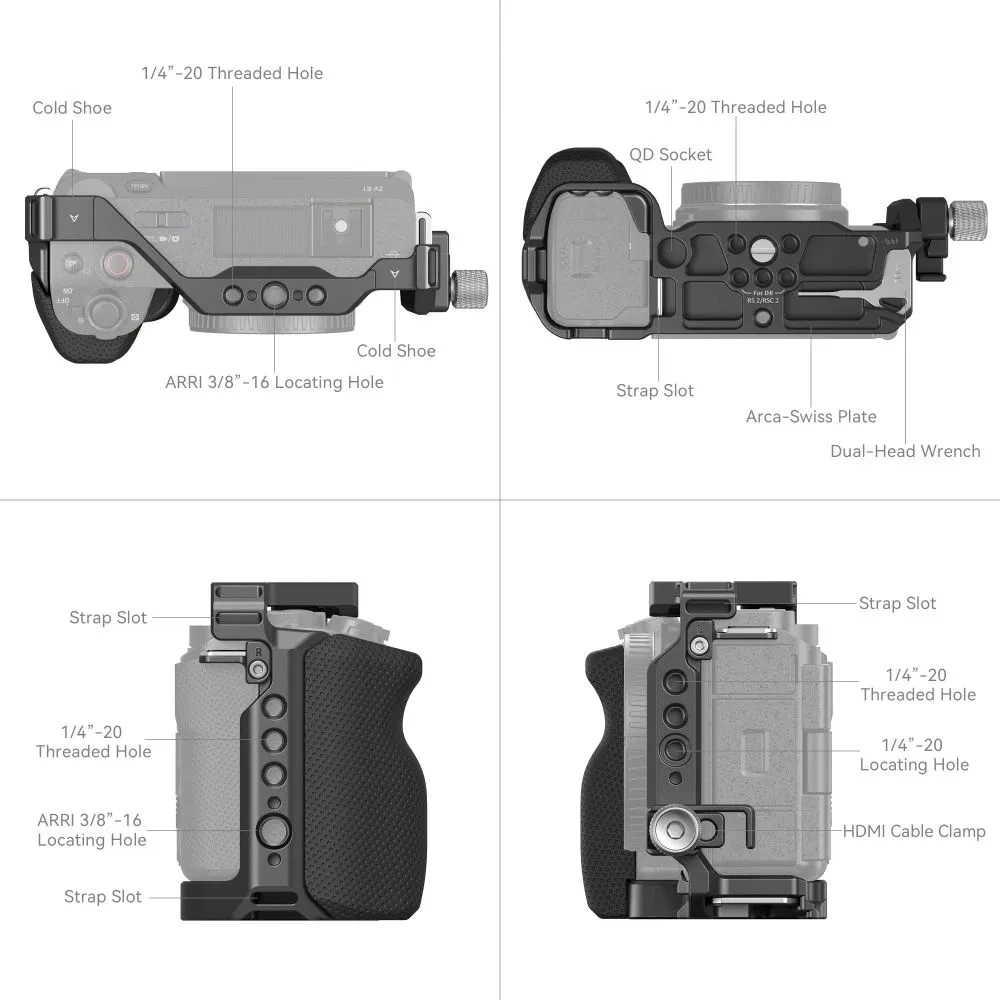
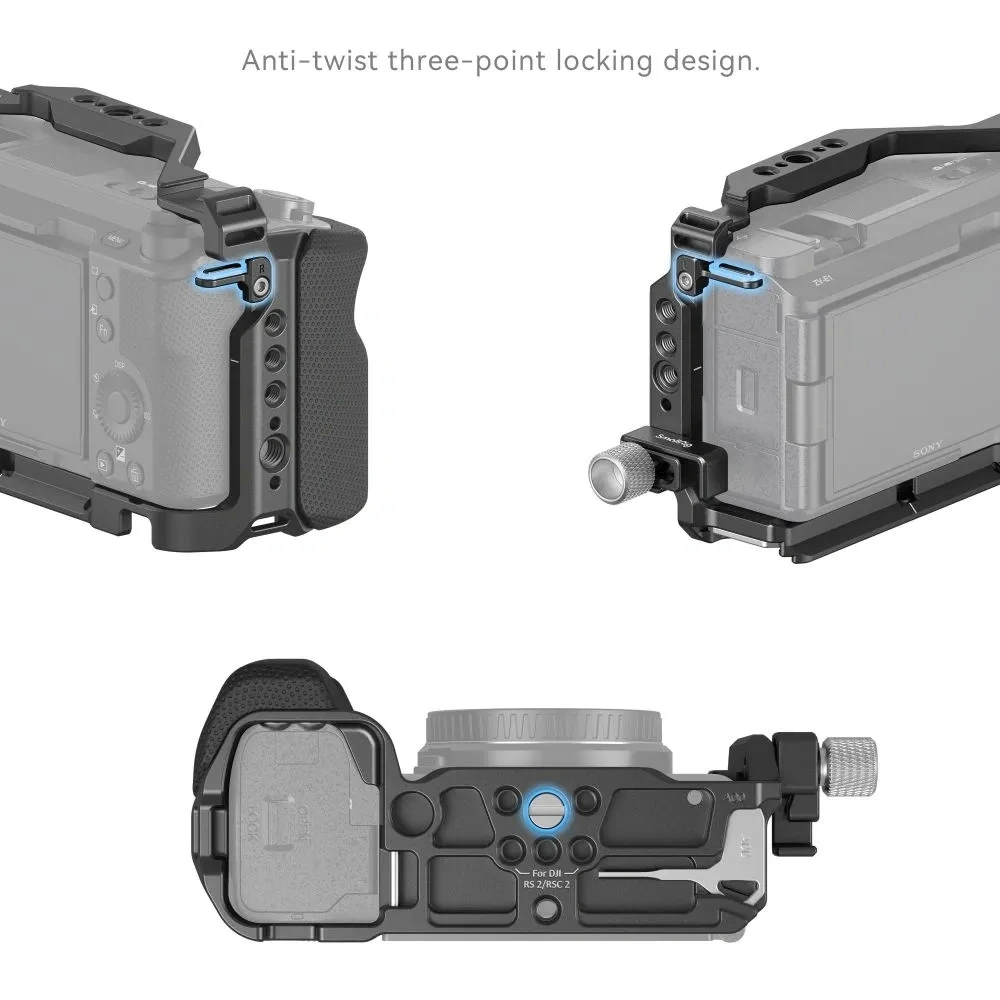
SmallRig 4257 Full Cage Kit with Silicone Grip and Cable Clamp for HDMI.
I find the cable clamp is useless; however, the cage protects the camera well and allows many other items to be attached to the camera.
The silicone grip is a positive addition to the camera’s useability.

I found that the Smallrig cage caused the camera to stop functioning due to overheating after continuously recording for 15 minutes at 4K@60 fps, in a room at 70 degree Farenheit (21 degrees Celsius). The Smallrig handgrip was noticeably warm when the camera shut off. The camera did not tend to overheat before putting it in the cage. - SmallRig 4153 adjustable camera top handle for an ARRI-style mount. This was a purchase I regretted. The camera moves around too much when held by this handle. Best not to buy one, methinks.
-
SmallRig Snap-On NATO Side Handle 4017.
Using a handle reduces camera shaking when handheld, which allows you to shoot smoother videos.
I often use this camera to make videos of musicians playing live when the audience is dancing. Because the handle protrudes several inches, it prevents the delicate camera viewscreen hinge from being broken due to dancers jostling the camera operator when the viewscreen is flipped out to the side. The handle protrude just far enough to protect the viewscreen when the camera is handheld.

The handle protects the camera viewscreen when flipped to the side
The handle requires the SmallRig 4257 full cage kit mentioned above, and one of the SmallRig quick release NATO rails, discussed next.")
The handle snaps on and off, but is secure (when properly adjusted) -
SmallRig quick release NATO rail to attach the NATO handle to the camera cage.
-
A 50 mm / 1.9" rail (
BUN2482) is shown in the above photos, and it works fine. -
A 70 mm / 2.8" rail (
BUN2483) would allow the top of the NATO handle to be positioned flush with top of the right camera grip. -
A 90 mm / 3.5" rail (
BUN2484) would allow the NATO handle to be positioned slightly lower than the rest of the camera body.
-
A 50 mm / 1.9" rail (
- 25-foot micro-HDMI to HDMI 2.0 cable. This cable allows the camera to be connected to a 4K TV. I tried using a left-angle micro-HDMI connector, but the small doors that cover the camera’s micro-HDMI port interfere with the cable connector. A straight micro-HDMI connector is required.
Power Consumption
A fresh battery lasts just under 2 hours when the camera is on, or less if it is working hard. Horrible!

Manuals
ZV-E1
Product registration. I was unable to register using Google Chrome, but Firefox worked.
Creators App Manuals
Sony Support
Sony used to provide callback support, but as of 2024-12-01 that had been discontinued. Looks like those staff were let go. They added a lot of value.
General Sony Canada Support; Cameras & Camcorders Text/call 416-216-4104. An annoying virtual assistant answers: "agent" / "product support" / "I do not have a case". But this does not connect you to camera support. Triage blocks you, and they do not understand cameras, so being specific right away only confuses them.
The chat help is low quality. Once you get through to a person, their knowledge is weak. For example, the last "tech support" person I chatted with tried to tell me that Sony’s WiFi Direct implementation supported 5G. I replied that 5G (the fifth generation of cellular network technology) has nothing to do with 5 GHz (a frequency band for Wi-Fi).
Calling the support phone number put me on hold for 45 minutes, then the call was disconnected.
You are on your own, folks!
Setup
Firmware Update
Download the Creator’s App onto your mobile device. Supposedly, this app requires the camera to have the latest software update; however, this is also how you update the camera.
I was able to go through the update process, which took about 15 minutes; however, the camera firmware still showed v1.00 afterward. I had to insert a fully charged battery, then use the menu to complete the update:
Questions
From Sony USA Support:
Camera support: 239-245-6360.
General Sony support 1-800-883-6817 Mon - Fri 10:00 am - 6:00 pm ET, excluding holidays.
Chat support is also available at the above URL.
I had many questions about the Creator’ App. Sony support was unable to answer many of them satisfactorily. Here are the questions and answers (shown in italics):
Where does the Sony Creator’s app store imported video on an iPad?
The Sony Creators App stores imported videos in the Photos app on an iPad.
If you have transferred videos using this app,
you will find them within your Photos app under the designated album or media type based on how the iPad organizes imports.
The Creators App storages the imported videos in the photos app of your phone where the camera Phtos/videos are saved too.
They may be saved into a subdirectory called Creators App or CA_IMAGES.
The support person confused App with Directory.
We don't have an exact directory for the iPad because this depends on the device folders. I kindly suggest you to contact Apple support to get an accurate and exact locations on their iPad system. If you'd like to know more about how Apple creates the folders it would be better to get in contact with them.
How do I copy a video from the camera to a PC using Wi-Fi?
Based on the camera features, a Wi-Fi connection to import images is not possible. The way to do it is by using a USB connection.
I am able to copy from an iPad to a PC. How can I copy from a camera to an iPad?
Selecting and transferring images with your smartphone is described here.
The View and Import menu item is not visible. When I first installed Creator’s App, I only saw Import, now I only see Differential Import and I cannot go back to Import. How to I get the View and Import menu item to appear?
- Turn on the power of the camera.
- On your smartphone or tablet, launch Creators' App.
- Open the (Cameras) screen and select [Import].
- Select which images to transfer, and then select (Transfer) at the bottom of the screen.
To toggle between Import and Differential Import, open the Creators's App (Cameras) screen and select Camera Settings / Differential import settings, then disable Use differential import.
The current documentation no longer mentions View and Import.
There is a button on the Creators App labeled "Monitor & Control". Clicking on it takes me to the Apple App store, which has a page for an app of that name, but there is no description. What is this app for?
Our mobile app for visual content creators Monitor & Control enables wireless monitoring, high-precision exposure adjustment, and focus control on the larger screen of your smartphone or tablet The Monitor & Control application for smartphones and tablets is used to remotely manage and supervise compatible Sony cameras.This sounds like a more capable version of Creators App, is that correct?
Their usage it's different, I couldn't tell if one is better than the other but they are different on their usage. See the official Monitor & Control website.
HDMI Display
The camera defaults to overlaying status information on the HDMI output. When this setting is in force, connecting an external HDMI monitor causes the flip-out monitor on the camera to turn off, which means you can no longer control it. Dumb.
To disable the information overlay and restore the functionality of the flip-out monitor:
HDMI-CEC
It appears that a TV remote control can be used to control the camera when a suitable HDMI cable connects the camera with the TV. This uses HDMI-CEC, which Sony variously calls BRAVIA Link, BRAVIA Sync, and Control for HDMI. So far, I have not been able to make this work with my Samsung smart TV. I am using a Sony Bluetooth remote control for this purpose anyway.
HEIF format
By default, the camera stores still images in HEIF format. High Efficiency Image Format (HEIF) is a relatively new image file format that was introduced by the Moving Picture Experts Group (MPEG) in 2015. It was designed to be a more efficient alternative to the traditional JPEG format, offering improved compression and image quality.
Importing HEIF format using Creator’s App gave me problems on a fairly new iPad and Android phone, so I changed the camera’s default format for stills to JPG.
- Windows support.
- Android support. The Creator’s App running on Android claims that Android does not support HEIF images, but the Android docs disagree.
- iOS and macOS support.
4K 120p Upgrade License
Enter the camera serial number here.
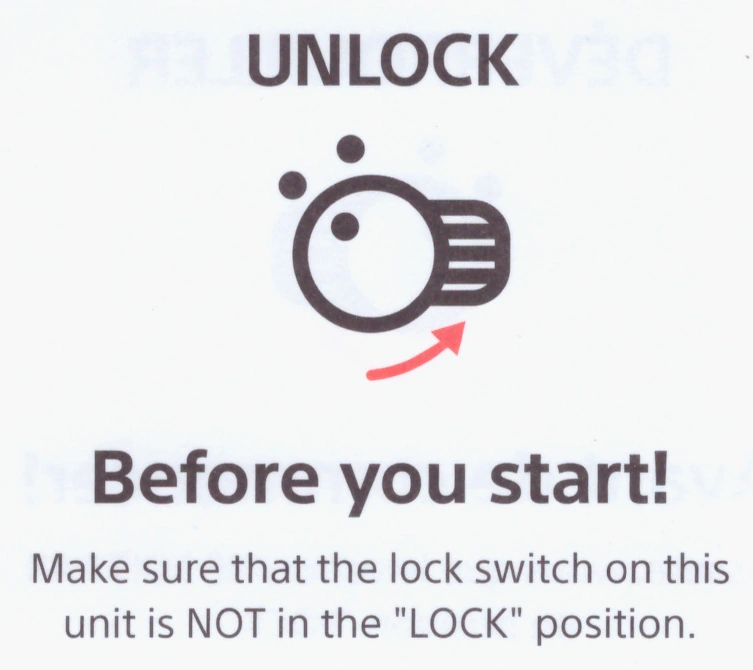
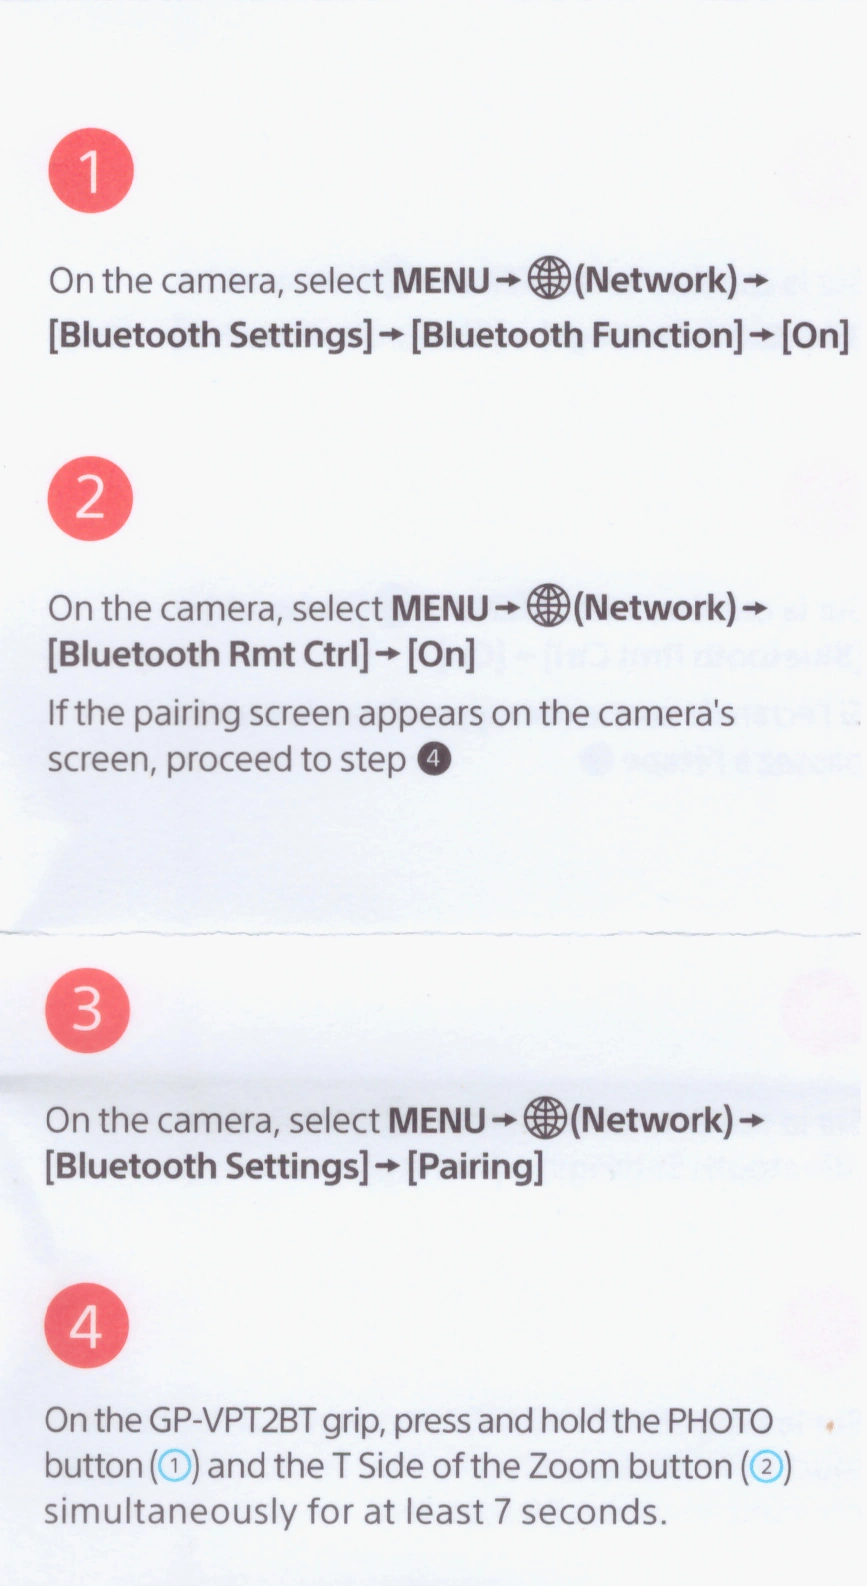
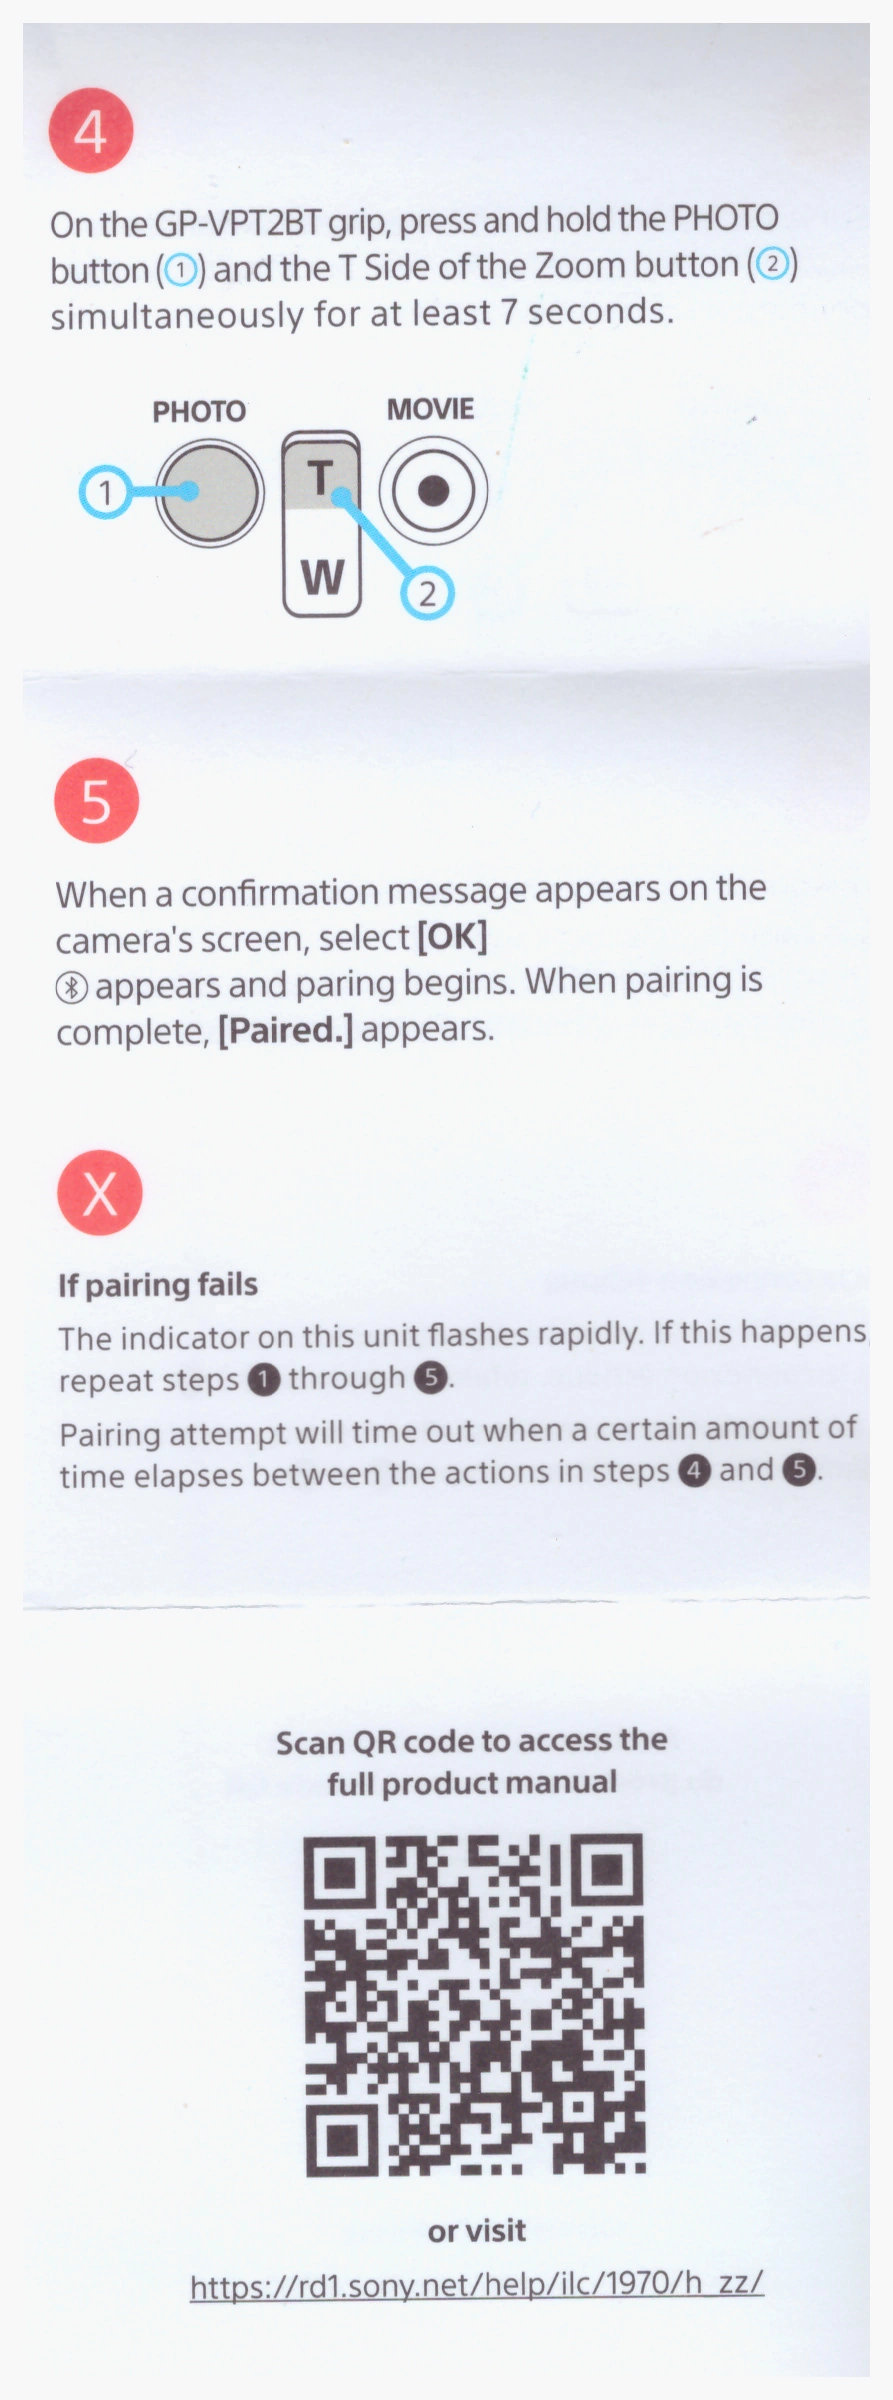
Camera Grip Pairing
Camera and Camera Grip pairing instructions are shown below:
25GB Cloud Storage
Sony Creator’s Cloud provides 25 GB of free cloud storage and can update the camera firmware. The update works by the mobile device downloading the camera software and then transmitting the software to the camera.
Audio Level
This camera is hung from a frankenpod, with a USB-C power cable and a 3.5 mm / 1/8" audio feed from TotalMix running on my Windows DAW. The audio distorts on with this configuration using default settings.
The settings I am using to avoid distortion are:
- RME UFX-III output 3/4: +4dBu setting and channel output level set to -25 dB.
- Sony ZV-E1 Fn / Audio Rec Level dialed way back to 7 (default is 28).
Sony Creator’s App does not display the audio level. Cameras should have audio levels of -12dB to -18dB. This oversight is quite regrettable. Although is necessary to occassionally plug headphones into each of my cameras in order to set up audio input levels, this oversight means I must do so much more often.
I really just want to ensure that the peak audio level is not red or yellow, and that enough audio signal reaches the camera to be noticed. I do not need a real-time accurate representation of the audio signal.
Catalyst Browse
Catalyst Browse is a free, simple viewing and logging tool exclusively for all Sony Pro formats. Available for both Windows and Mac OS X.
Annoying Pixel Mapping
I often see the following message on the Sony ZV-E1 display when it turns on:
According to Sony, failure to perform pixel mapping may cause bright spots in recorded images. Sony recommends that pixel mapping be done every three days.
The camera will prompt you to perform pixel mapping when required. All you need to do is attach the lens cap and press OK when prompted. The procedure takes about 5 seconds, and then the camera restarts.
Pixel mapping cannot be performed when the battery is low.
Software
The software provided by Sony for this device is:
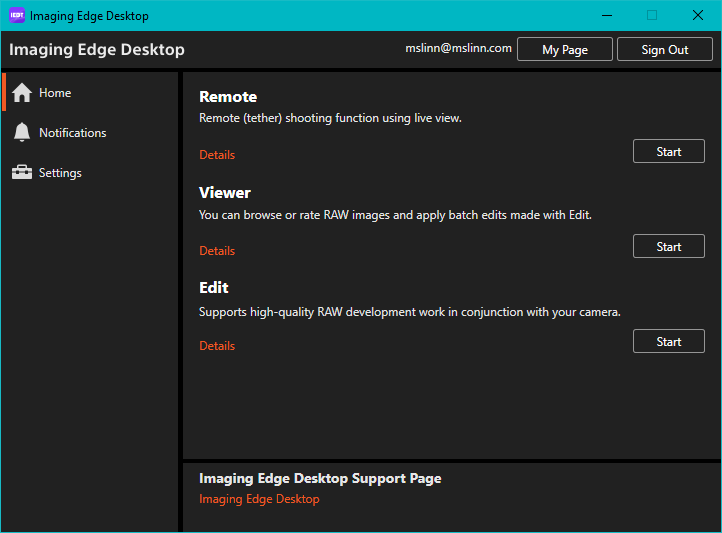
- Imaging Edge Desktop
- Catalyst Prepare Plugin for Adobe Premier Pro
- Creators cloud software for mobile devices
2024-09-03: Sony verified with me that none of these software packages are able to transfer videos or images taken manually to a computer via WiFi. The only transfers that are possible via WiFi are those taken with Creators App or Imaging Edge. In other words, if you use the shutter button to take a photo, you must pull the flash card out of the camera and copy the contents of the card to the computer manually.
Imaging Edge Remote
The Windows icons for all the Imaging Edge applications are identical, which makes selecting the application you want more difficult than it should be.
In order to view or control the camera from a computer, the camera must be set to the PC Remote mode.
To activate PC Remote mode, you must first disconnect the camera from any mobile device apps that it might be connected to. You have three options for connecting the computer to the camera:
- Wi-Fi Access Point
- USB C
- Bluetooth is also possible, however the ZV-E1 manual refers vaguely to the ZV-E10 without providing a URL, page number or section number.
Wi-Fi Access Point
The relevent manual section is here.
-
Use camera menu
MENU → Network → 1 → Wi-Fi → Wi-Fi Connect → On -
MENU → Network → 3 → Cnct./PC Remote → PC Remote Function → PC Remote → On
Once connected, the bottom of the display will show, in a very small font, the SSID connected to and the camera's MAC address. -
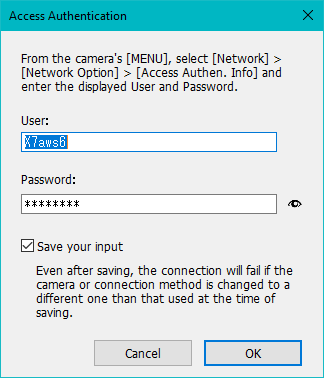
Optional: to see the userid and password access authentication, use camera menu
MENU → Network → 7 → Access Authen. Info
USB C
When connected by USB-C, the maximum streaming video resolution for USB cables over 3 meters long is 720p. The 5GB/s option only allows for a maximum of 3 meter-long cables, which is not long enough for my modest studio.
The relevent manual section is here.
-
Use the camera menu to connect to the same SSID as the computer is attached to:
MENU → Network → 1 → Wi-Fi → Wi-Fi Connect → On -
Use camera menu:
MENU → Network → 1 → Cnct./PC Remote → PC Remote Function → PC Remote → On - If a message about access authentication should appear on the camera, select [Access Authen. Info].
-
If no access authentication message appears, verify the following settings:
MENU → Network → 7 → Network Option → Access Authen. Settings → Access Authen. → On
MENU → Network → 7 → Network Option → Access Authen. Info - Complete the connection.
Wi-Fi Direct
Your computer needs a dedicated Wi-Fi anntena to control a ZV-E1 from that computer using Wi-Fi.
However, when connecting via Wi-Fi, video recordings are stored on the camera’s memory card, and will not be streamed over USB.
I generally control the camera via a Wi-Fi and swap the memory cards ever few minutes. This is a real PITA.
- MENU → Network → Cnct./PC Remote → PC Remote Function → Wi-Fi Direct Info.
- Click the network icon on the computer screen (bottom right on Windows, top right on Mac) and select the SSID displayed on the camera from the list that is displayed.
- Use the SSID and password displayed on the camera to establish a Wi-Fi connection between the computer and the camera.
- Complete the connection.
Completing the Connection
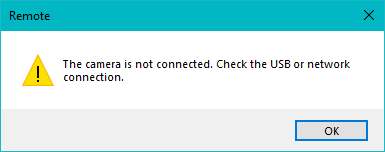
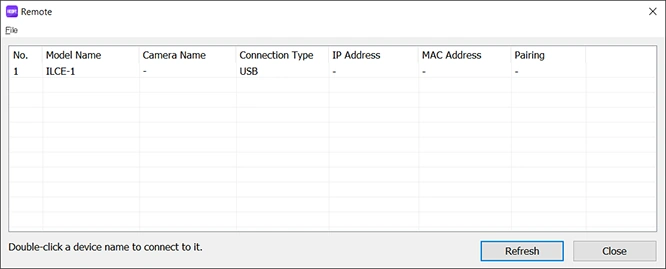
Launch Image Edge Desktop and press the Start button next to the Remote option.
This appears each time I click on the Start button. Another annoying bug.
Refreshing the list displays the camera.
Double-click on your camera from the list of cameras that appears.
For Wi-Fi access, you will need to authenticate each time using the user name and password displayed on the camera. Instead, the camera and the remote control app should recognize each other.
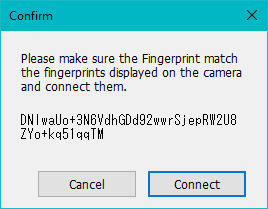
Confirm that the fingerprint displayed on the computer matches the one displayed on the camera, then click Connect. This appears each time you connect the camera. There is no reason for this. Another time-wasting annoyance.
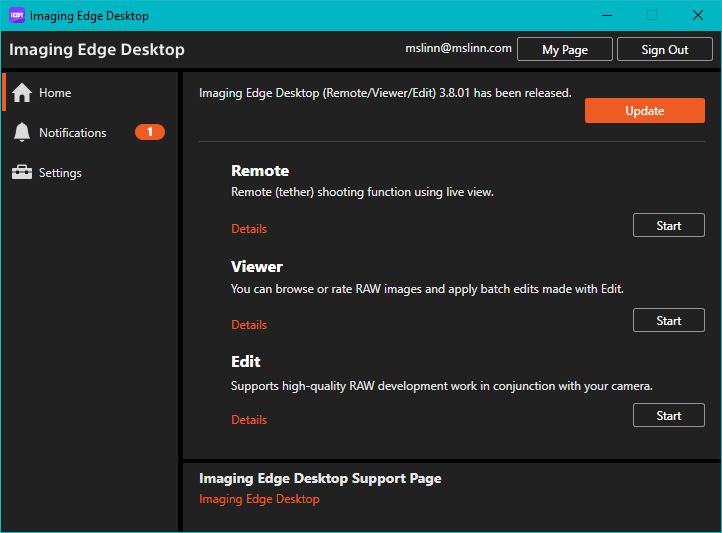
Updates
When an update is available for Sony Imaging Edge Desktop, the destop tray icon will display a red dot.
The application will also display an orange button labeled Update in the top right corner of the window.
Volume Photography Commands Service
The 2025-06-26 update provides support for the Sony Volume Photography Commands service. The documentation says this allows remote users to set and display the white balance color temperature in 10K increments. However, the announcement only applies to the Sony ICLE-6700 camera.

Interesting, but not useful for the ZV-E1 camera.
Menu Operations
Once the menu is displayed, pressing the Fn button moves to the next menu item.
- Push to the right of the round wheel to select a menu item.
- Push the center button within the round wheel to view options.
- Push the at the top of the round wheel to move to the preceding choice, and push at the bottom to move to the next choice.
- Push to the left to back up.
Wow!
💕The Sony ZV-E1 is a much better video camera than the Sony A7iii and the Lumix S5ii. The prime lens is not hurting things either.
Chroma Subsampling
A video signal is split into two different aspects: luminance information and color information. Luminance, or luma for short, defines most of the picture since contrast is what forms the shapes that you see on the screen.
For example, a black and white image will not look less detailed than a color picture. Color information, chrominance, or simply chroma is important as well, but has less visual impact.
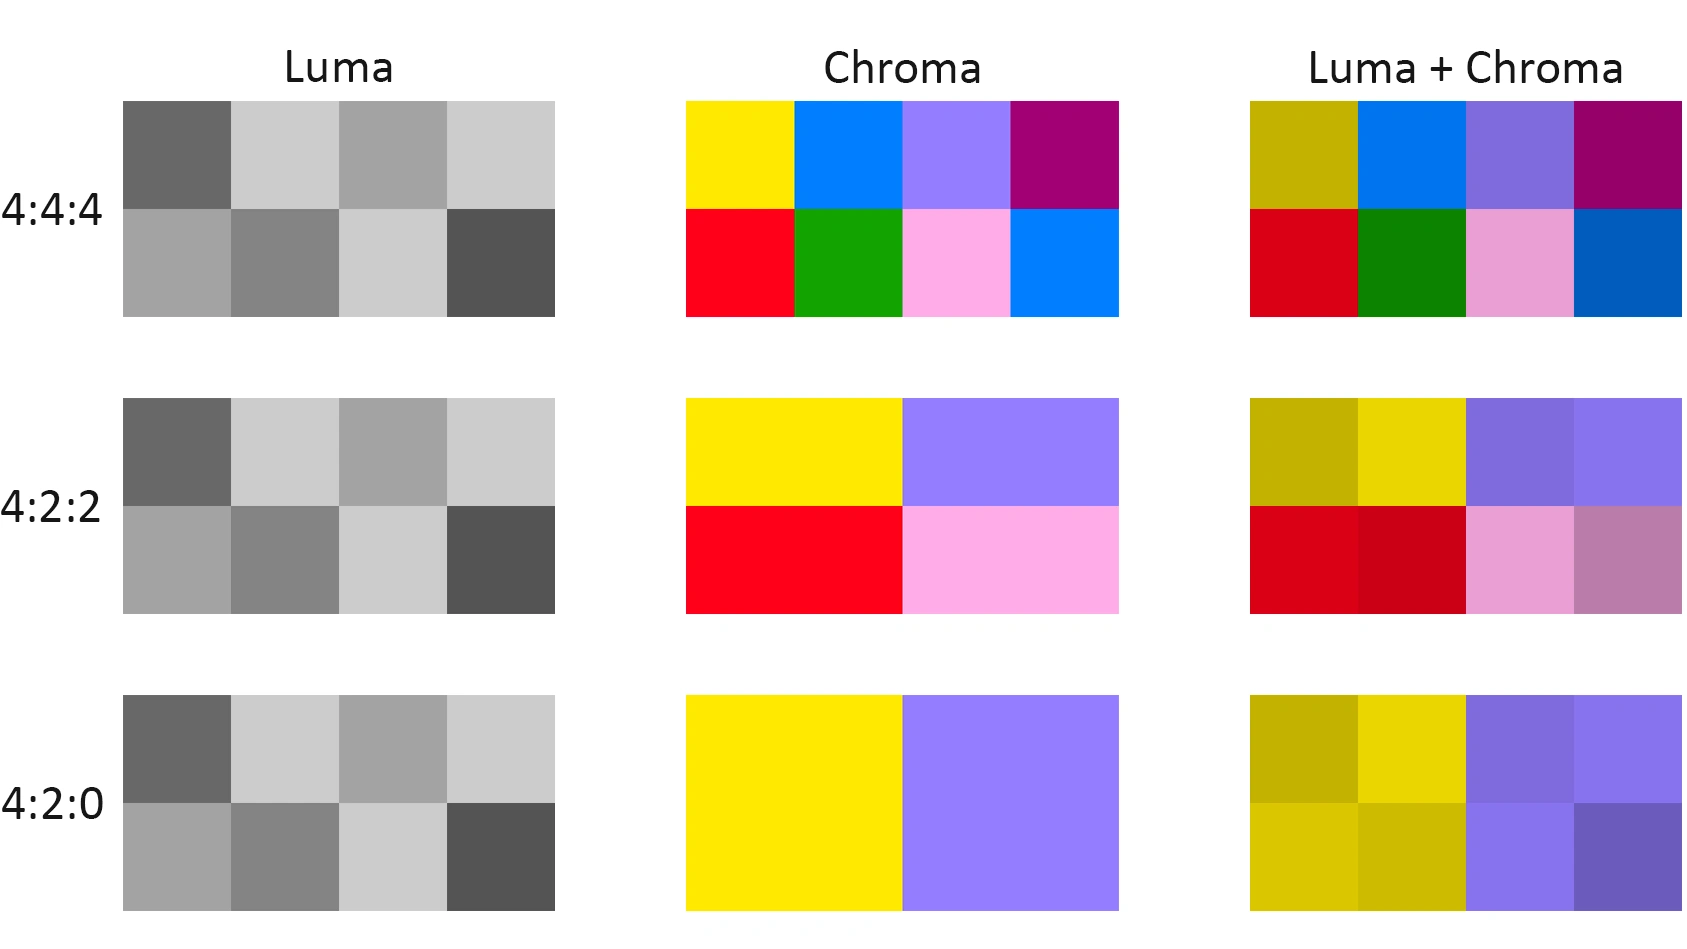
Chroma subsampling can reduce file sizes up to 50%.
4:2:2 color sampling provides more accurate and detailed color representation compared to the more common 4:2:0.
A 10-bit depth allows for 1024 levels of brightness per color channel, resulting in smoother color gradations and less banding than 8-bit video, especially in areas with subtle color changes.
The Sony ZV-E1 supports 4:2:2 color sampling for video recording, using 8- or 10-bit depth. 10-bit 4:2:2 video uses Long GOP or All Intra compression, which allows the camera to capture more color information, providing more flexibility in post-processing and color grading.
- The higher the bit rate, the higher the image quality.
- Color sampling (4:2:2, 4:2:0) is the recording ratio of color information. The more uniform this ratio is, the better the color reproducibility, and it is possible to remove colors neatly even when compositing using a green screen.
- Bit depth represents the gradation of luminance information. When the bit depth is 8 bits, 256 levels of gradation can be obtained. When the bit depth is 10 bits, 1024 levels of gradation can be obtained. A larger value enables smoother expression from dark to bright areas.
- [4:2:2 10 bit] is a setting that assumes that the recorded movie will be edited on a computer. The playback environment for [4:2:2 10 bit] is limited.
Maximum Video Length
Sony shows the video data rates for various camera settings in the ZV-E1 help guide.
The Sony help guide is written in a highly compressed format, so it is hard to read. The next 2 sections show an expanded version of the relevant details.
Mbps is approximately "a million bits per second", while MBps is approximately "a million bytes per second".
The difference between bits and bytes is approximately a factor of ten (one order of magnitude).
256 GB means 256 million kilobytes, not 256 billion bits.
To be completely accurate, when kilo is used as a prefix for digital units of measure, it means 1024, not 1000.
Similarly, mega means 10242 (1,048,576), and giga means 10243 (1,073,741,824).
So, 150 MBps is about ten times the data rate of 150 Mbps, and 256 GB is about ten times more storage than 256 Gb.
The following settings can be established as documented in the Sony Help Guide.
3840 x 2160 (4:2:0, 8-bit)
- 59.94p (150 Mbps)
- 50p (150 Mbps)
- 29.97p (100 Mbps/60 Mbps)
- 25p (100 Mbps/60 Mbps)
- 23.98p (100 Mbps/60 Mbps)
3840 x 2160 (4:2:2, 10-bit)
- 59.94p (200 Mbps)
- 50p (200 Mbps)
- 29.97p (140 Mbps)
- 25p (140 Mbps)
- 23.98p (100 Mbps)
Computing Maximum Recording Time
I was interested in knowing how long a video recording could be before it filled the SanDisk 256GB Extreme microSDXC UHS-I memory card that I put in the camera.
Currently, my ZV-E1 camera is set for XAVC S 4K (3840x2160) at 59.94 fps (150M bits per second; color 4:2:0 8-bit), with 48 kHz stereo audio at 1519 kbps. A 41-second video used 832 MB, which means each second of video consumes approximately 20 MB.
The longest video the camera could shoot before this memory card becomes completely full is therefore 213 minutes, or 3.5 hours. However, if the Smallrig cage is used, this would have to be done as videos no more than about 10 minutes long, with pauses to cool down the camera.
I tested shooting at 30p/100 Mbps/30 Mbps, and found no heat issues after a 30-minute recording. This was set from two menu items under MENU / Shooting / Image Quality/Rec / Movie Settings:
- Rec Frame Rate: 30p
- Record Setting: 100M 4:2:0 8bit
Flexible ISO slog LUT
I am interested shooting with 10-bit color and the flexible ISO S-Log LUT. The Sony Help Guide does not say too much. More to come...
Videos
Really great Sony ZV-E1 tutorial videos on YouTube:


