Published 2024-01-18.
Last modified 2024-02-13.
Time to read: 8 minutes.
llm collection.
Windows Subsystem for Linux (WSL) provides a virtualized Linux environment. By default, WSL uses Ubuntu, but you can install any Linux distribution you wish. WSL comes in two flavors:
- WSL1 imposes less of a load on your system, but does not include system services, cannot run kernel modules, and is not capable of running all Linux software.
-
WSL2
is a complete Linux, including
systemd, but it requires a more powerful computer.
To run LLMs as a system service your Windows computer will need WSL2. If your computer has trouble running WSL1, forget about attempting to run LLMs locally, because there is no way your machine is powerful enough to run LLMs.
Fixing Slow Ethernet
When working with LLMs locally your machine will often download very large files. However, by default WSL is slow for downloading large files. The fix is quick and easy, if somewhat arcane.
-
Open the Windows Control Panel.
There are two ways to do this:
- Press and release the Windows key, type
Control Panel, then press Enter. -
Hold the Windows key, press R, release the Windows key,
type
Control Panel, then press Enter.
- Press and release the Windows key, type
-
You should see:
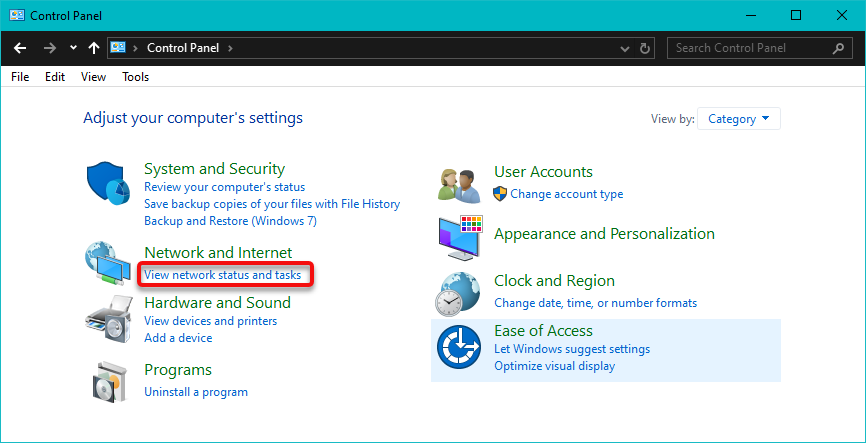
If you do see the above, then go to step 3.
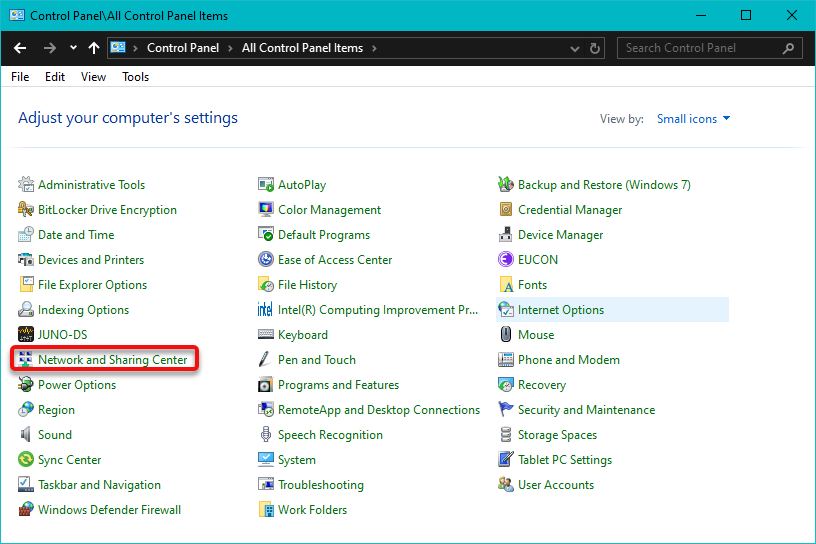
Otherwise, you will see the following; if so, click on Network and Sharing Center and go to step 4.
- Find the Network and Internet section and click on View network status and tasks, which will display the Network and Sharing Center.
-
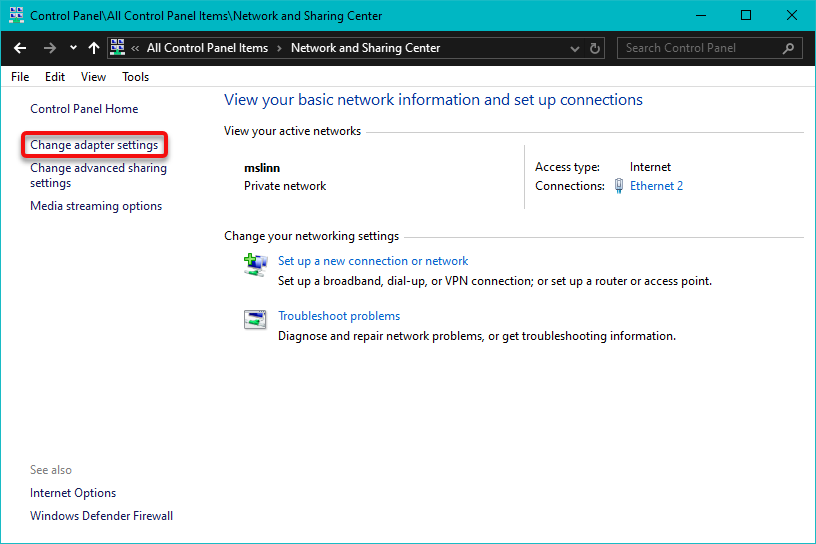
Click on Change adapter settings in the left-hand menu.
-
A new windows will open, called Control Panel\Network and Internet\Network Connections.
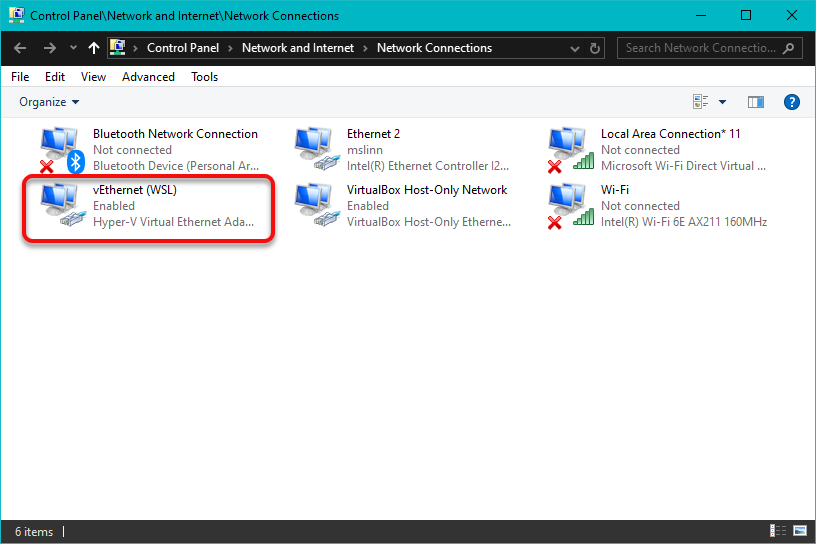
Find the vEthernet (WSL) adapter and double-click on it. -
Another new window will open called vEthernet (WSL) Status.
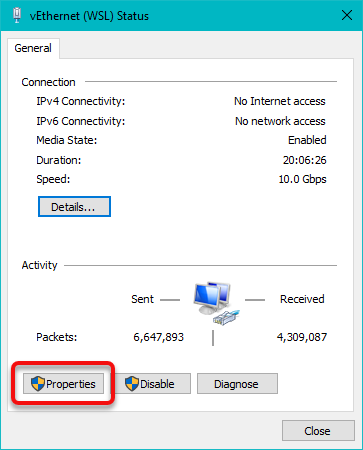
Click on the Properties button. -
Yet another new window will open called vEthernet (WSL) Properties.
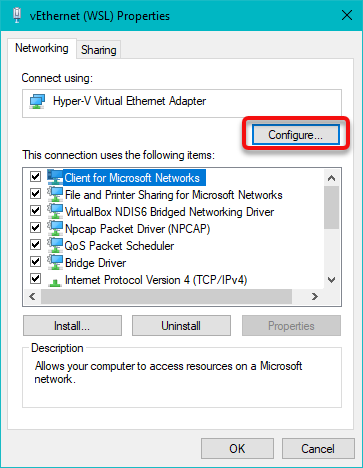
Click on the Configure... button. -
The previous window will close, and a new window called Hyper-V Virtual Ethernet Adapter Properties will open.
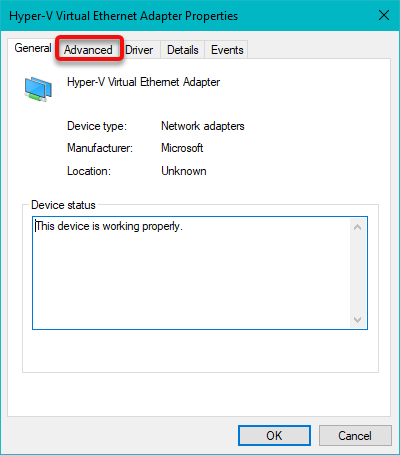
Open the Advanced tab. -
Select Large Send Offload Version 2 (IPv4) and change the drop-down to disabled.
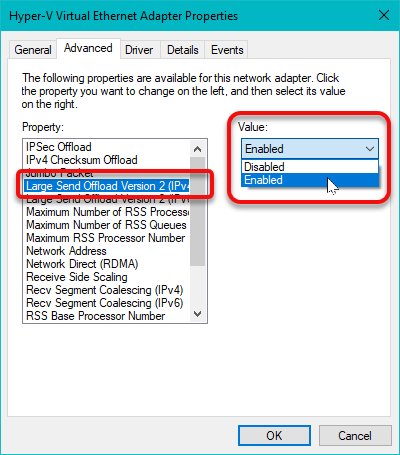
-
Select Large Send Offload Version 2 (IPv6) and change the drop-down to disabled.
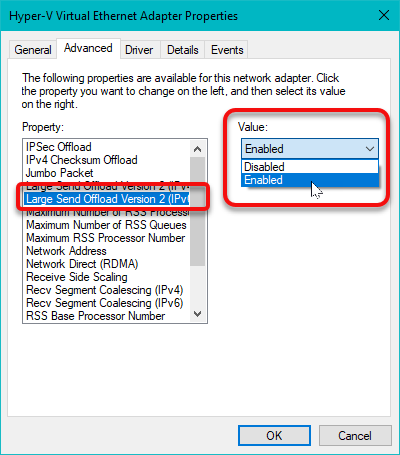
- Click on OK
- Close all the remaining control panel and Ethernet-related windows that you opened during this procedure.
NVIDIA CUDA on WSL/Ubuntu
What is a GPU and do you need one in Deep Learning?
This topic spans Video Drivers,
Building the WSL Kernel,
WDDM,
SMI,
gpustat,
nvtop and
Windows Task Manager.
WSL2 GPU acceleration is available on NVIDIA Pascal and later GPU architecture on both GeForce and Quadro product SKUs in WDDM mode. It is not available on Quadro GPUs in TCC mode or Tesla GPUs yet.
For up-to-date systems with a suitable NVIDIA video card, the proper video driver for Windows should automatically be installed.
This is a relatively recent development.
You should only read this section to verify that your NVIDIA video card is properly set up for use by LLMs that run in WSL2.
😁
If you are reading installation instructions for an LLM that runs on WSL,
and the instructions were written before July 2023, they are out of date.
Things work better now.
libcuda.so,
therefore users must not install any NVIDIA GPU Linux driver within WSL 2.
One has to be very careful here as the default CUDA Toolkit comes packaged with a driver, and it is easy to overwrite the WSL 2 NVIDIA driver with the default installation.
We recommend developers to use a separate CUDA Toolkit for WSL 2 (Ubuntu) available from the CUDA Toolkit Downloads page to avoid this overwriting. This WSL-Ubuntu CUDA toolkit installer will not overwrite the NVIDIA driver that was already mapped into the WSL 2 environment.
The NVIDIA web page cited above has old and incorrect information regarding WSL2 on Windows 10: it is not necessary to enroll in the Windows Insider program. Instead, WSL2 is generally available for Windows 10.
Video Drivers
Some programs require an NVIDIA video driver installed in Windows, plus CUDA installed in WSL, while other products require a Linux video driver, plus CUDA in WSL. To view all NVidia software installed on WSL/Ubuntu, type:
$ apt list --installed 2> /dev/null | grep nvidia
libnvidia-compute-525/mantic-updates,mantic-security,now 525.147.05-0ubuntu0.23.10.1 amd64 [installed,automatic]
libnvidia-ml-dev/mantic,now 12.0.140~12.0.1-2 amd64 [installed,automatic]
nvidia-cuda-dev/mantic,now 12.0.146~12.0.1-2 amd64 [installed,automatic]
nvidia-cuda-gdb/mantic,now 12.0.140~12.0.1-2 amd64 [installed,automatic]
nvidia-cuda-toolkit-doc/mantic,now 12.0.1-2 all [installed,automatic]
nvidia-cuda-toolkit/mantic,now 12.0.140~12.0.1-2 amd64 [installed]
nvidia-opencl-dev/mantic,now 12.0.140~12.0.1-2 amd64 [installed,automatic]
nvidia-profiler/mantic,now 12.0.146~12.0.1-2 amd64 [installed,automatic]
nvidia-visual-profiler/mantic,now 12.0.146~12.0.1-2 amd64 [installed,automatic]
This machine does not have an NVIDIA driver installed on WSL:
$ apt list --installed 2> /dev/null | grep nvidia-driver
Building the WSL Kernel
The kernel needs to be rebuilt in order to link in a video driver. The standard Linux command that fetches the proper headers fails on WSL:
$ yes | sudo apt install linux-headers-$(uname -r)
Reading package lists... Done
Building dependency tree... Done
Reading state information... Done
E: Unable to locate package linux-headers-5.15.133.1-microsoft-standard-WSL2
E: Couldn't find any package by glob 'linux-headers-5.15.133.1-microsoft-standard-WSL2'
However, we can use generic headers:
$ yes | sudo apt install linux-headers-generic
Kernel 5.19.0-28-generic needs gcc-12 to compile the nvidia-driver-525 correctly.
$ yes | sudo apt install gcc-12 g++-12
Update-alternatives can make gcc-12 the default C/C++ compiler.
Here is the help message:
$  update-alternatives --help
update‐alternatives(1)        dpkg suite        update‐alternatives(1)

NAME
        update-alternatives - maintain symbolic links determining
        default commands

SYNOPSIS
        update‐alternatives [option...] command

DESCRIPTION
        update‐alternatives creates, removes, maintains and displays
        information about the symbolic links comprising the Debian
        alternatives system.

        It is possible for several programs fulfilling the same or
        similar functions to be installed on a single system at the
        same time.  For example, many systems have several text editors
        installed at once.  This gives choice to the users of a system,
        allowing each to use a different editor, if desired, but makes
        it difficult for a program to make a good choice for an editor
        to invoke if the user has not specified a particular
        preference.

        Debian’s alternatives system aims to solve this problem.  A
        generic name in the filesystem is shared by all files providing
        interchangeable functionality.  The alternatives system and the
        system administrator together determine which actual file is
        referenced by this generic name.  For example, if the text
        editors ed(1) and nvi(1) are both installed on the system, the
        alternatives system will cause the generic name /usr/bin/editor
        to refer to /usr/bin/nvi by default. The system administrator
        can override this and cause it to refer to /usr/bin/ed instead,
        and the alternatives system will not alter this setting until
        explicitly requested to do so.

        The generic name is not a direct symbolic link to the selected
        alternative.  Instead, it is a symbolic link to a name in the
        alternatives directory, which in turn is a symbolic link to the
        actual file referenced.  This is done so that the system
        administrator’s changes can be confined within the /etc
        directory: the FHS (q.v.) gives reasons why this is a Good
        Thing.

        When each package providing a file with a particular
        functionality is installed, changed or removed, update‐
        alternatives is called to update information about that file in
        the alternatives system.  update‐alternatives is usually called
        from the following Debian package maintainer scripts, postinst
        (configure) to install the alternative and from prerm and
        postrm (remove) to remove the alternative.  Note: in most (if
        not all) cases no other maintainer script actions should call
        update‐alternatives, in particular neither of upgrade nor
        disappear, as any other such action can lose the manual state
        of an alternative, or make the alternative temporarily flip‐
        flop, or completely switch when several of them have the same
        priority.

        It is often useful for a number of alternatives to be
        synchronized, so that they are changed as a group; for example,
        when several versions of the vi(1) editor are installed, the
        manual page referenced by /usr/share/man/man1/vi.1 should
        correspond to the executable referenced by /usr/bin/vi.
        update‐alternatives handles this by means of master and slave
        links; when the master is changed, any associated slaves are
        changed too.  A master link and its associated slaves make up a
        link group.

        Each link group is, at any given time, in one of two modes:
        automatic or manual.  When a group is in automatic mode, the
        alternatives system will automatically decide, as packages are
        installed and removed, whether and how to update the links.  In
        manual mode, the alternatives system will retain the choice of
        the administrator and avoid changing the links (except when
        something is broken).

        Link groups are in automatic mode when they are first
        introduced to the system.  If the system administrator makes
        changes to the system’s automatic settings, this will be
        noticed the next time update‐alternatives is run on the changed
        link’s group, and the group will automatically be switched to
        manual mode.

        Each alternative has a priority associated with it.  When a
        link group is in automatic mode, the alternatives pointed to by
        members of the group will be those which have the highest
        priority.

        When using the --config option, update‐alternatives will list
        all the choices for the link group of which given name is
        the master alternative name.  The current choice is marked with
        a ‘*’.  You will then be prompted for your choice regarding
        this link group.  Depending on the choice made, the link group
        might no longer be in auto mode. You will need to use the
        --auto option in order to return to the automatic mode (or you
        can rerun --config and select the entry marked as automatic).

        If you want to configure non‐interactively you can use the
        --set option instead (see below).

        Different packages providing the same file need to do so
        cooperatively.  In other words, the usage of update‐
        alternatives is mandatory for all involved packages in such
        case. It is not possible to override some file in a package
        that does not employ the update‐alternatives mechanism.

TERMINOLOGY
        Since the activities of update‐alternatives are quite involved,
        some specific terms will help to explain its operation.

        generic name (or alternative link)
            A   name,  like  /usr/bin/editor,  which  refers,  via  the
            alternatives system, to one of a number of files of similar
            function.

        alternative name
            The name of a symbolic link in the alternatives directory.

        alternative (or alternative path)
            The name of a specific file in the filesystem, which may be
            made accessible via a generic name using  the  alternatives
            system.

        alternatives directory
            A  directory,  by default /etc/alternatives, containing the
            symlinks.

        administrative directory
            A   directory,   by   default   /var/lib/dpkg/alternatives,
            containing update‐alternatives’ state information.

        link group
            A  set  of  related  symlinks,  intended to be updated as a
            group.

        master link
            The alternative link in a link group which  determines  how
            the other links in the group are configured.

        slave link
            An  alternative link in a link group which is controlled by
            the setting of the master link.

        automatic mode
            When a link group is in automatic  mode,  the  alternatives
            system  ensures  that  the  links in the group point to the
            highest priority alternative appropriate for the group.

        manual mode
            When a link group  is  in  manual  mode,  the  alternatives
            system   will   not   make   any   changes  to  the  system
            administrator’s settings.

COMMANDS
        --install link name path priority [--slave link name path]...
            Add a group of alternatives to the  system.   link  is  the
            generic  name  for the master link, name is the name of its
            symlink in the alternatives  directory,  and  path  is  the
            alternative  being  introduced  for  the  master link.  The
            arguments after --slave are the generic name, symlink  name
            in  the alternatives directory and the alternative path for
            a slave link.  Zero or more --slave options, each  followed
            by  three arguments, may be specified. Note that the master
            alternative must exist or the call will fail. However if  a
            slave  alternative  doesn’t  exist, the corresponding slave
            alternative link will simply not be  installed  (a  warning
            will  still  be  displayed). If some real file is installed
            where an alternative link has to be installed, it  is  kept
            unless --force is used.

            If  the  alternative  name  specified exists already in the
            alternatives system’s  records,  the  information  supplied
            will  be  added as a new set of alternatives for the group.
            Otherwise, a new group, set  to  automatic  mode,  will  be
            added  with this information.  If the group is in automatic
            mode, and the newly added alternatives’ priority is  higher
            than  any  other installed alternatives for this group, the
            symlinks will be  updated  to  point  to  the  newly  added
            alternatives.

        --set name path
            Set  the  program  path  as  alternative for name.  This is
            equivalent to --config  but  is  non‐interactive  and  thus
            scriptable.

        --remove name path
            Remove  an  alternative  and  all  of  its associated slave
            links.  name is a name in the alternatives  directory,  and
            path is an absolute filename to which name could be linked.
            If  name  is indeed linked to path, name will be updated to
            point to another appropriate alternative (and the group  is
            put back in automatic mode), or removed if there is no such
            alternative  left.   Associated slave links will be updated
            or removed, correspondingly.  If the link is not  currently
            pointing   to   path,   no  links  are  changed;  only  the
            information about the alternative is removed.

        --remove-all name
            Remove all alternatives and all of their  associated  slave
            links.  name is a name in the alternatives directory.

        --all
            Call  --config  on  all  alternatives.  It  can be usefully
            combined with  --skip-auto  to  review  and  configure  all
            alternatives  which  are  not configured in automatic mode.
            Broken alternatives are also displayed.  Thus a simple  way
            to  fix all broken alternatives is to call yes ’’ | update‐
            alternatives --force --all.

        --auto name
            Switch the link group behind the alternative  for  name  to
            automatic mode.  In the process, the master symlink and its
            slaves  are  updated  to  point  to  the  highest  priority
            installed alternatives.

        --display name
            Display information  about  the  link  group.   Information
            displayed  includes  the group’s mode (auto or manual), the
            master and slave links, which alternative the  master  link
            currently  points to, what other alternatives are available
            (and  their  corresponding  slave  alternatives),  and  the
            highest priority alternative currently installed.

        --get-selections
            List all master alternative names (those controlling a link
            group)  and their status (since version 1.15.0).  Each line
            contains up to 3 fields (separated by one or more  spaces).
            The  first field is the alternative name, the second one is
            the status (either  auto  or  manual),  and  the  last  one
            contains  the  current  choice  in the alternative (beware:
            it’s a filename and thus might contain spaces).

        --set-selections
            Read configuration of alternatives on standard input in the
            format generated by --get-selections and  reconfigure  them
            accordingly (since version 1.15.0).

        --query name
            Display  information  about  the  link group like --display
            does, but in a machine parseable way (since version 1.15.0,
            see section QUERY FORMAT below).

        --list name
            Display all targets of the link group.

        --config name
            Show available alternatives for a link group and allow  the
            user  to  interactively  select  which one to use. The link
            group is updated.

        --help
            Show the usage message and exit.

        --version
            Show the version and exit.

OPTIONS
        --altdir directory
            Specifies the alternatives directory, when this  is  to  be
            different     from     the     default.      Defaults    to
            «/etc/alternatives».

        --admindir directory
            Specifies the administrative directory, when this is to  be
            different     from     the     default.      Defaults    to
            «/var/lib/dpkg/alternatives» if DPKG_ADMINDIR has not  been
            set.

        --instdir directory
            Specifies  the  installation  directory  where alternatives
            links will be created (since version 1.20.1).  Defaults  to
            «/» if DPKG_ROOT has not been set.

        --root directory
            Specifies  the root directory (since version 1.20.1).  This
            also sets the alternatives, installation and administrative
            directories to match.  Defaults to «/» if DPKG_ROOT has not
            been set.

        --log file
            Specifies the log file (since version 1.15.0), when this is
            to      be      different      from       the       default
            (/var/log/alternatives.log).

        --force
            Allow replacing or dropping any real file that is installed
            where an alternative link has to be installed or removed.

        --skip-auto
            Skip   configuration  prompt  for  alternatives  which  are
            properly configured in automatic mode. This option is  only
            relevant with --config or --all.

        --quiet
            Do not generate any comments unless errors occur.

        --verbose
            Generate more comments about what is being done.

        --debug
            Generate  even  more comments, helpful for debugging, about
            what is being done (since version 1.19.3).

EXIT STATUS
        0   The requested action was successfully performed.

        2   Problems were encountered whilst parsing the  command  line
            or performing the action.

ENVIRONMENT
        DPKG_ROOT
            If  set  and  the --instdir or --root options have not been
            specified,  it  will  be  used  as  the   filesystem   root
            directory.

        DPKG_ADMINDIR
            If set and the --admindir option has not been specified, it
            will be used as the base administrative directory.

FILES
        /etc/alternatives/
            The  default  alternatives directory.  Can be overridden by
            the --altdir option.

        /var/lib/dpkg/alternatives/
            The default administration directory.  Can be overridden by
            the --admindir option.

QUERY FORMAT
        The --query format is using an RFC822-like  flat  format.  It’s
        made  of  n  +  1 stanzas where n is the number of alternatives
        available in the queried link group. The first stanza  contains
        the following fields:

        Name: name
            The alternative name in the alternative directory.

        Link: link
            The generic name of the alternative.

        Slaves: list‐of‐slaves
            When  this  field is present, the next lines hold all slave
            links associated to the master  link  of  the  alternative.
            There  is one slave per line. Each line contains one space,
            the generic name of the slave alternative,  another  space,
            and the path to the slave link.

        Status: status
            The status of the alternative (auto or manual).

        Best: best‐choice
            The  path  of the best alternative for this link group. Not
            present if there is no alternatives available.

        Value: currently‐selected‐alternative
            The path of the currently selected alternative. It can also
            take the magic value none. It is used if the  link  doesn’t
            exist.

        The  other  stanzas  describe the available alternatives in the
        queried link group:

        Alternative: path‐of‐this‐alternative
            Path to this stanza’s alternative.

        Priority: priority‐value
            Value of the priority of this alternative.

        Slaves: list‐of‐slaves
            When this field is present, the next lines hold  all  slave
            alternatives   associated   to   the  master  link  of  the
            alternative.  There  is  one  slave  per  line.  Each  line
            contains   one   space,  the  generic  name  of  the  slave
            alternative, another space,  and  the  path  to  the  slave
            alternative.

    Example
        $ update-alternatives --query editor
        Name: editor
        Link: /usr/bin/editor
        Slaves:
          editor.1.gz /usr/share/man/man1/editor.1.gz
          editor.fr.1.gz /usr/share/man/fr/man1/editor.1.gz
          editor.it.1.gz /usr/share/man/it/man1/editor.1.gz
          editor.pl.1.gz /usr/share/man/pl/man1/editor.1.gz
          editor.ru.1.gz /usr/share/man/ru/man1/editor.1.gz
        Status: auto
        Best: /usr/bin/vim.basic
        Value: /usr/bin/vim.basic

        Alternative: /bin/ed
        Priority: -100
        Slaves:
          editor.1.gz /usr/share/man/man1/ed.1.gz

        Alternative: /usr/bin/vim.basic
        Priority: 50
        Slaves:
          editor.1.gz /usr/share/man/man1/vim.1.gz
          editor.fr.1.gz /usr/share/man/fr/man1/vim.1.gz
          editor.it.1.gz /usr/share/man/it/man1/vim.1.gz
          editor.pl.1.gz /usr/share/man/pl/man1/vim.1.gz
          editor.ru.1.gz /usr/share/man/ru/man1/vim.1.gz

DIAGNOSTICS
        With  --verbose  update‐alternatives chatters incessantly about
        its activities on its standard  output  channel.   If  problems
        occur,   update‐alternatives  outputs  error  messages  on  its
        standard error channel and returns an exit status of 2.   These
        diagnostics should be self‐explanatory; if you do not find them
        so, please report this as a bug.

EXAMPLES
        There   are  several  packages  which  provide  a  text  editor
        compatible with vi, for example nvi and vim. Which one is  used
        is  controlled  by  the link group vi, which includes links for
        the program itself and the associated manpage.

        To display the available packages  which  provide  vi  and  the
        current setting for it, use the --display action:

        update-alternatives --display vi

        To  choose  a particular vi implementation, use this command as
        root and then select a number from the list:

        update-alternatives --config vi

        To  go  back   to   having   the   vi   implementation   chosen
        automatically, do this as root:

        update-alternatives --auto vi

SEE ALSO
        ln(1), FHS (the Filesystem Hierarchy Standard).

1.22.0                        2023‐08‐31        update‐alternatives(1)
Now we can make gcc-12 the default C/C++ compiler:
$ sudo update-alternatives \
  --install /usr/bin/gcc gcc /usr/bin/gcc-12 60 \
  --slave /usr/bin/g++ g++ /usr/bin/g++-12

$ sudo update-alternatives --set gcc /usr/bin/gcc-12
update-alternatives: using /usr/bin/gcc-12 to provide /usr/bin/gcc (gcc) in manual mode

$ gcc --version
gcc (Ubuntu 12.3.0-9ubuntu2) 12.3.0
Copyright (C) 2022 Free Software Foundation, Inc.
This is free software; see the source for copying conditions.  There is NO
warranty; not even for MERCHANTABILITY or FITNESS FOR A PARTICULAR PURPOSE.
I tried to follow the official NVIDIA installation instructions for WSL/Ubuntu, but they did not work. However, the following worked for my RTX 3060. First I filled in NVIDIA driver form and discovered that my system needed version 535.154.05. The following incantation listed available NVIDIA drivers:
$ apt-cache pkgnames nvidia-driver-
nvidia-driver-460-server
nvidia-driver-525-open
nvidia-driver-418
nvidia-driver-430
nvidia-driver-435
nvidia-driver-440
nvidia-driver-450
nvidia-driver-455
nvidia-driver-460
nvidia-driver-465
nvidia-driver-470
nvidia-driver-495
nvidia-driver-510
nvidia-driver-515
nvidia-driver-520
nvidia-driver-525
nvidia-driver-530
nvidia-driver-535
nvidia-driver-545
nvidia-driver-470-server
nvidia-driver-545-open
nvidia-driver-525-server
nvidia-driver-515-open
nvidia-driver-515-server
nvidia-driver-535-server
nvidia-driver-530-open
nvidia-driver-535-server-open
nvidia-driver-520-open
nvidia-driver-535-open
nvidia-driver-510-server
Then I installed the driver for my video card and rebooted WSL:
$ yes | sudo apt install nvidia-driver-535

$ sudo reboot
WDDM
The Windows Display Driver Model (WDDM) provides the functionality required to render the desktop and applications using Desktop Window Manager, a compositing window manager running on top of Direct3D. Windows 10 includes WDDM 2.x, which is designed to dramatically reduce workload on the kernel-mode driver for GPUs that support virtual memory addressing, to allow multithreading parallelism in the user-mode driver and result in lower CPU utilization. The Windows 10 May 2020 Update introduced WDDM 2.7. See the Wikipedia article for more information.
You can check the version of WDDM that your computer has.
Type Windows-R, type dxdiag, and press Enter.
You should see:
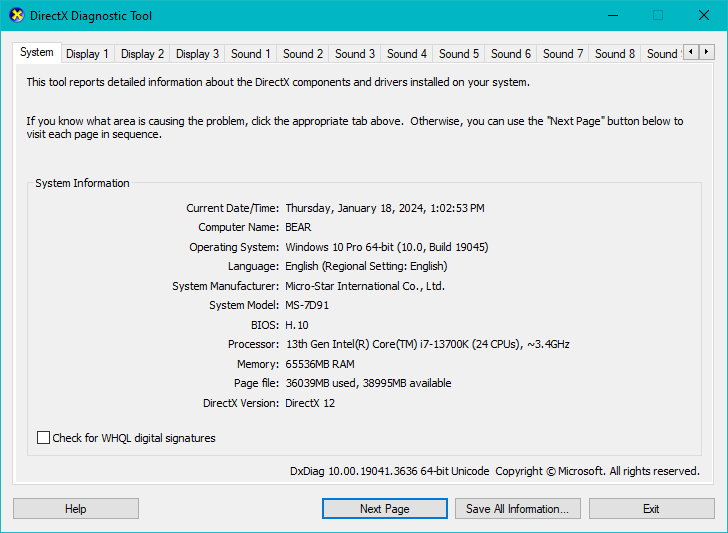
Each video output will have its own tab. My workstation, called Bear, has 3 screens; details about them are shown in the tabs labeled Display 1, Display 2 and Display 3. Each of these tabs should show the same driver model, which for me was WDDM 2.7:
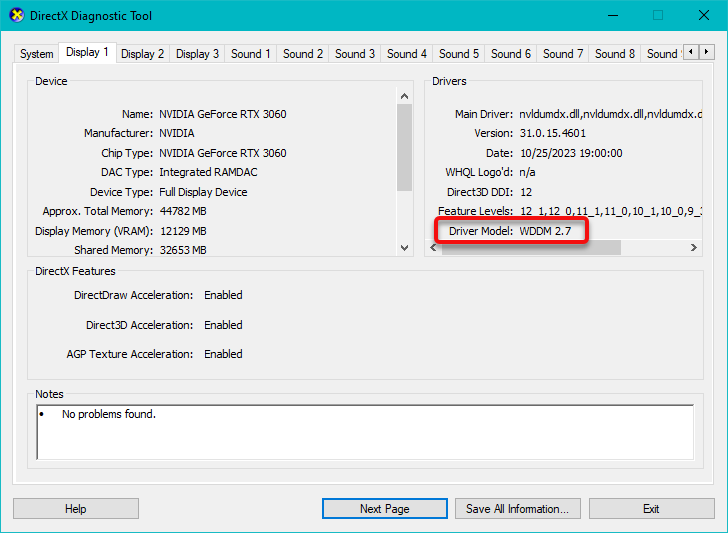
Having verified that the latest publicly available version of WDDM is installed and working, the status of the NVIDIA driver for WSL2 could be checked next.
NVIDIA System Management Interface (SMI)
While running LLMs, you should verify that they are using your hardware properly. Running models without any GPU support potentially means very, very long wait times.
Run your GPU monitoring software before launching LLM models, and watch as the GPU works through its pipelines. Even just monitoring the GPU temperature can be a useful indicator, to verify that programs are in fact using the GPU and not just the CPU.
You can verify that your computer's NVIDIA hardware product is working properly with WSL2.
NVIDIA installs /mnt/c/Windows/system32/nvidia-smi.exe, which reports on CUDA status and usage.
The default Windows installation puts it on the Windows system directory,
which means that default it will also be found on the WSL PATH.
Under both OSes you can run the program without providing its path or filetype.
The help message for nvidia-smi is:
$ nvidia-smi -h
NVIDIA System Management Interface -- v546.01

NVSMI provides monitoring information for Tesla and select Quadro devices.
The data is presented in either a plain text or an XML format, via stdout or a file.
NVSMI also provides several management operations for changing the device state.

Note that the functionality of NVSMI is exposed through the NVML C-based
library. See the NVIDIA developer website for more information about NVML.
Python wrappers to NVML are also available.  The output of NVSMI is
not guaranteed to be backwards compatible; NVML and the bindings are backwards
compatible.

http://developer.nvidia.com/nvidia-management-library-nvml/
http://pypi.python.org/pypi/nvidia-ml-py/
Supported products:
- Full Support
    - All Tesla products, starting with the Kepler architecture
    - All Quadro products, starting with the Kepler architecture
    - All GRID products, starting with the Kepler architecture
    - GeForce Titan products, starting with the Kepler architecture
- Limited Support
    - All Geforce products, starting with the Kepler architecture
nvidia-smi [OPTION1 [ARG1]] [OPTION2 [ARG2]] ...

    -h,   --help                Print usage information and exit.

  LIST OPTIONS:

    -L,   --list-gpus           Display a list of GPUs connected to the system.

    -B,   --list-excluded-gpus  Display a list of excluded GPUs in the system.

  SUMMARY OPTIONS:

    <no arguments>              Show a summary of GPUs connected to the system.

    [plus any of]

    -i,   --id=                 Target a specific GPU.
    -f,   --filename=           Log to a specified file, rather than to stdout.
    -l,   --loop=               Probe until Ctrl+C at specified second interval.

  QUERY OPTIONS:

    -q,   --query               Display GPU or Unit info.

    [plus any of]

    -u,   --unit                Show unit, rather than GPU, attributes.
    -i,   --id=                 Target a specific GPU or Unit.
    -f,   --filename=           Log to a specified file, rather than to stdout.
    -x,   --xml-format          Produce XML output.
          --dtd                 When showing xml output, embed DTD.
    -d,   --display=            Display only selected information: MEMORY,
                                    UTILIZATION, ECC, TEMPERATURE, POWER, CLOCK,
                                    COMPUTE, PIDS, PERFORMANCE, SUPPORTED_CLOCKS,
                                    PAGE_RETIREMENT, ACCOUNTING, ENCODER_STATS,
                                    SUPPORTED_GPU_TARGET_TEMP, VOLTAGE, FBC_STATS
                                    ROW_REMAPPER, RESET_STATUS
                                Flags can be combined with comma e.g. ECC,POWER.
                                Sampling data with max/min/avg is also returned
                                for POWER, UTILIZATION and CLOCK display types.
                                Doesn't work with -u or -x flags.
    -l,   --loop=               Probe until Ctrl+C at specified second interval.

    -lms, --loop-ms=            Probe until Ctrl+C at specified millisecond interval.

  SELECTIVE QUERY OPTIONS:

    Allows the caller to pass an explicit list of properties to query.

    [one of]

    --query-gpu                 Information about GPU.
                                Call --help-query-gpu for more info.
    --query-supported-clocks    List of supported clocks.
                                Call --help-query-supported-clocks for more info.
    --query-compute-apps        List of currently active compute processes.
                                Call --help-query-compute-apps for more info.
    --query-accounted-apps      List of accounted compute processes.
                                Call --help-query-accounted-apps for more info.
                                This query is not supported on vGPU host.
    --query-retired-pages       List of device memory pages that have been retired.
                                Call --help-query-retired-pages for more info.
    --query-remapped-rows       Information about remapped rows.
                                Call --help-query-remapped-rows for more info.

    [mandatory]

    --format=                   Comma separated list of format options:
                                  csv - comma separated values (MANDATORY)
                                  noheader - skip the first line with column headers
                                  nounits - don't print units for numerical
                                              values

    [plus any of]

    -i,   --id=                 Target a specific GPU or Unit.
    -f,   --filename=           Log to a specified file, rather than to stdout.
    -l,   --loop=               Probe until Ctrl+C at specified second interval.
    -lms, --loop-ms=            Probe until Ctrl+C at specified millisecond interval.

  DEVICE MODIFICATION OPTIONS:

    [any one of]

    -e,   --ecc-config=         Toggle ECC support: 0/DISABLED, 1/ENABLED
    -p,   --reset-ecc-errors=   Reset ECC error counts: 0/VOLATILE, 1/AGGREGATE
    -c,   --compute-mode=       Set MODE for compute applications:
                                0/DEFAULT, 1/EXCLUSIVE_THREAD (DEPRECATED),
                                2/PROHIBITED, 3/EXCLUSIVE_PROCESS
    -dm,  --driver-model=       Enable or disable TCC mode: 0/WDDM, 1/TCC
    -fdm, --force-driver-model= Enable or disable TCC mode: 0/WDDM, 1/TCC
                                Ignores the error that display is connected.
          --gom=                Set GPU Operation Mode:
                                    0/ALL_ON, 1/COMPUTE, 2/LOW_DP
    -lgc  --lock-gpu-clocks=    Specifies <minGpuClock,maxGpuClock> clocks as a
                                    pair (e.g. 1500,1500) that defines the range
                                    of desired locked GPU clock speed in MHz.
                                    Setting this will supercede application clocks
                                    and take effect regardless if an app is running.
                                    Input can also be a singular desired clock value
                                    (e.g. <GpuClockValue>). Optionally, --mode can be
                                    specified to indicate a special mode.
    -m    --mode=               Specifies the mode for --locked-gpu-clocks.
                                    Valid modes: 0, 1
    -rgc  --reset-gpu-clocks
                                Resets the Gpu clocks to the default values.
    -lmc  --lock-memory-clocks=  Specifies <minMemClock,maxMemClock> clocks as a
                                    pair (e.g. 5100,5100) that defines the range
                                    of desired locked Memory clock speed in MHz.
                                    Input can also be a singular desired clock value
                                    (e.g. <MemClockValue>).
    -rmc  --reset-memory-clocks
                                Resets the Memory clocks to the default values.
    -lmcd --lock-memory-clocks-deferred=
                                    Specifies memClock clock to lock. This limit is
                                    applied the next time GPU is initialized.
                                    This is guaranteed by unloading and reloading the kernel module.
                                    Requires root.
    -rmcd --reset-memory-clocks-deferred
                                Resets the deferred Memory clocks applied.
    -ac   --applications-clocks= Specifies <memory,graphics> clocks as a
                                    pair (e.g. 2000,800) that defines GPU's
                                    speed in MHz while running applications on a GPU.
    -rac  --reset-applications-clocks
                                Resets the applications clocks to the default values.
    -pl   --power-limit=        Specifies maximum power management limit in watts.
                                Takes an optional argument --scope.
    -sc   --scope=              Specifies the device type for --scope: 0/GPU, 1/TOTAL_MODULE (Grace Hopper Only)
    -cc   --cuda-clocks=        Overrides or restores default CUDA clocks.
                                In override mode, GPU clocks higher frequencies when running CUDA applications.
                                Only on supported devices starting from the Volta series.
                                Requires administrator privileges.
                                0/RESTORE_DEFAULT, 1/OVERRIDE
    -am   --accounting-mode=    Enable or disable Accounting Mode: 0/DISABLED, 1/ENABLED
    -caa  --clear-accounted-apps
                                Clears all the accounted PIDs in the buffer.
          --auto-boost-default= Set the default auto boost policy to 0/DISABLED
                                or 1/ENABLED, enforcing the change only after the
                                last boost client has exited.
          --auto-boost-permission=
                                Allow non-admin/root control over auto boost mode:
                                0/UNRESTRICTED, 1/RESTRICTED
    -mig  --multi-instance-gpu= Enable or disable Multi Instance GPU: 0/DISABLED, 1/ENABLED
                                Requires root.
    -gtt  --gpu-target-temp=    Set GPU Target Temperature for a GPU in degree celsius.
                                Requires administrator privileges

    [plus optional]

    -i,   --id=                 Target a specific GPU.
    -eow, --error-on-warning    Return a non-zero error for warnings.

  UNIT MODIFICATION OPTIONS:

    -t,   --toggle-led=         Set Unit LED state: 0/GREEN, 1/AMBER

    [plus optional]

    -i,   --id=                 Target a specific Unit.

  SHOW DTD OPTIONS:

          --dtd                 Print device DTD and exit.

      [plus optional]

    -f,   --filename=           Log to a specified file, rather than to stdout.
    -u,   --unit                Show unit, rather than device, DTD.

    --debug=                    Log encrypted debug information to a specified file.

  Device Monitoring:
    dmon                        Displays device stats in scrolling format.
                                "nvidia-smi dmon -h" for more information.

    daemon                      Runs in background and monitor devices as a daemon process.
                                This is an experimental feature. Not supported on Windows baremetal
                                "nvidia-smi daemon -h" for more information.

    replay                      Used to replay/extract the persistent stats generated by daemon.
                                This is an experimental feature.
                                "nvidia-smi replay -h" for more information.

  Process Monitoring:
    pmon                        Displays process stats in scrolling format.
                                "nvidia-smi pmon -h" for more information.

  NVLINK:
    nvlink                      Displays device nvlink information. "nvidia-smi nvlink -h" for more information.

  C2C:
    c2c                         Displays device C2C information. "nvidia-smi c2c -h" for more information.

  CLOCKS:
    clocks                      Control and query clock information. "nvidia-smi clocks -h" for more information.

  ENCODER SESSIONS:
    encodersessions             Displays device encoder sessions information. "nvidia-smi encodersessions -h" for more information.

  FBC SESSIONS:
    fbcsessions                 Displays device FBC sessions information. "nvidia-smi fbcsessions -h" for more information.

  MIG:
    mig                         Provides controls for MIG management. "nvidia-smi mig -h" for more information.

  COMPUTE POLICY:
    compute-policy              Control and query compute policies. "nvidia-smi compute-policy -h" for more information.

  BOOST SLIDER:
    boost-slider                Control and query boost sliders. "nvidia-smi boost-slider -h" for more information.

  POWER HINT:    power-hint                  Estimates GPU power usage. "nvidia-smi power-hint -h" for more information.

  BASE CLOCKS:    base-clocks                 Query GPU base clocks. "nvidia-smi base-clocks -h" for more information.

  GPU PERFORMANCE MONITORING:
    gpm                         Control and query GPU performance monitoring unit. "nvidia-smi gpm -h" for more information.

  PCI:
    pci                         Display device PCI information. "nvidia-smi pci -h" for more information.

Please see the nvidia-smi documentation for more detailed information.
I tried out a few incantations:
$ nvidia-smi -L
GPU 0: NVIDIA GeForce RTX 3060 (UUID: GPU-7dd6e528-14ae-f08d-8312-257d14b212ce)

$ nvidia-smi -B
No excluded devices found.
Run the following command in WSL to check CUDA status.
$ nvidia-smi
Thu Jan 18 12:43:22 2024
+---------------------------------------------------------------------------------------+
| NVIDIA-SMI 546.01                 Driver Version: 546.01       CUDA Version: 12.3     |
|-----------------------------------------+----------------------+----------------------+
| GPU  Name                     TCC/WDDM  | Bus-Id        Disp.A | Volatile Uncorr. ECC |
| Fan  Temp   Perf          Pwr:Usage/Cap |         Memory-Usage | GPU-Util  Compute M. |
|                                         |                      |               MIG M. |
|=========================================+======================+======================|
|   0  NVIDIA GeForce RTX 3060      WDDM  | 00000000:01:00.0  On |                  N/A |
|  0%   48C    P3              32W / 170W |   6120MiB / 12288MiB |      5%      Default |
|                                         |                      |                  N/A |
+-----------------------------------------+----------------------+----------------------+

+---------------------------------------------------------------------------------------+
| Processes:                                                                            |
|  GPU   GI   CI        PID   Type   Process name                            GPU Memory |
|        ID   ID                                                             Usage      |
|=======================================================================================|
|    0   N/A  N/A      1964    C+G   ...Programs\Microsoft VS Code\Code.exe    N/A      |
|    0   N/A  N/A      2300    C+G   ...64__8xx8rvfyw5nnt\app\Messenger.exe    N/A      |
|    0   N/A  N/A      3100    C+G   ...aam7r\AcrobatNotificationClient.exe    N/A      |
|    0   N/A  N/A      9288    C+G   ...siveControlPanel\SystemSettings.exe    N/A      |
|    0   N/A  N/A     10604    C+G   ...m Files\Mozilla Firefox\firefox.exe    N/A      |
|    0   N/A  N/A     10732    C+G   ...r and Support Assistant\DSATray.exe    N/A      |
|    0   N/A  N/A     12240    C+G   ...GeForce Experience\NVIDIA Share.exe    N/A      |
|    0   N/A  N/A     12836    C+G   C:\Windows\explorer.exe                   N/A      |
|    0   N/A  N/A     13108    C+G   ...b3d8bbwe\Microsoft.Media.Player.exe    N/A      |
|    0   N/A  N/A     14920    C+G   ....Search_cw5n1h2txyewy\SearchApp.exe    N/A      |
|    0   N/A  N/A     16420    C+G   ...x64__jr9bq2af9farr\WorkingHours.exe    N/A      |
|    0   N/A  N/A     17208    C+G   ...oogle\Chrome\Application\chrome.exe    N/A      |
|    0   N/A  N/A     19156    C+G   ...Smith\Snagit 2022\SnagitCapture.exe    N/A      |
|    0   N/A  N/A     20488    C+G   ...m Files\Mozilla Firefox\firefox.exe    N/A      |
|    0   N/A  N/A     20784    C+G   ...Mozilla Thunderbird\thunderbird.exe    N/A      |
|    0   N/A  N/A     20820    C+G   ...CBS_cw5n1h2txyewy\TextInputHost.exe    N/A      |
|    0   N/A  N/A     23848    C+G   ...al\Discord\app-1.0.9030\Discord.exe    N/A      |
|    0   N/A  N/A     24048    C+G   ...werToys\PowerToys.ColorPickerUI.exe    N/A      |
|    0   N/A  N/A     26756    C+G   ...ekyb3d8bbwe\PhoneExperienceHost.exe    N/A      |
|    0   N/A  N/A     27100    C+G   ...\PowerToys\PowerToys.FancyZones.exe    N/A      |
|    0   N/A  N/A     27216    C+G   ... Files\Avid\Avid Link\Avid Link.exe    N/A      |
|    0   N/A  N/A     28460    C+G   ...ys\WinUI3Apps\PowerToys.Peek.UI.exe    N/A      |
|    0   N/A  N/A     28628    C+G   ...werToys\PowerToys.PowerLauncher.exe    N/A      |
|    0   N/A  N/A     30556    C+G   ...1.0_x64__8wekyb3d8bbwe\Video.UI.exe    N/A      |
|    0   N/A  N/A     32032    C+G   ...__8wekyb3d8bbwe\WindowsTerminal.exe    N/A      |
|    0   N/A  N/A     32928    C+G   ....5287.0_x64__8j3eq9eme6ctt\IGCC.exe    N/A      |
|    0   N/A  N/A     35792    C+G   ...hSmith\Snagit 2022\SnagitEditor.exe    N/A      |
|    0   N/A  N/A     36336    C+G   ...5n1h2txyewy\ShellExperienceHost.exe    N/A      |
|    0   N/A  N/A     41572    C+G   ...64.0_x64__56jybvy8sckqj\nvcplui.exe    N/A      |
+---------------------------------------------------------------------------------------+
You can use the Bash watch command to run
nvidia-smi on WSL.
Here is the watch help message:
$ man watch
WATCH(1)                     User Commands                    WATCH(1)

NAME
        watch   -   execute  a  program  periodically,  showing  output
        fullscreen

SYNOPSIS
        watch [options] command

DESCRIPTION
        watch runs command repeatedly, displaying its output and errors
        (the first screenfull).  This allows you to watch  the  program
        output  change  over  time.  By default, command is run every 2
        seconds and watch will run until interrupted.

OPTIONS
        -b, --beep
              Beep if command has a non‐zero exit.

        -c, --color
              Interpret ANSI color and style sequences.

        -d, --differences[=permanent]
              Highlight the differences between successive updates. If
              the optional permanent argument is specified then  watch
              will show all changes since the first iteration.

        -e, --errexit
              Freeze  updates  on  command error, and exit after a key
              press.

        -g, --chgexit
              Exit when the output of command changes.

        -n, --interval seconds
              Specify update interval.  The  command  will  not  allow
              quicker  than  0.1 second interval, in which the smaller
              values are converted. Both ’.’ and ’,’ work for any  lo‐
              cales.  The  WATCH_INTERVAL  environment  can be used to
              persistently set a non‐default interval  (following  the
              same rules and formatting).

        -p, --precise
              Make  watch attempt to run command every --interval sec‐
              onds.  Try it with ntptime (if present) and  notice  how
              the  fractional  seconds stays (nearly) the same, as op‐
              posed to normal mode where they continuously increase.

        -q, --equexit <cycles>
              Exit when output of command  does  not  change  for  the
              given number of cycles.

        -r, --no‐rerun
              Do not run the program on terminal resize, the output of
              the program will re‐appear at the next regular run time.

        -t, --no-title
              Turn  off  the header showing the interval, command, and
              current time at the top of the display, as well  as  the
              following blank line.

        -w, --no-wrap
              Turn off line wrapping. Long lines will be truncated in‐
              stead of wrapped to the next line.

        -x, --exec
              Pass  command  to exec(2) instead of sh -c which reduces
              the need to use extra quoting to get the desired effect.

        -h, --help
              Display help text and exit.

        -v, --version
              Display version information and exit.

EXIT STATUS
              0      Success.
              1      Various failures.
              2      Forking the process to watch failed.
              3      Replacing child process stdout  with  write  side
                      pipe failed.
              4      Command execution failed.
              5      Closing child process write pipe failed.
              7      IPC pipe creation failed.
              8      Getting  child  process  return  value with wait‐
                      pid(2) failed, or command exited up on error.
              other  The watch will propagate command exit  status  as
                      child exit status.
ENVIRONMENT
        The  behavior of watch is affected by the following environment
        variables.

        WATCH_INTERVAL
              Update interval, follows the same rules as the  --inter‐
              val command line option.

NOTES
        POSIX  option processing is used (i.e., option processing stops
        at the first non-option argument).  This means that flags after
        command don’t get interpreted by watch itself.

BUGS
        Upon terminal resize, the screen  will  not  be  correctly  re‐
        painted  until  the  next  scheduled update.  All --differences
        highlighting is lost on that update as  well.  When  using  the
        --no-rerun option, no output of will be visible.

        Non‐printing  characters are stripped from program output.  Use
        cat ‐v as part of the command pipeline if you want to see them.

        Combining Characters that are supposed to display on the  char‐
        acter  at  the last column on the screen may display one column
        early, or they may not display at all.

        Combining Characters never count as different in  --differences
        mode.  Only the base character counts.

        Blank lines directly after a line which ends in the last column
        do not display.

        --precise  mode  doesn’t  yet have advanced temporal distortion
        technology to compensate for a command  that  takes  more  than
        --interval seconds to execute.  watch also can get into a state
        where it rapid‐fires as many executions of command as it can to
        catch  up  from a previous executions running longer than --in‐
        terval (for example, netstat(8) taking ages on a DNS lookup).

EXAMPLES
        To watch for mail, you might do
              watch -n 60 from
        To watch the contents of a directory change, you could use
              watch -d ls -l
        If you’re only interested in files owned by user joe, you might
        use
              watch -d ’ls -l | fgrep joe’
        To see the effects of quoting, try these out
              watch echo $$
              watch echo ’$$’
              watch echo "’"’$$’"’"
        To see the effect of precision time keeping, try adding -p to
              watch -n 10 sleep 1
        You can watch for your administrator to install the latest ker‐
        nel with
              watch uname -r
        (Note that -p isn’t guaranteed to work  across  reboots,  espe‐
        cially  in  the  face  of  ntpdate (if present) or other bootup
        time‐changing mechanisms)

REPORTING BUGS
        Please send bug reports to procps@freelists.org

procps‐ng                     2023‐01‐17                      WATCH(1)
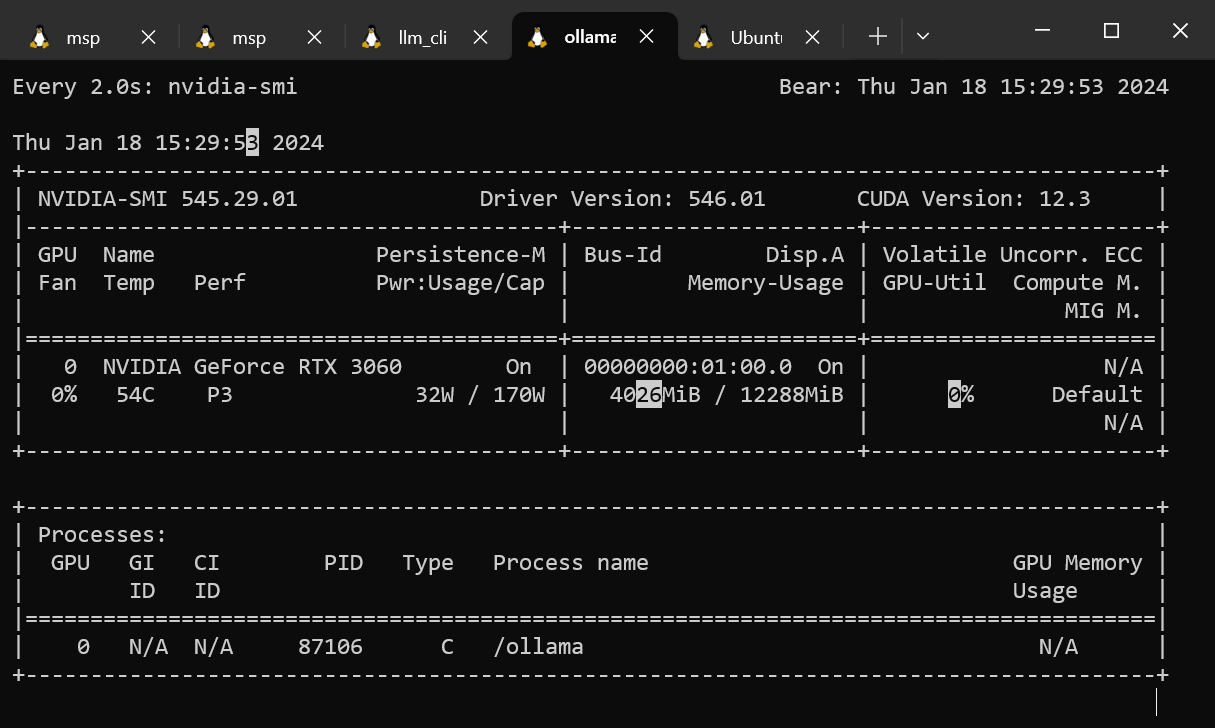
Now lets use the watch command to check the GPU using nvidia-smi every 2 seconds,
and updating the displayed information as it changes.
Recently updated information is highlighted.
$ watch -d nvidia-smi
This is a screen shot of the above command in action:
nvtop
Nvtop is an ncurses-based GPU status viewer for NVIDIA GPUs, which functions in a similar manner as the top command.
This program works fine under native Ubuntu, however
nvtop did not detect my RTX 3060 GPU, so I was unable to make this program work under WSL/Ubuntu.
If you are running on WSL/Ubuntu, skip this section and proceed to gpustat
$ yes | sudo apt install nvtop
The help information is:
$ nvtop -h
nvtop -h
nvtop version 3.0.2
Available options:
  -d --delay        : Select the refresh rate (1 == 0.1s)
  -v --version      : Print the version and exit
  -c --config-file  : Provide a custom config file location to load/save preferences
  -p --no-plot      : Disable bar plot
  -r --reverse-abs  : Reverse abscissa: plot the recent data left and older on the right
  -C --no-color     : No colors
line information
  -f --freedom-unit : Use fahrenheit
  -E --encode-hide  : Set encode/decode auto hide time in seconds (default 30s, negative = always on screen)
  -h --help         : Print help and exit
gpustat
Gpustat is a simple tool to get Nvidia GPU stats on Linux and FreeBSD Unix.
It is written in Python and is a good tool for CLI users, especially ML/AI developers.
Gpustat does not require an NVIDIA driver for Linux.
$ pip install gpustat
Here is the help information:
$ gpustat -h
usage: gpustat [-h] [--force-color | --no-color] [-a] [-c] [-f] [-u] [-p] [-F] [-e [{,enc,dec,enc,dec}]] [-P [{,draw,limit,draw,limit,limit,draw}]] [--json] [-i [INTERVAL]]
               [--no-header] [--gpuname-width GPUNAME_WIDTH] [--debug] [-v]

options:
  -h, --help            show this help message and exit
  --force-color, --color
                        Force to output with colors
  --no-color            Suppress colored output
  -a, --show-all        Display all gpu properties above
  -c, --show-cmd        Display cmd name of running process
  -f, --show-full-cmd   Display full command and cpu stats of running process
  -u, --show-user       Display username of running process
  -p, --show-pid        Display PID of running process
  -F, --show-fan-speed, --show-fan
                        Display GPU fan speed
  -e [{,enc,dec,enc,dec}], --show-codec [{,enc,dec,enc,dec}]
                        Show encoder/decoder utilization
  -P [{,draw,limit,draw,limit,limit,draw}], --show-power [{,draw,limit,draw,limit,limit,draw}]
                        Show GPU power usage or draw (and/or limit)
  --json                Print all the information in JSON format
  -i [INTERVAL], --interval [INTERVAL], --watch [INTERVAL]
                        Use watch mode if given; seconds to wait between updates
  --no-header           Suppress header message
  --gpuname-width GPUNAME_WIDTH
                        The width at which GPU names will be displayed.
  --debug               Allow to print additional informations for debugging.
  -v, --version         show program's version number and exit
We can use watch as before with gpustat to view the GPU load in real time:
$ watch -d gpustat
This is a screen shot of the above command in action:

Windows Task Manager
Although nvidia-smi can give detailed information, its lack of historical data makes it of limited use.
The Windows Task Manager can provide a solid indication when the GPU is being utilized.
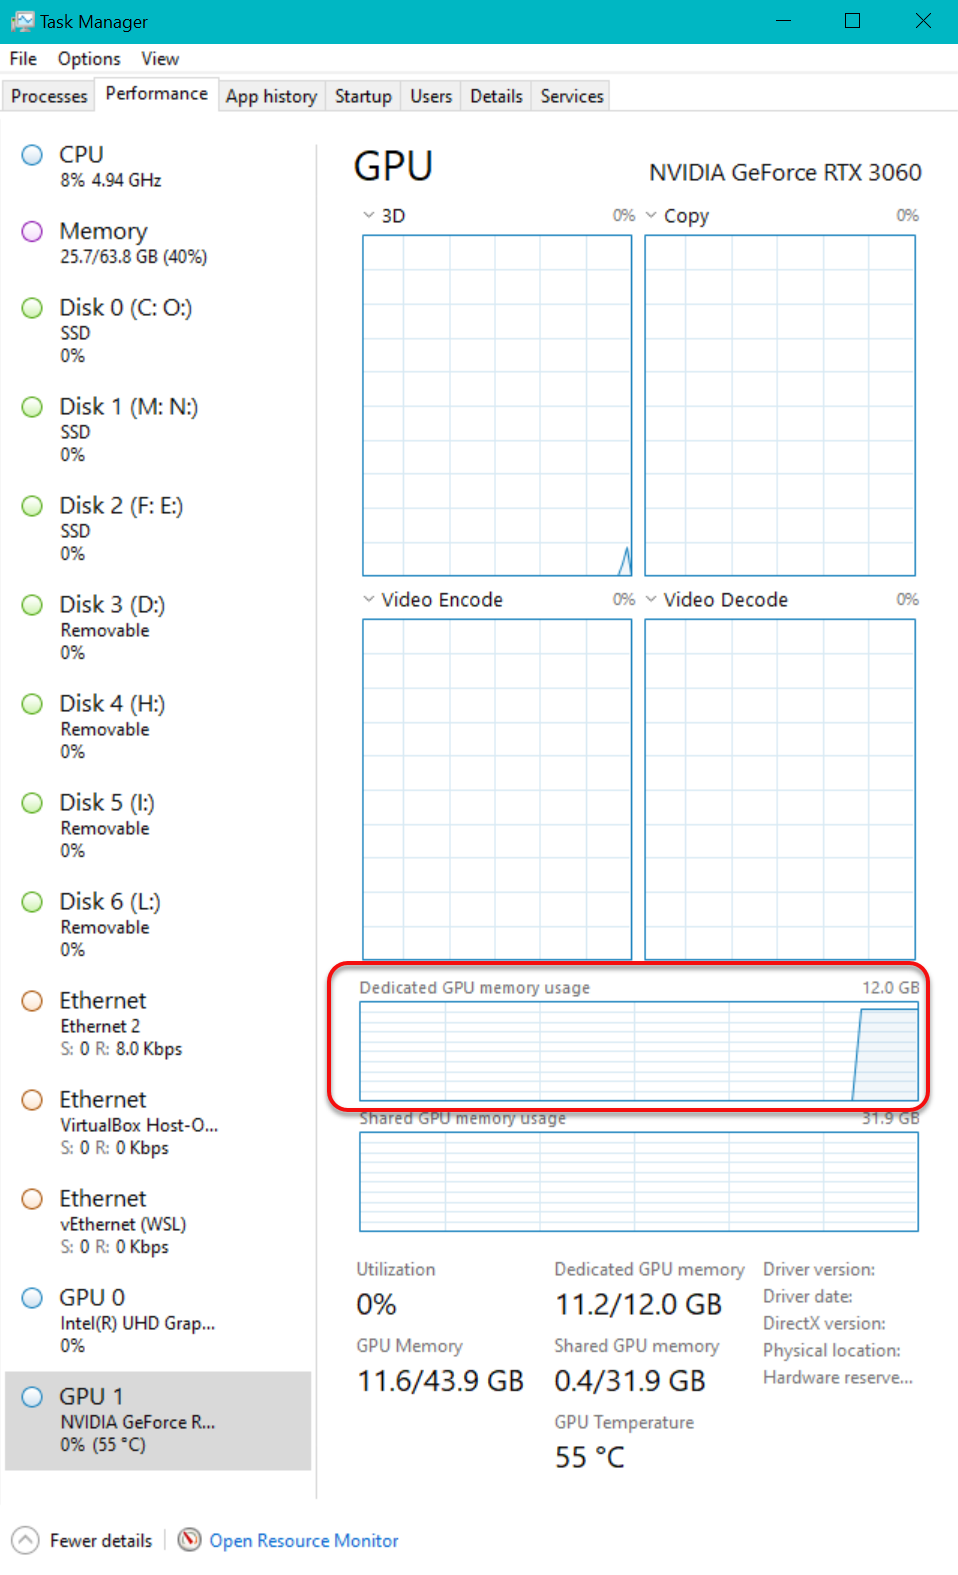
To see the above real-time display, press CTRL-Shift-Esc. The Windows Task Manager should launch, unless you installed an alternative like Process Explorer.
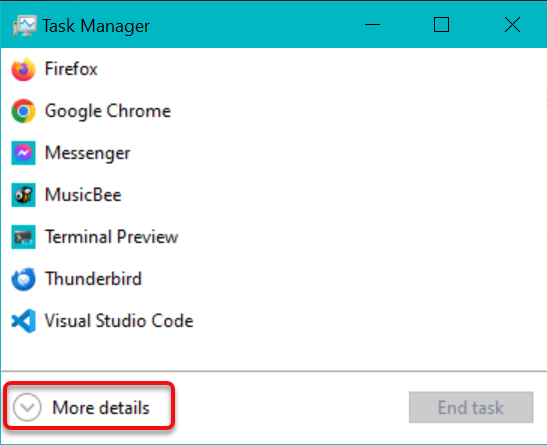
View the more detailed, and larger display layout for Windows Task Manager by clicking on More details as shown in the above image. The window will grow substantially, and several tabs will be shown at the top of the window. Click on the Performance tab as shown in the next image.
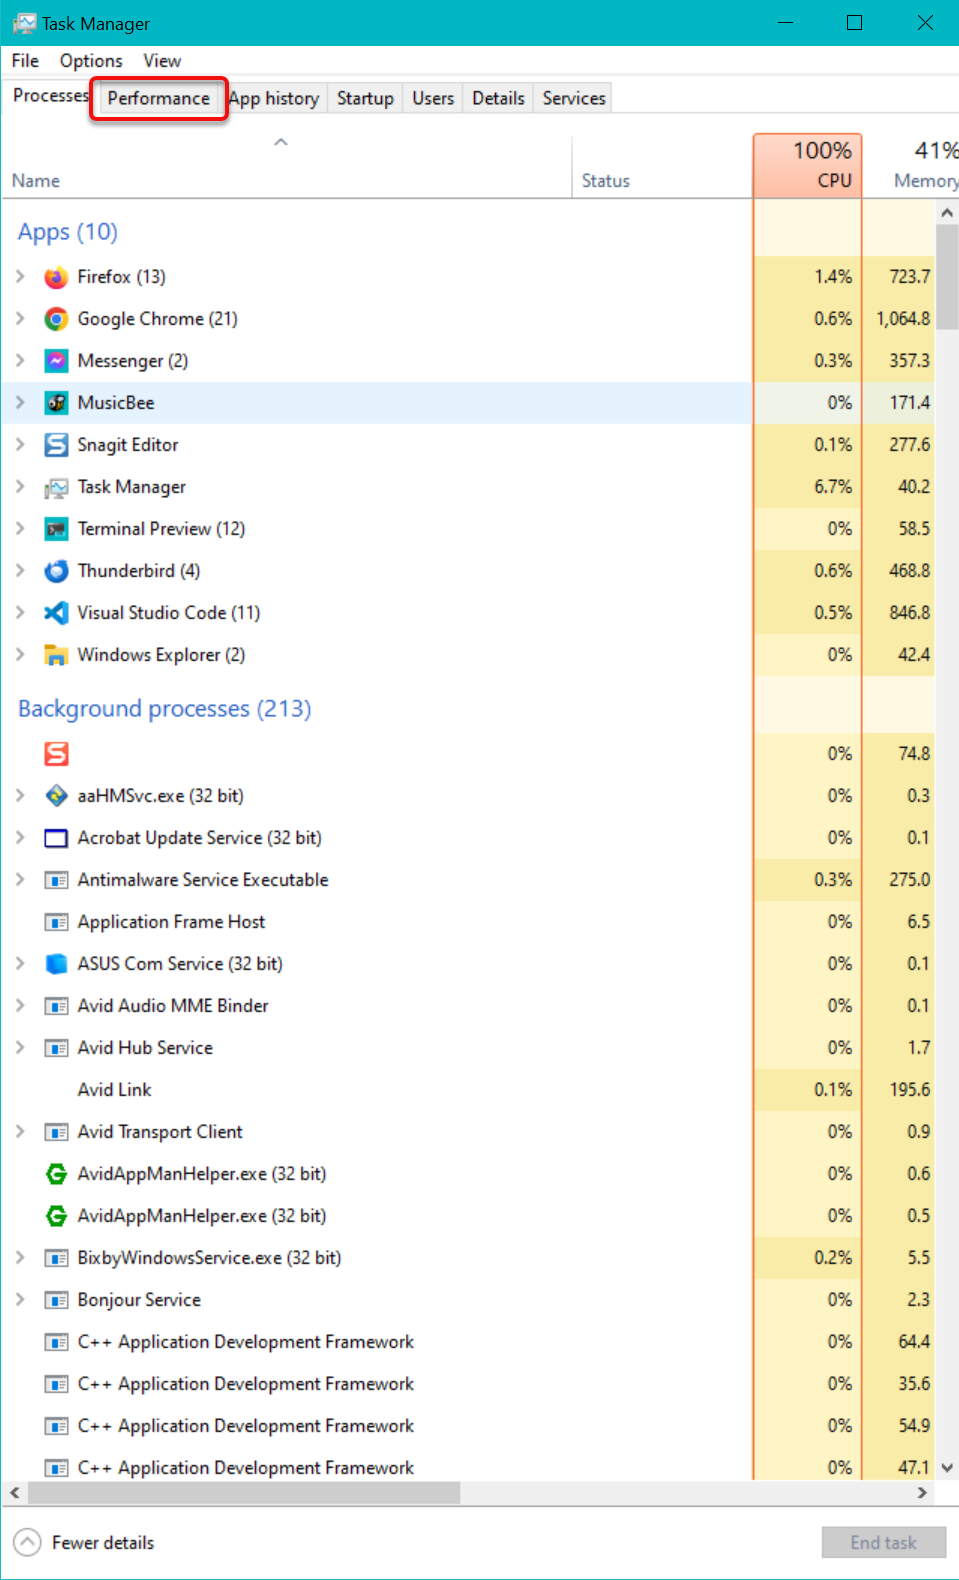
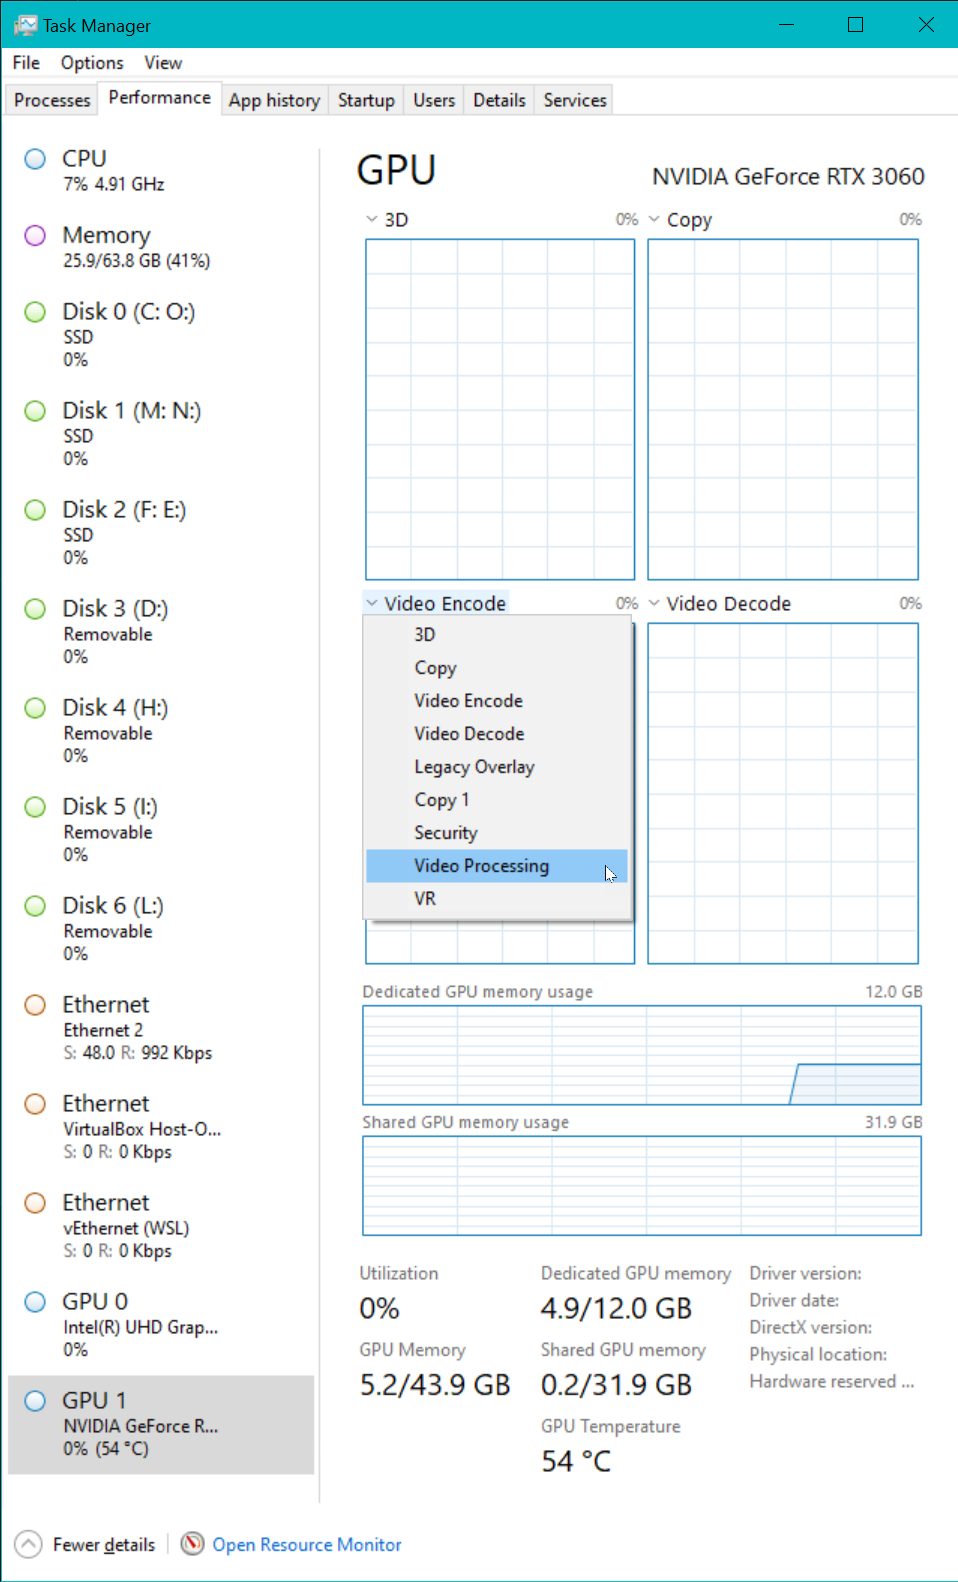
Now click on the GPU 1 area near the bottom left of the window.
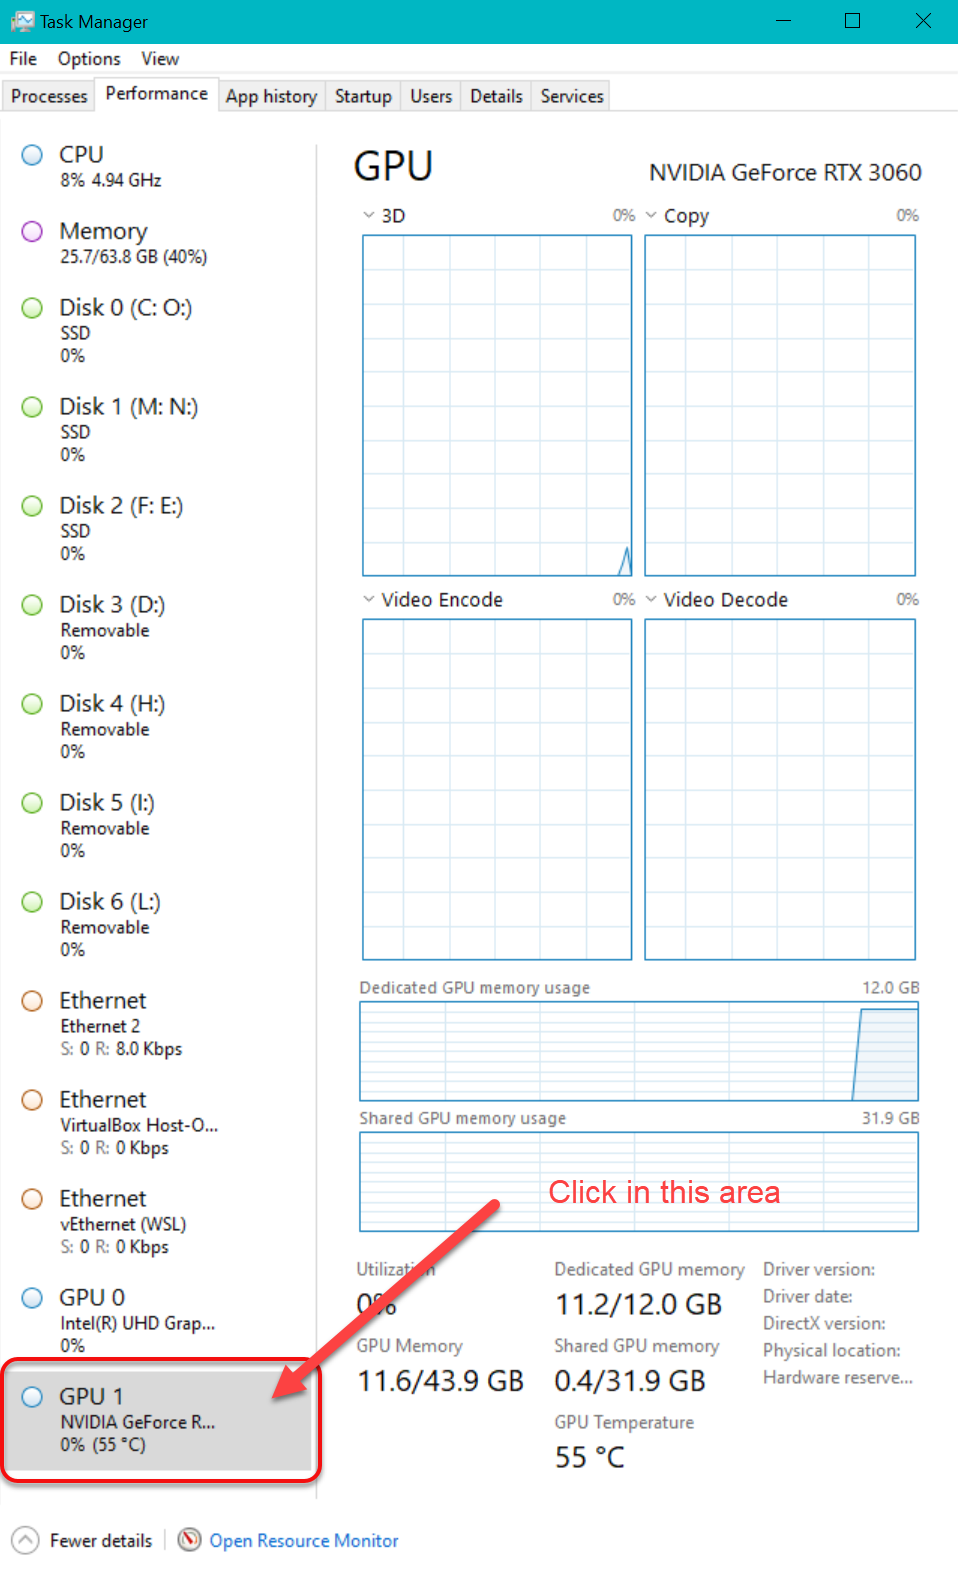
Six real-time graphs appear, with live statistics displayed below. You can use the pull-down menu at the top of every real-time graph to control the information that is displayed within it:
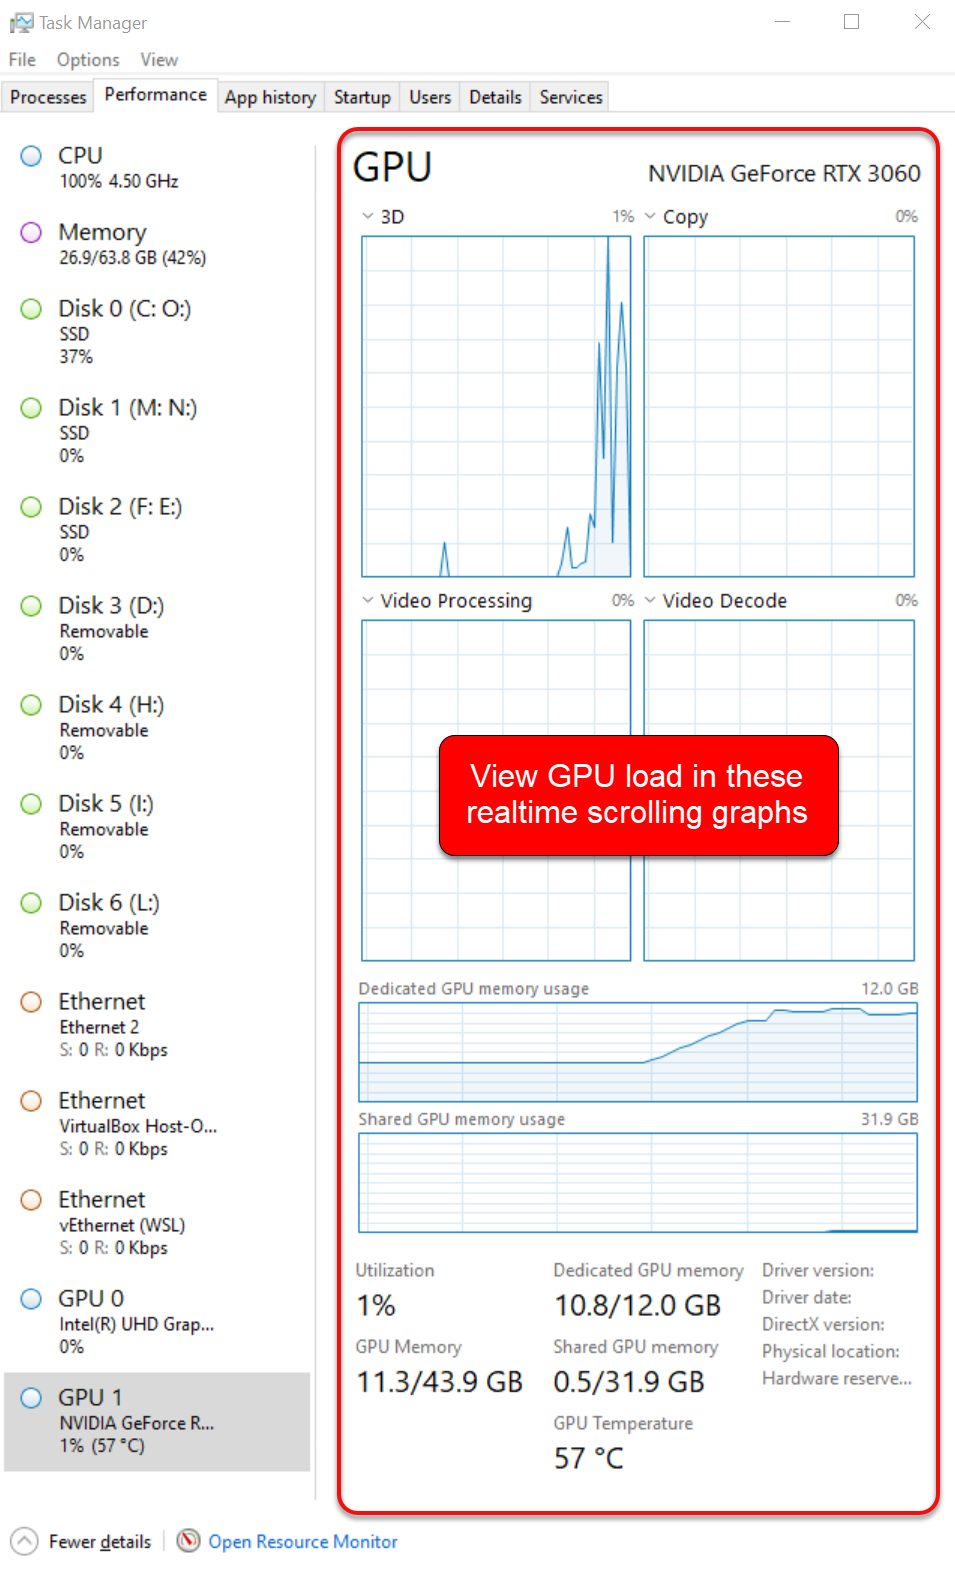
Finally you can launch your model! As it runs, look for the load to appear on the real-time GPU status graphs, as shown below.
System Swap
Some programs, such as Fooocus, require lots of memory. When physical memory is fully used, operating systems employ virtual memory via system swap space. Swap space should be located on NVMe drives, otherwise computation will be very slow. For fastest operation the partition containing the swap space should not be located the drive containing the system partition, or the partition holding the data that you want to process.
Windows uses the Pagefile to provide swap space.
Microsoft Windows 10 and 11 by default sets up a dynamically resized Pagefile for you.
Windows will automatically resize the Pagefile as required if size is set to Auto,
however because Pagefile must be continguous,
this can lead to swap failure if a swap area needs to grow to larger than available space on the drive in use.
It is better to manually set swap size to the largest size that you expect to need,
on your fastest available drive that resides in a separate partition.
You can use System Information to quickly view the memory and virtual memory parameters of your Windows computer.
Press and release the Windows key, type info and press Enter.
This is what I saw for my workstation:
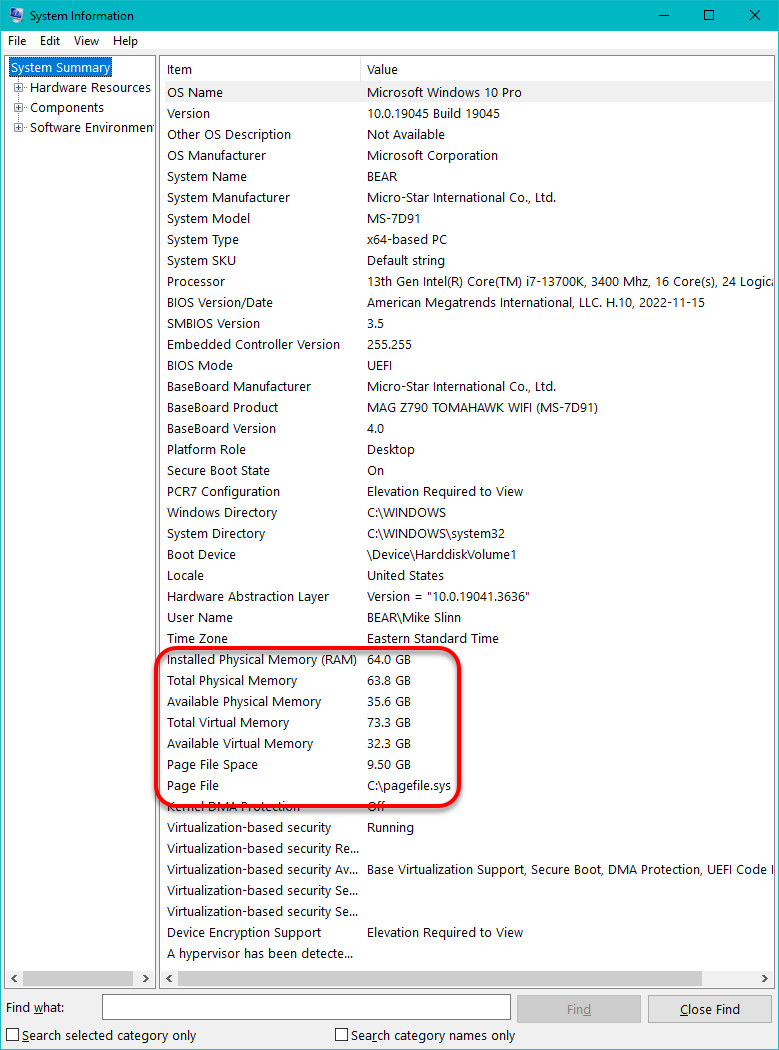
The 9.5 GB pagefile shown above is too small for Fooocus; a Pagefile of 40GB is recommended. Microsoft recommends that the maximum pagefile size should be three times the initial size, which means the initial size should be 9.3 GB.
On a Windows-based computer, when you use the Virtual Memory user interface in Advanced System Settings to set a page file on a partition that is larger than 2 TB, you will receive the following error message: “Drive X: is too small for the maximum paging file size specified. Please enter a smaller number.” This problem occurs because the Virtual Memory user interface incorrectly calculates the maximum space that is required to create the page file.
Windows PowerShell, running with adminstrator privileges, is more reliable way to display and control the Windows pagefile settings.
-
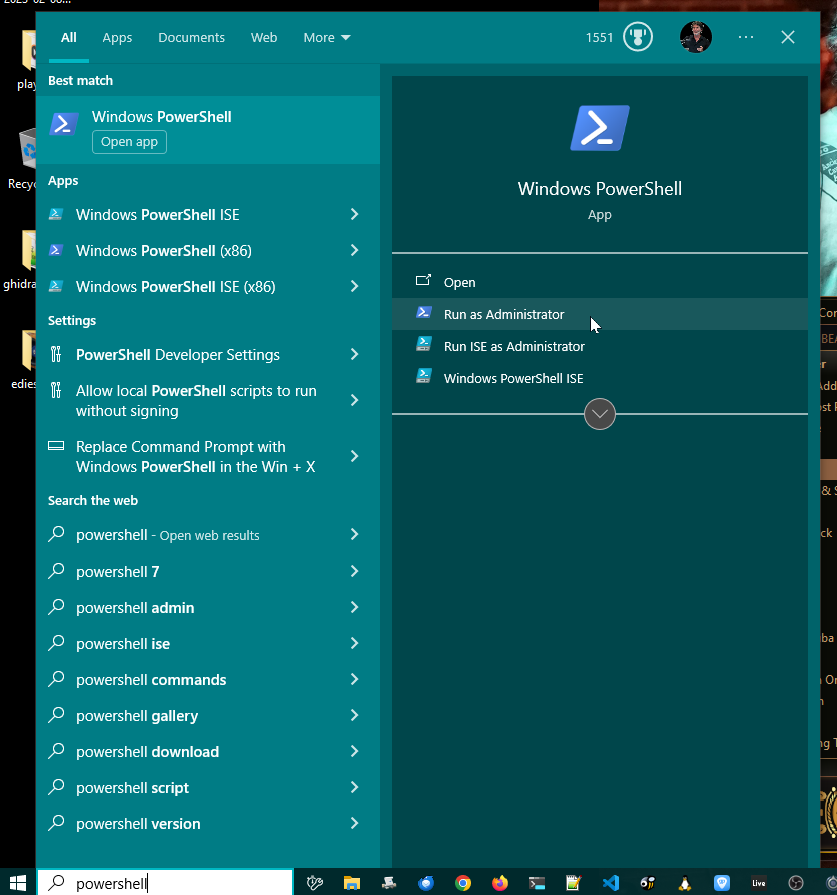
Launch PowerShell by typing Windows, typing
powershell, then selecting Run as administrator.
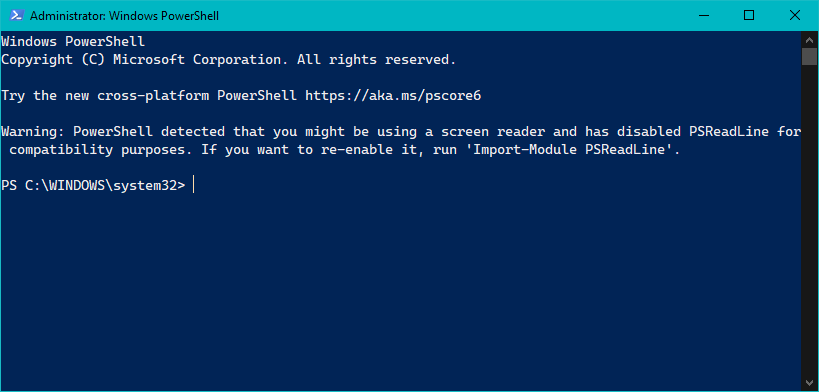
-
Ignore the warning regarding screen readers that might appear.
This seems to be a recently introduced Windows bug.
-
I changed directory to
C:\so you could read the commands that I typed more easily. The commands that we will use are unaffected by the current directory.PowerShell (continued)PS C:\WINDOWS\system32> cd \ PS C:\>
- The following incantion can be explained as:
-
The
Get-CimInstancePowerShell command finds an available Common Information Model (CIM) server, such as the Windows Management Instrumentation (WMI) service -
The
Win32_PageFileUsageclass represents the file used for handling virtual memory file swapping on a Win32 system. Information contained within objects instantiated from this class specify the run-time state of the page file. -
flis shorthand forFormat-List
PowerShell (continued)PS C:\> Get-CimInstance Win32_PageFileUsage | fl * Status : Name : C:\pagefile.sys CurrentUsage : 445 Caption : C:\pagefile.sys Description : C:\pagefile.sys InstallDate : 2020-06-24 10:24:59 AM AllocatedBaseSize : 9728 PeakUsage : 457 TempPageFile : False PSComputerName : CimClass : root/cimv2:Win32_PageFileUsage CimInstanceProperties : {Caption, Description, InstallDate, Name...} CimSystemProperties : Microsoft.Management.Infrastructure.CimSystemProperties
We can see from the above that my computer had one pagefile, located on theC:drive. 9,728 MB (9.7 GB) was allocated for the pagefile, but only 445 MB was used. This is a permanent page file that always occupies all allocated space. For more information on using PowerShell for pagefile, see Pagefile configuration and guidance. -
The
-
To remove
the automatic pagefile on drive
C:(notice the tiny backtick at the end of the first line of the command, which continues the command line):PowerShell (continued)PS C:\> $pagefileset = Gwmi win32_pagefilesetting |` where{$_.caption -like 'C:*'} PS C:\> $pagefileset.Delete()
If you check the pagefile using System Information right now, it will still show the old settings. -
On my computer Bear, drive
O:is a 2 TB partition on a 4 TB NVMEe that was not in use. The following sets up a system managed 40 GB pagefile on driveO:. see this and this page for more information.PowerShell (continued)PS C:\> Set-WmiInstance -Class Win32_PageFileSetting -Arguments ` @{name="O:\pagefile.sys"; InitialSize = 9333; MaximumSize = 40000} ` -EnableAllPrivileges | Out-Null - Restart the computer to activate the changes in system swap.


