Published 2025-04-23.
Time to read: 4 minutes.
av_studio collection.
Ducking is the technique of temporarily lowering the volume of one audio track when the audio operator wants another track to come to the forefront. Ducking is commonly used in an audio or video recording that features a narrator speaking over background music or ambient sound.
Ducking is often used with a noise gate; this allows the ducking feature to only activate when the vocalist sings or speaks into the microphone.
There is more than one way to introduce ducking on a track with Davinci Resolve. Below, I present two methods of ducking by using gain staging. These methods affect the volume of a track before effects are applied, and before the mix slider positions have any effect.
- The first method is quick and is easily customizable, but this method makes assumptions about what you want. This method uses a new feature, introduced in Davinci Resolve 19, which has an unfortunate bug.
- The second method takes more time to get working properly but has no restrictions, although it suffers from a serious user interface problem.

Ducking Feature
Apply this new track-level effect to the music track being ducked using the Inspector. The Inspector panel visibility can be toggled by typing CTRL-9.
The ducking feature affects the volume of the background track before any effects are applied and before the mixer slider values are applied.

- Display the Audio tab in the Inspector and select the Audio tab.
-
Click on the audio track info area (select the entire track, do not select a clip).
The available effects that can be applied to the track are now displayed in the Inspector.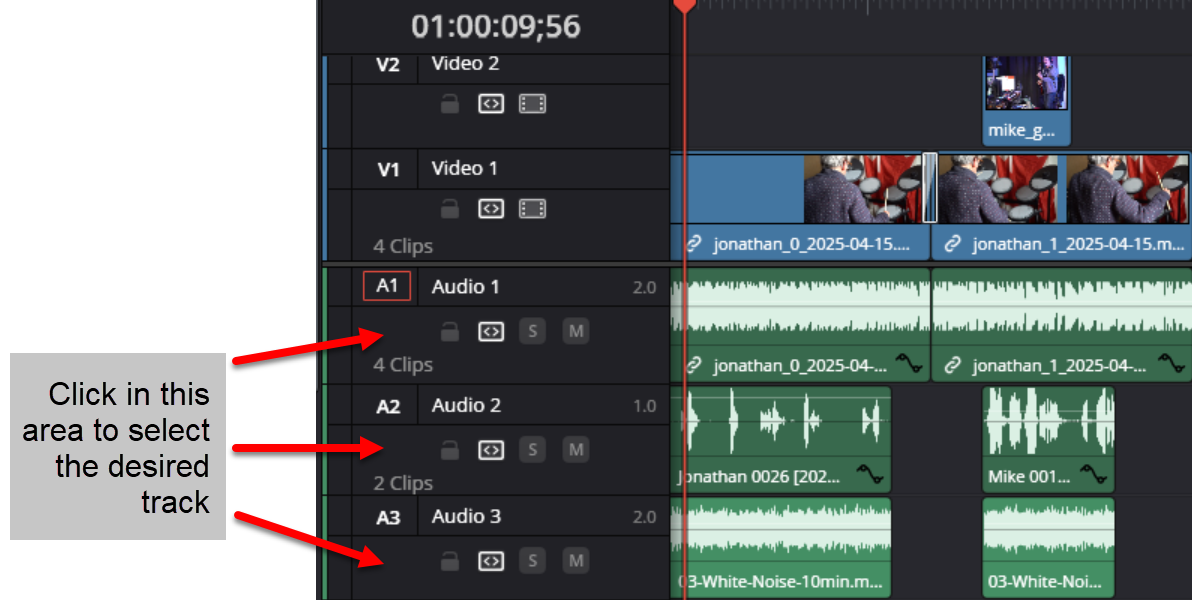
-
Enable the Ducker effect for the selected track.
Do not enable the Dialogue Leveler effect at the same time as the Ducker effect. These two effects work against each other. - Set the ducker source to the name of the audio channel that contains the voiceover.
-
Open the Advanced section of the Ducker control and make the following settings:
- Duck level 18
- Lookahead 100
- Rise Time 250
- Hold 500
- Recovery 750

Davinci Resolve Inspector
See DUCKING Made EASY in DaVinci Resolve 19 for a demonstration of this method.

The only way I could resolve the problem was to add a track of white noise clips that mirrored the position and lengths of voiceover sound where I wanted ducking to activate, and to point the ducking feature to the white noise track instead of the voiceover track. The volume of the white noise track must be set to zero in the mixer; if you do not do this, you will hear the white noise in the resulting video.
Manual Volume Control
This method is highly customizable but takes longer than the preceding method to set up.
Normally, ducking results in the volume of the background track being restored to the original loudness. This means that the first and last points have the same height. It is also common for the second and third points to have the same volume/height. You can change the volume of these four points if you want the background sound to swell or recede, or to resume at a different volume.
ALT-click on the volume line at four places; each click adds a keyframe point. You can add more keyframe points later if you like. Don't worry about being accurate. You can click on any keyframe point and drag it in any direction. The first two clicks should define a downward ramp. This ramp can be between -1 and -90 degrees, where the time axis defines zero degrees as time increases. The third and fourth clicks should ramp in the other direction. This ramp can be between 1 and 90 degrees. The angles of the two ramps are usually opposites of each other (-90 degrees and +90 degrees, for example).

The Inspector panel visibility can be toggled by typing CTRL-9. Display the Audio tab in the Inspector and notice the Volume controls. The horizontal slider controls the height of the selected keyframe point, which makes it move up and down. This is decidedly not intuitive.
If two points are placed close together, Davinci Resolve will automatically merge them. This can be annoying or helpful.
You can cause an adjacent keyframe point to be selected by clicking on the left and right arrows that surround the red 'dot' to the right of the numeric control.
 is the same color as the waveform, so it cannot be seen")
The contour followed between each keyframe can be controlled. By default, straight (linear) lines are drawn between successive keyframes. Right-click on any keyframe point to display a contextual smoothing menu for that point.
You can smooth the line emanating from the first point by selecting Ease In. Similarly, you can smooth the line attaching to the second point by selecting Ease Out. To smooth the entire line, select Ease In and Out.
See How To Automate Audio In DaVinci Resolve for a demonstration of this method.
Volume Line Color Problem
The color of the volume line for a clip is the same as the color used to draw the clip. Keyframe points are easy to see, but the volume line drawn between them is not easy to see, especially when the signal is loud.
I am surprised that a user interface problem this serious has been evident in the program for such a long time. This annoying detail mars an otherwise stellar program, causing the user to expend more energy and squint a lot harder than should be required.


